Tuesday, September 12, 2017
Posted by The TensorFlow Team
TensorFlow 1.3 introduces two important features that you should try out:
Datasets: A completely new way of creating input pipelines (that is, reading data into your program).
Estimators: A high-level way to create TensorFlow models. Estimators include pre-made models for common machine learning tasks, but you can also use them to create your own custom models.
Below you can see how they fit in the TensorFlow architecture. Combined, they offer an easy way to create TensorFlow models and to feed data to them:

Our Example Model
To explore these features we're going to build a model and show you relevant code snippets. The complete code is available here, including instructions for getting the training and test files. Note that the code was written to demonstrate how Datasets and Estimators work functionally, and was not optimized for maximum performance.
The trained model categorizes Iris flowers based on four botanical features (sepal length, sepal width, petal length, and petal width). So, during inference, you can provide values for those four features and the model will predict that the flower is one of the following three beautiful variants:

From left to right: Iris setosa (by Radomil, CC BY-SA 3.0), Iris versicolor (by Dlanglois, CC BY-SA 3.0), and Iris virginica(by Frank Mayfield, CC BY-SA 2.0).
We're going to train a Deep Neural Network Classifier with the below structure. All input and output values will be float32, and the sum of the output values will be 1 (as we are predicting the probability for each individual Iris type):
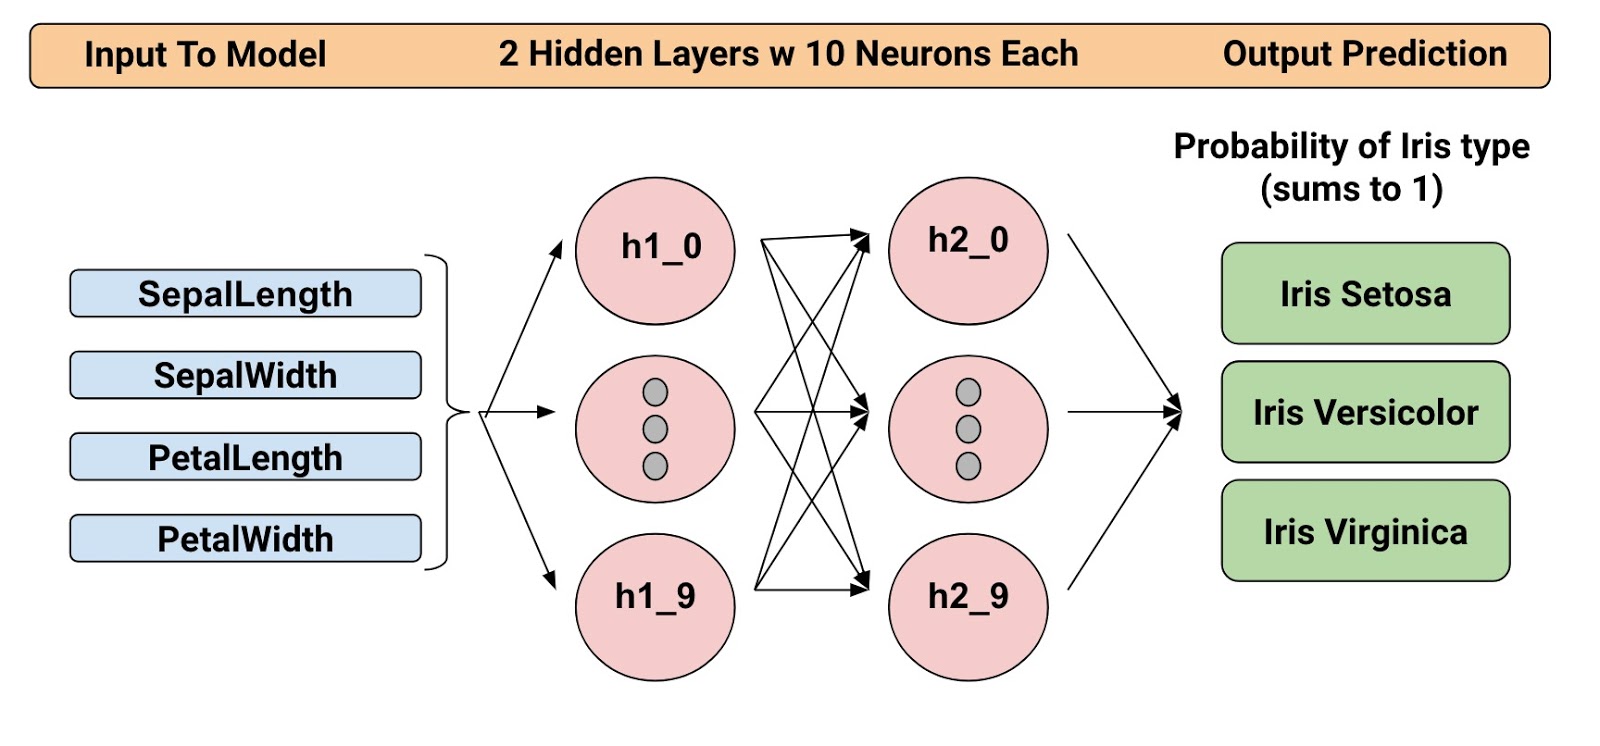
For example, an output result might be 0.05 for Iris Setosa, 0.9 for Iris Versicolor, and 0.05 for Iris Virginica, which indicates a 90% probability that this is an Iris Versicolor.
Alright! Now that we have defined the model, let's look at how we can use Datasets and Estimators to train it and make predictions.
Introducing The Datasets
Datasets is a new way to create input pipelines to TensorFlow models. This API is much more performant than using feed_dict or the queue-based pipelines, and it's cleaner and easier to use. Although Datasets still resides in tf.contrib.data at 1.3, we expect to move this API to core at 1.4, so it's high time to take it for a test drive.
At a high-level, the Datasets consists of the following classes:
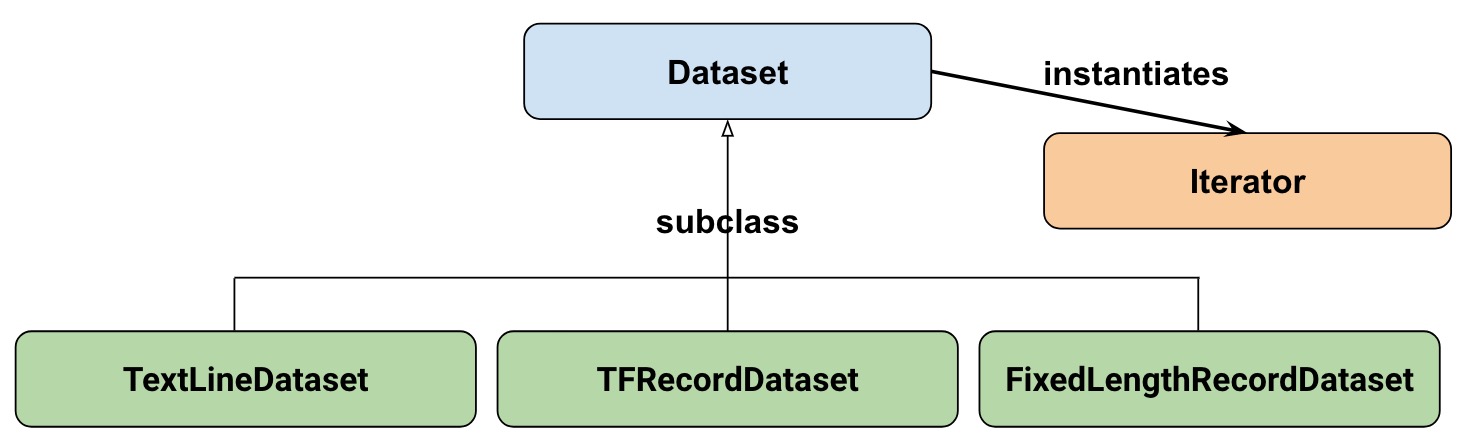
Where:
- Dataset: Base class containing methods to create and transform datasets. Also allows you initialize a dataset from data in memory, or from a Python generator.
- TextLineDataset: Reads lines from text files.
- TFRecordDataset: Reads records from TFRecord files.
- FixedLengthRecordDataset: Reads fixed size records from binary files.
- Iterator: Provides a way to access one dataset element at a time.
Our dataset
To get started, let's first look at the dataset we will use to feed our model. We'll read data from a CSV file, where each row will contain five values-the four input values, plus the label:

The label will be:
- 0 for Iris Setosa
- 1 for Versicolor
- 2 for Virginica.
Representing our dataset
To describe our dataset, we first create a list of our features:
feature_names = [
    'SepalLength',
    'SepalWidth',
    'PetalLength',
    'PetalWidth']
When we train our model, we'll need a function that reads the input file and returns the feature and label data. Estimators requires that you create a function of the following format:
def input_fn():
    ...<code>...
    return ({ 'SepalLength':[values], ..<etc>.., 'PetalWidth':[values] },
            [IrisFlowerType])
The return value must be a two-element tuple organized as follows: :
- The first element must be a dict in which each input feature is a key, and then a list of values for the training batch.
- The second element is a list of labels for the training batch.
Since we are returning a batch of input features and training labels, it means that all lists in the return statement will have equal lengths. Technically speaking, whenever we referred to "list" here, we actually mean a 1-d TensorFlow tensor.
To allow simple reuse of the input_fn we're going to add some arguments to it. This allows us to build input functions with different settings. The arguments are pretty straightforward:
-
file_path: The data file to read. -
perform_shuffle: Whether the record order should be randomized. -
repeat_count: The number of times to iterate over the records in the dataset. For example, if we specify 1, then each record is read once. If we specify None, iteration will continue forever.
Here's how we can implement this function using the Dataset API. We will wrap this in an "input function" that is suitable when feeding our Estimator model later on:
def my_input_fn(file_path, perform_shuffle=False, repeat_count=1):
   def decode_csv(line):
       parsed_line = tf.decode_csv(line, [[0.], [0.], [0.], [0.], [0]])
       label = parsed_line[-1:] # Last element is the label
       del parsed_line[-1] # Delete last element
       features = parsed_line # Everything (but last element) are the features
       d = dict(zip(feature_names, features)), label
       return d

   dataset = (tf.contrib.data.TextLineDataset(file_path) # Read text file
       .skip(1) # Skip header row
       .map(decode_csv)) # Transform each elem by applying decode_csv fn
   if perform_shuffle:
       # Randomizes input using a window of 256 elements (read into memory)
       dataset = dataset.shuffle(buffer_size=256)
   dataset = dataset.repeat(repeat_count) # Repeats dataset this # times
   dataset = dataset.batch(32)  # Batch size to use
   iterator = dataset.make_one_shot_iterator()
   batch_features, batch_labels = iterator.get_next()
   return batch_features, batch_labels
Note the following: :
-
TextLineDataset: The Dataset API will do a lot of memory management for you when you're using its file-based datasets. You can, for example, read in dataset files much larger than memory or read in multiple files by specifying a list as argument. -
shuffle: Reads buffer_size records, then shuffles (randomizes) their order. -
map: Calls thedecode_csvfunction with each element in the dataset as an argument (since we are using TextLineDataset, each element will be a line of CSV text). Then we applydecode_csvto each of the lines. -
decode_csv: Splits each line into fields, providing the default values if necessary. Then returns a dict with the field keys and field values. The map function updates each elem (line) in the dataset with the dict.
That's an introduction to Datasets! Just for fun, we can now use this function to print the first batch:
next_batch = my_input_fn(FILE, True) # Will return 32 random elements

# Now let's try it out, retrieving and printing one batch of data.
# Although this code looks strange, you don't need to understand
# the details.
with tf.Session() as sess:
    first_batch = sess.run(next_batch)
print(first_batch)

# Output
({'SepalLength': array([ 5.4000001, ...<repeat to 32 elems>], dtype=float32),
  'PetalWidth': array([ 0.40000001, ...<repeat to 32 elems>], dtype=float32),
  ...
 },
 [array([[2], ...<repeat to 32 elems>], dtype=int32) # Labels
)
That's actually all we need from the Dataset API to implement our model. Datasets have a lot more capabilities though; please see the end of this post where we have collected more resources.
Introducing Estimators
Estimators is a high-level API that reduces much of the boilerplate code you previously needed to write when training a TensorFlow model. Estimators are also very flexible, allowing you to override the default behavior if you have specific requirements for your model.
There are two possible ways you can build your model using Estimators:
- Pre-made Estimator - These are predefined estimators, created to generate a specific type of model. In this blog post, we will use the DNNClassifier pre-made estimator.
- Estimator (base class) - Gives you complete control of how your model should be created by using a model_fn function. We will cover how to do this in a separate blog post.
Here is the class diagram for Estimators:

We hope to add more pre-made Estimators in future releases.
As you can see, all estimators make use of input_fn that provides the estimator with input data. In our case, we will reuse my_input_fn, which we defined for this purpose.
The following code instantiates the estimator that predicts the Iris flower type:
# Create the feature_columns, which specifies the input to our model.
# All our input features are numeric, so use numeric_column for each one.
feature_columns = [tf.feature_column.numeric_column(k) for k in feature_names]

# Create a deep neural network regression classifier.
# Use the DNNClassifier pre-made estimator
classifier = tf.estimator.DNNClassifier(
   feature_columns=feature_columns, # The input features to our model
   hidden_units=[10, 10], # Two layers, each with 10 neurons
   n_classes=3,
   model_dir=PATH) # Path to where checkpoints etc are stored
We now have a estimator that we can start to train.
Training the model
Training is performed using a single line of TensorFlow code:
# Train our model, use the previously function my_input_fn
# Input to training is a file with training example
# Stop training after 8 iterations of train data (epochs)
classifier.train(
   input_fn=lambda: my_input_fn(FILE_TRAIN, True, 8))
But wait a minute... what is this "lambda: my_input_fn(FILE_TRAIN, True, 8)" stuff? That is where we hook up Datasets with the Estimators! Estimators needs data to perform training, evaluation, and prediction, and it uses the input_fn to fetch the data. Estimators require aninput_fn with no arguments, so we create a function with no arguments using lambda, which calls our input_fn with the desired arguments: the file_path, shuffle setting, andrepeat_count. In our case, we use our my_input_fn, passing it:
-
FILE_TRAIN, which is the training data file. -
True, which tells the Estimator to shuffle the data. -
8, which tells the Estimator to and repeat the dataset 8 times.
Evaluating Our Trained Model
Ok, so now we have a trained model. How can we evaluate how well it's performing? Fortunately, every Estimator contains an evaluate method:
# Evaluate our model using the examples contained in FILE_TEST
# Return value will contain evaluation_metrics such as: loss & average_loss
evaluate_result = estimator.evaluate(
   input_fn=lambda: my_input_fn(FILE_TEST, False, 4)
print("Evaluation results")
for key in evaluate_result:
   print("   {}, was: {}".format(key, evaluate_result[key]))
In our case, we reach an accuracy of about ~93%. There are various ways of improving this accuracy, of course. One way is to simply run the program over and over. Since the state of the model is persisted (in model_dir=PATH above), the model will improve the more iterations you train it, until it settles. Another way would be to adjust the number of hidden layers or the number of nodes in each hidden layer. Feel free to experiment with this; please note, however, that when you make a change, you need to remove the directory specified inmodel_dir=PATH, since you are changing the structure of the DNNClassifier.
Making Predictions Using Our Trained Model
And that's it! We now have a trained model, and if we are happy with the evaluation results, we can use it to predict an Iris flower based on some input. As with training, and evaluation, we make predictions using a single function call:
# Predict the type of some Iris flowers.
# Let's predict the examples in FILE_TEST, repeat only once.
predict_results = classifier.predict(
    input_fn=lambda: my_input_fn(FILE_TEST, False, 1))
print("Predictions on test file")
for prediction in predict_results:
   # Will print the predicted class, i.e: 0, 1, or 2 if the prediction
   # is Iris Sentosa, Vericolor, Virginica, respectively.
   print prediction["class_ids"][0]
Making Predictions on Data in Memory
The preceding code specified FILE_TEST to make predictions on data stored in a file, but how could we make predictions on data residing in other sources, for example, in memory? As you may guess, this does not actually require a change to our predict call. Instead, we configure the Dataset API to use a memory structure as follows:
# Let create a memory dataset for prediction.
# We've taken the first 3 examples in FILE_TEST.
prediction_input = [[5.9, 3.0, 4.2, 1.5],  # -> 1, Iris Versicolor
                    [6.9, 3.1, 5.4, 2.1],  # -> 2, Iris Virginica
                    [5.1, 3.3, 1.7, 0.5]]  # -> 0, Iris Sentosa
def new_input_fn():
   def decode(x):
       x = tf.split(x, 4) # Need to split into our 4 features
       # When predicting, we don't need (or have) any labels
       return dict(zip(feature_names, x)) # Then build a dict from them

   # The from_tensor_slices function will use a memory structure as input
   dataset = tf.contrib.data.Dataset.from_tensor_slices(prediction_input)
   dataset = dataset.map(decode)
   iterator = dataset.make_one_shot_iterator()
   next_feature_batch = iterator.get_next()
   return next_feature_batch, None # In prediction, we have no labels

# Predict all our prediction_input
predict_results = classifier.predict(input_fn=new_input_fn)

# Print results
print("Predictions on memory data")
for idx, prediction in enumerate(predict_results):
   type = prediction["class_ids"][0] # Get the predicted class (index)
   if type == 0:
       print("I think: {}, is Iris Sentosa".format(prediction_input[idx]))
   elif type == 1:
       print("I think: {}, is Iris Versicolor".format(prediction_input[idx]))
   else:
       print("I think: {}, is Iris Virginica".format(prediction_input[idx])
Dataset.from_tensor_slices() is designed for small datasets that fit in memory. When using TextLineDataset as we did for training and evaluation, you can have arbitrarily large files, as long as your memory can manage the shuffle buffer and batch sizes.
Freebies
Using a pre-made Estimator like DNNClassifier provides a lot of value. In addition to being easy to use, pre-made Estimators also provide built-in evaluation metrics, and create summaries you can see in TensorBoard. To see this reporting, start TensorBoard from your command-line as follows:
# Replace PATH with the actual path passed as model_dir argument when the
# DNNRegressor estimator was created.
tensorboard --logdir=PATH
The following diagrams show some of the data that TensorBoard will provide:

Summary
In this this blogpost, we explored Datasets and Estimators. These are important APIs for defining input data streams and creating models, so investing time to learn them is definitely worthwhile!
For more details, be sure to check out
- The complete source code used in this blogpost is available here.
- Josh Gordon's excellent Jupyter notebook on the matter. Using that notebook, you will learn how to run a more extensive example that has many different types of features (inputs). As you recall from our model, we just used numeric features.
- For Datasets, see a new chapter in the Programmer's guide and reference documentation.
- For Estimators, see a new chapter in the Programmer's guide and reference documentation.
But it doesn't stop here. We will shortly publish more posts that describe how these APIs work, so stay tuned for that!
Until then, Happy TensorFlow coding!

原文來源:Google Developers Blog
作者:TensorFlow團隊
在TensorFlow 1.3版本里面有兩個重要的特征,你應該好好嘗試一下:
?數據集(Datasets):一種創建輸入流水線的全新方法(即將數據讀取到程序中)。
?評估器(Estimator):一種創建TensorFlow模型的高級方法。評估器包括用于常見機器學習任務的預制模型,當然,你也可以使用它們來創建你的自定義模型。
接下來你將看到它們如何是如何適應TensorFlow架構的。如果將它們結合起來,它們將提供了一種創建TensorFlow模型并向其饋送數據的簡單方法:
我們的示例模型
為了能夠更好地對這些特征進行深一步探索,我們將構建一個模型并展示相關代碼片段。點擊此處鏈接,你將獲得完整代碼資源(https://github.com/mhyttsten/Misc/blob/master/Blog_Estimators_DataSet.py),其中包含關于訓練和測試文件的說明。有一點需要注意的是,此代碼只是為了演示數據集和評估器在功能方面的有效性,因此并未針對最大性能進行優化。
一個經過訓練的模型根據四種植物特征(萼片長度、萼片寬度、花瓣長度和花瓣寬度)對鳶尾花進行分類。因此,在推理過程中,你可以為這四個特征提供值,并且該模型將預測出該花是以下三種美麗的變體之一:

從左至右:Iris setosa(山鳶尾,Radomil,CC BY-SA 3.0),Iris versicolor(雜色鳶尾,Dlanglois,CC BY-SA 3.0)和Iris virginica(維吉尼亞鳶尾,Frank Mayfield,CC BY-SA 2.0)。
我們將用下面的結構對一個深度神經網絡分類器進行訓練。所有輸入和輸出值都將為float32,輸出值的和為1(正如我們所預測的每個單獨鳶尾花類型的概率):

例如,一個輸出結果是Iris Setosa(山鳶尾)的概率為0.05,是Iris Versicolor(雜色鳶尾)的概率為0.9,是Iris Virginica(維吉尼亞鳶尾)的概率為0.05,這表明該花是Iris Versicolor(雜色鳶尾)的概率為90%。
好的!既然我們已經定義了這個模型,接下來就看一下該如何使用Datasets(數據集)和Estimator(評估器)對其進行訓練并做出預測。
Datasets(數據集)的簡介
Dataset是一種為TensorFlow模型創建輸入流水線的新方式。相較于使用feed_dict或基于隊列的流水線,這個API要好用得多,而且它更干凈,更易于使用。雖然在1.3版本中,Datasets仍然位于tf.contrib.data中,但我們希望將該API移動到1.4版本中,所以現在是對其進行測試驅動器的時候了。
在高級別中,Dataset涵蓋以下幾級:

其中:
?Dataset:包含創建和轉換數據集方法的基類。還使得你能夠對內存中或來自Python生成器的數據初始化數據集。
?TextLineDataset:從文本文件中讀取行。
?TFRecordDataset:讀取TFRecord文件中的記錄。
?FixedLengthRecordDataset:從二進制文件讀取固定大小的記錄。
?Iterator(迭代器):提供一種一次訪問一個數據集元素的方法。
我們的數據集
首先,我們先來看看那些將用來饋送模型的數據集。我們將從CSV文件中讀取數據,其中每行將包含五個值——四個輸入值以及標簽:

標簽將是:
0為Iris Setosa(山鳶尾);
1為Versicolor(雜色鳶尾);
2為Virginica(維吉尼亞鳶尾)
表征數據集
為了描述我們的數據集,我們首先創建一個關于特征的列表:
feature_names = [
    'SepalLength',
    'SepalWidth',
    'PetalLength',
    'PetalWidth']
當訓練模型時,我們需要一個讀取輸入文件并返回特征和標簽數據的函數。Estimators(評估器)要求你按照以下格式創建一個函數:
def input_fn():
    ...<code>...
    return ({ 'SepalLength':[values], ..<etc>.., 'PetalWidth':[values] },
            [IrisFlowerType])
返回值必須是一個雙元素元組,其組織如下:
?第一個元素必須是一個dict(命令),其中每個輸入特征都是一個鍵,然后是訓練批量的值列表。
?第二個元素是訓練批量的標簽列表。
由于我們返回了一批輸入特征和訓練標簽,所以這意味著返回語句中的所有列表將具有相同的長度。從技術上說,每當我們在這里提到“列表”時,實際上指的是一個1-d TensorFlow張量。
為了使得能夠重用input_fn,我們將添加一些參數。從而使得我們能夠用不同的設置構建輸入函數。這些配置是很簡單的:
file_path:要讀取的數據文件。
perform_shuffle:記錄順序是否應該是隨機的。
repeat_count:迭代數據集中記錄的次數。例如,如果我們指定1,則每個記錄將被讀取一次。如果我們指定None,則迭代將永遠持續下去。
以下是使用Dataset API實現此函數的方法。我們將把它封裝在一個“輸入函數”中,它將與我們饋送評估器模型相適應。
def my_input_fn(file_path, perform_shuffle=False, repeat_count=1):
   def decode_csv(line):
       parsed_line = tf.decode_csv(line, [[0.], [0.], [0.], [0.], [0]])
       label = parsed_line[-1:] # Last element is the label
       del parsed_line[-1] # Delete last element
       features = parsed_line # Everything (but last element) are the features
       d = dict(zip(feature_names, features)), label
       return d

   dataset = (tf.contrib.data.TextLineDataset(file_path) # Read text file
       .skip(1) # Skip header row
       .map(decode_csv)) # Transform each elem by applying decode_csv fn
   if perform_shuffle:
       # Randomizes input using a window of 256 elements (read into memory)
       dataset = dataset.shuffle(buffer_size=256)
   dataset = dataset.repeat(repeat_count) # Repeats dataset this # times
   dataset = dataset.batch(32)  # Batch size to use
   iterator = dataset.make_one_shot_iterator()
   batch_features, batch_labels = iterator.get_next()
   return batch_features, batch_labels
請注意以下事項:
TextLineDataset:當你使用其基于文件的數據集時,Dataset API將為你處理大量的內存管理。例如,你可以通過指定列表作為參數,讀取比內存大得多的數據集文件或讀入多個文件。
Shuffle(隨機化):讀取buffer_size記錄,然后shuffle(隨機化)其順序。
Map(映射):將數據集中的每個元素調用decode_csv函數,作為參數(因為我們使用的是TextLineDataset,每個元素都將是一行CSV文本)。然后我們將decode_csv應用于每一行。
decode_csv:將每行拆分為字段,如有必要,提供默認值。然后返回一個帶有字段鍵和字段值的dict(命令)。映射函數使用dict更新數據集中的每個elem(行)。
當然,以上只是對Datasets的粗略介紹!接下來,我們可以使用此函數打印第一個批次:
next_batch = my_input_fn(FILE, True) # Will return 32 random elements

# Now let's try it out, retrieving and printing one batch of data.
# Although this code looks strange, you don't need to understand
# the details.
with tf.Session() as sess:
    first_batch = sess.run(next_batch)
print(first_batch)

# Output
({'SepalLength': array([ 5.4000001, ...<repeat to 32 elems>], dtype=float32),
  'PetalWidth': array([ 0.40000001, ...<repeat to 32 elems>], dtype=float32),
  ...
 },
 [array([[2], ...<repeat to 32 elems>], dtype=int32) # Labels
)
實際上,我們需要從Dataset API中實現我們的模型。Datasets具有更多的功能,詳情請看這篇文章的結尾,我們收集了更多的資源。
Estimators(評估器)的介紹
Estimator是一種高級API,在訓練TensorFlow模型時,它可以減少以前需要編寫的大量樣板代碼。Estimator也非常靈活,如果你對模型有特定要求,它使得你能夠覆蓋其默認行為。
下面介紹兩種可能的方法,你可以用來用Estimator構建模型:
?Pre-made Estimator(預制評估器)——這些是預定義的評估器,用于生成特定類型的模型。在這篇文章中,我們將使用DNNClassifier預制評估器。
?Estimator(基礎級別)——通過使用model_fn函數,你可以完全控制如何創建模型。我們將在另一篇文章中對其詳細介紹。
以下是評估器的類圖:

我們希望在將來的版本中添加更多的預制評估器。
你可以看到,所有的評估器都使用input_fn來提供輸入數據。在我們的示例中,我們將重用我們為此定義的my_input_fn。
以下代碼實例化了預測鳶尾花類型的評估器:
# Create the feature_columns, which specifies the input to our model.
# All our input features are numeric, so use numeric_column for each one.
feature_columns = [tf.feature_column.numeric_column(k) for k in feature_names]

# Create a deep neural network regression classifier.
# Use the DNNClassifier pre-made estimator
classifier = tf.estimator.DNNClassifier(
   feature_columns=feature_columns, # The input features to our model
   hidden_units=[10, 10], # Two layers, each with 10 neurons
   n_classes=3,
   model_dir=PATH) # Path to where checkpoints etc are stored
我們現在有一個評估器,我們可以開始訓練了。
訓練模型
使用單行TensorFlow代碼進行訓練:
# Train our model, use the previously function my_input_fn
# Input to training is a file with training example
# Stop training after 8 iterations of train data (epochs)
classifier.train(
   input_fn=lambda: my_input_fn(FILE_TRAIN, True, 8))
但等一下... "lambda: my_input_fn(FILE_TRAIN, True, 8)"這是什么東西?這就是我們用評估器連接數據集的地方!評估器需要數據來執行訓練、評估和預測,并且使用input_fn來獲取數據。評估器需要一個沒有參數的input_fn,所以我們使用lambda創建一個沒有參數的函數,它使用所需的參數調用input_fn:file_path、shuffle setting和repeat_count。在我們的示例中,我們使用my_input_fn,傳遞它:
?FILE_TRAIN,它是訓練數據文件。
?True,這告訴評估器shuffle數據。
?8,它告訴評估器并重復數據集8次。
評估我們訓練過的模型
好的,現在我們有一個訓練過的模型。我們如何評估它的表現呢?幸運的是,每個評估器都包含一個評估方法:
# Evaluate our model using the examples contained in FILE_TEST
# Return value will contain evaluation_metrics such as: loss & average_loss
evaluate_result = estimator.evaluate(
   input_fn=lambda: my_input_fn(FILE_TEST, False, 4)
print("Evaluation results")
for key in evaluate_result:
   print("   {}, was: {}".format(key, evaluate_result[key]))
在我們的示例中,準確度能達到93%。當然有各種各樣的方式來提高這個準確性。一種方法是一遍又一遍地運行程序。由于模型的狀態是持久的(在上面的model_dir = PATH中),模型將會改進你對其進行的迭代次數的更改,直到它穩定為止。另一種方法是調整隱藏層數或每個隱藏層中的節點數。隨意嘗試一下,但請注意,當你進行更改時,你需要刪除model_dir = PATH中指定的目錄,因為你正在更改DNNClassifier的結構。
使用我們訓練過模型進行預測
就是這樣!我們現在有一個訓練過的模型,如果我們對評估結果感到滿意,我們可以使用它來基于一些輸入來預測鳶尾花。與訓練和評估一樣,我們使用單個函數調用進行預測:
# Predict the type of some Iris flowers.
# Let's predict the examples in FILE_TEST, repeat only once.
predict_results = classifier.predict(
    input_fn=lambda: my_input_fn(FILE_TEST, False, 1))
print("Predictions on test file")
for prediction in predict_results:
   # Will print the predicted class, i.e: 0, 1, or 2 if the prediction
   # is Iris Sentosa, Vericolor, Virginica, respectively.
   print prediction["class_ids"][0]
在內存中對數據進行預測
前面的代碼指定了FILE_TEST以對存儲在文件中的數據進行預測,但是我們如何對駐留在其他來源的數據進行預測,例如在內存中?你可能會猜到,這并不需要改變我們的預測調用。相反,我們將Dataset API配置為使用記憶結構,如下所示:
# Let create a memory dataset for prediction.
# We've taken the first 3 examples in FILE_TEST.
prediction_input = [[5.9, 3.0, 4.2, 1.5],  # -> 1, Iris Versicolor
                    [6.9, 3.1, 5.4, 2.1],  # -> 2, Iris Virginica
                    [5.1, 3.3, 1.7, 0.5]]  # -> 0, Iris Sentosa
def new_input_fn():
   def decode(x):
       x = tf.split(x, 4) # Need to split into our 4 features
       # When predicting, we don't need (or have) any labels
       return dict(zip(feature_names, x)) # Then build a dict from them

   # The from_tensor_slices function will use a memory structure as input
   dataset = tf.contrib.data.Dataset.from_tensor_slices(prediction_input)
   dataset = dataset.map(decode)
   iterator = dataset.make_one_shot_iterator()
   next_feature_batch = iterator.get_next()
   return next_feature_batch, None # In prediction, we have no labels

# Predict all our prediction_input
predict_results = classifier.predict(input_fn=new_input_fn)

# Print results
print("Predictions on memory data")
for idx, prediction in enumerate(predict_results):
   type = prediction["class_ids"][0] # Get the predicted class (index)
   if type == 0:
       print("I think: {}, is Iris Sentosa".format(prediction_input[idx]))
   elif type == 1:
       print("I think: {}, is Iris Versicolor".format(prediction_input[idx]))
   else:
       print("I think: {}, is Iris Virginica".format(prediction_input[idx])
Dataset.from_tensor_slices()專為適合內存的小型數據集而設計。當我們使用TextLineDataset進行訓練和評估時,你可以擁有任意大的文件,只要你的內存可以管理隨機緩沖區和批量大小。
使用像DNNClassifier這樣的預制評估器提供了很多價值。除了易于使用,預制評估器還提供內置的評估指標,并創建可在TensorBoard中看到的概要。要查看此報告,請從你的命令行啟動TensorBoard,如下所示:
# Replace PATH with the actual path passed as model_dir argument when the
# DNNRegressor estimator was created.
tensorboard --logdir=PATH
下面的圖顯示了一些tensorboard將提供數據:

概要
在這篇文章中,我們探討了數據集和評估器。這些是用于定義輸入數據流和創建模型的重要API,因此投入時間來學習它們是絕對值得的!
有關更多詳情,請務必查看:
?此文中使用的完整源代碼可在此處獲取。(https://goo.gl/PdGCRx)
?Josh Gordon的Jupyter notebook的出色使用。(https://github.com/tensorflow/workshops/blob/master/notebooks/07_structured_data.ipynb)使用Jupyter notebook,你將學習如何運行一個更廣泛的例子,其具有許多不同類型的特征(輸入)。從我們的模型來看,我們只使用了數值特征。
?有關數據集,請參閱程序員指南(https://www.tensorflow.org/programmers_guide/datasets)和參考文檔(https://www.tensorflow.org/api_docs/python/tf/contrib/data)中的新章節。
?有關評估器,請參閱程序員指南(https://www.tensorflow.org/programmers_guide/estimators)和參考文檔(https://www.tensorflow.org/versions/master/api_docs/python/tf/estimator)中的新章節。
原文: 關于TensorFlow 1.3的Datasets和Estimator,你了解多少?谷歌大神來解答
原文: Google Developers Blog: Introduction to TensorFlow Datasets and Estimators
