引文
有時候為了實現某些效果,比如:
- 繪制某些簡易圖案,比如對勾,字形
- 手勢相關的畫線
- 制作一些復雜動效
需要對簡單的UIView進行操作,這時需要我們繼承CALayer &UIView,重寫里面的繪制方法。兩者的區別可以參見這里,二者的主要區別是:
- UIView繼承于UIResponder,在 UIResponder中定義了處理各種事件和事件傳遞的接口, 而 CALayer直接繼承 NSObject,并沒有相應的處理事件的接口。UIView可以響應事件,Layer不可以.
- UIView主要是對顯示內容的管理而 CALayer 主要側重顯示內容的繪制。可以理解成控制器和內部模型的關系
如何重寫來控制顯示
- 對UIView
繪制:- (void)drawRect:(CGRect)rect;
修改了元素,需要重繪:-(void)setNeedsDisplay; - 對CALayer
繪制:- (void)drawInContext:(CGContextRef)ctx;
修改了元素,需要重繪:-(void)setNeedsDisplay;
修改了元素,需要自動重繪:
  +  (BOOL)needsDisplayForKey:(NSString *)key {
  if ([key isEqualToString:@"progress"]) {
        return YES;
    }
    return [super needsDisplayForKey:key];
}
如何在繪制方法里繪圖呢,下面是一些示例代碼:
- 對CALayer
    // 更新界面
  //構劃路徑
    UIBezierPath* ovalPath = [UIBezierPath bezierPath];
    [ovalPath moveToPoint: pointA];
    [ovalPath addCurveToPoint:pointB controlPoint1:c1 controlPoint2:c2];
    [ovalPath addCurveToPoint:pointC controlPoint1:c3 controlPoint2:c4];
    [ovalPath addCurveToPoint:pointD controlPoint1:c5 controlPoint2:c6];
    [ovalPath addCurveToPoint:pointA controlPoint1:c7 controlPoint2:c8];
    [ovalPath closePath];
//AddPath
 CGContextAddPath(ctx, ovalPath.CGPath);
//填充
    CGContextSetFillColorWithColor(ctx, [self.indicatorColor colorWithAlphaComponent:0.3].CGColor);
    CGContextFillPath(ctx);
- UIView 由于在
- (void)drawRect:(CGRect)rect;中沒有類似的context,所以需要先調用CGContextRef context = UIGraphicsGetCurrentContext();其余相同
項目中碰到的相關使用案例
1. loading轉圈動效,完成后打勾:
#import <QuartzCore/QuartzCore.h>
#import <UIKit/UIKit.h>

@interface ArcToCircleLayer : CALayer
@property (nonatomic) CGFloat progress;
@property (nonatomic,strong) UIColor* fillColor;
@property (nonatomic,strong) UIColor* finishedStrokeColor;

@property (nonatomic,assign) BOOL isFinished;

@end
#import "ArcToCircleLayer.h"

static CGFloat const kLineWidth = 6;

@implementation ArcToCircleLayer

@dynamic progress;

+ (BOOL)needsDisplayForKey:(NSString *)key {
    if ([key isEqualToString:@"progress"]) {
        return YES;
    }

    return [super needsDisplayForKey:key];
}

- (void)drawInContext:(CGContextRef)ctx {
    UIBezierPath *path = [UIBezierPath bezierPath];

    CGFloat radius = MIN(CGRectGetWidth(self.bounds), CGRectGetHeight(self.bounds)) / 2 - kLineWidth / 2;
    CGPoint center = CGPointMake(CGRectGetMidX(self.bounds), CGRectGetMidY(self.bounds));

    // O
    CGFloat originStart = M_PI * 7 / 2;
    CGFloat originEnd = M_PI * 3/2;
    CGFloat currentOrigin = originStart - (originStart - originEnd) * self.progress;

    // D
    CGFloat destStart = M_PI * 3;
    CGFloat destEnd = -1*M_PI/2;
    CGFloat currentDest = destStart - (destStart - destEnd) * self.progress;

    [path addArcWithCenter:center radius:radius startAngle: currentOrigin endAngle:currentDest clockwise:NO];
    CGContextAddPath(ctx, path.CGPath);
    CGContextSetLineWidth(ctx, kLineWidth);
    if (_isFinished) {
        if (self.finishedStrokeColor) {
            CGContextSetStrokeColorWithColor(ctx, self.finishedStrokeColor.CGColor);

        }else{
            CGContextSetStrokeColorWithColor(ctx, [UIColor whiteColor].CGColor);

        }

    }else{
        CGContextSetStrokeColorWithColor(ctx, [UIColor colorWithHexString:@"13eaa4"].CGColor);

    }

    CGContextStrokePath(ctx);
    if (_isFinished) {
        [path addArcWithCenter:center radius:radius startAngle: currentOrigin endAngle:currentDest clockwise:NO];
        CGContextAddPath(ctx, path.CGPath);
        CGContextSetFillColorWithColor(ctx, self.fillColor.CGColor);

        CGContextFillPath(ctx);
    }

}
2. 仿百度貼吧下拉刷新的效果
隨著下拉的進行:
- 小水滴由橢圓拉伸至圓形
- 圓形變大
- 圓形有個彈性跳躍的動畫,同時圓形內部有附帶動畫
這里的難點是如何實現彈性跳躍的動畫,這里特別感謝大神[KittenYang]的這篇文章:談談iOS中粘性動畫以及果凍效果的實現

"小球是由弧AB、弧BC、弧CD、弧DA 四段組成,其中每段弧都綁定兩個控制點:弧AB 綁定的是 C1 、 C2;弧BC 綁定的是 C3 、 C4 ....."
這里解釋下控制點的計算:
一段Bezier曲線由起點、終點、控制點構成,關于Bezier曲線的背景、曲線計算可以參考wiki,其中說到:
控制點引起曲線的變化如圖:The start and end of the curve is tangent to the first and last section of the Bézier polygon, respectively.
A curve can be split at any point into two subcurves, or into arbitrarily many subcurves, each of which is also a Bézier curve.
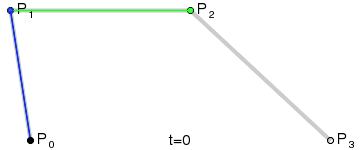
引文中利用控制點與起點和終點的相切關系,(由于預期得到的曲線都是橢圓,在起點和終點都是相切的,所以兩控制點必在垂直切線上)得到控制點的算法:
CGPoint c1 = CGPointMake(pointA.x + offset, pointA.y);
CGPoint c2 = CGPointMake(pointB.x, pointB.y - offset);

CGPoint c3 = CGPointMake(pointB.x, pointB.y + offset);
CGPoint c4 = CGPointMake(pointC.x + offset, pointC.y);

CGPoint c5 = CGPointMake(pointC.x - offset, pointC.y);
CGPoint c6 = CGPointMake(pointD.x, pointD.y + offset);

CGPoint c7 = CGPointMake(pointD.x, pointD.y - offset);
CGPoint c8 = CGPointMake(pointA.x - offset, pointA.y);
關于偏移量的計算:
當offSet設置為 直徑除以3.6 的時候,弧線能完美地貼合成圓弧。我隱約感覺這個 3.6 是必然,貌似和360度有某種關系,或許通過演算能得出 3.6 這個值的必然性,但我沒有嘗試。
其實這個值可以這樣計算:這類似于割圓術,算的最佳的可能更接近3.5。
這樣繪圖的工作就結束了,通過動態調整ABCD點就能實現圖形的變化了
3. 手勢密碼
手勢密碼是項目中挺重要的一環,其中有幾個要點
- 進入相關頁面(首次進入|從后臺進入)都會進行認證
- 手勢密碼頁面的兩種模式:設置,驗證
- 設置需要在上方額外顯示小九宮格來顯示設置的圖形
- 劃線時途徑中的圓形要有相關變色反饋、成功失敗也要有
設計時相關的模型為:
PasswordInputWindow:提供給外部的窗口類,用來調起手勢窗口
GesturePasswordController:窗口類的根控制器
GesturePasswordView:搭載TentacleView、NineCircleView、提示視圖的父視圖
TentacleView:搭載九宮格GesturePasswordButton的父視圖,主要處理滑動手勢來調整按鈕高亮顯示
NineCircleView:微縮版的TentacleView
GesturePasswordButton:繪制多種狀態下的數字按鍵。
下面代碼給出TentacleView怎么畫線的
- (void)drawRect:(CGRect)rect
{
    // Drawing code
//    if (touchesArray.count<2)return;
    for (int i=0; i<touchesArray.count; i++) {
        CGContextRef context = UIGraphicsGetCurrentContext();
        if (![[touchesArray objectAtIndex:i] objectForKey:@"num"]) { //防止過快滑動產生垃圾數據
            [touchesArray removeObjectAtIndex:i];
            continue;
        }
        if (success) {
           // CGContextSetRGBStrokeColor(context, 2/255.f, 174/255.f, 240/255.f, 0.7);//線條顏色
            CGContextSetRGBStrokeColor(context, 19/255.f, 234/255.f, 164/255.f, 0.2);//線條顏色
        }
        else {
            CGContextSetRGBStrokeColor(context, 255/255.f, 93/255.f, 93/255.f, 0.2);//紅色
        }
        CGContextSetLineCap(context,kCGLineCapRound);
        CGContextSetLineWidth(context,24/[UIScreen mainScreen].scale);
        CGContextMoveToPoint(context, [[[touchesArray objectAtIndex:i] objectForKey:@"x"] floatValue], [[[touchesArray objectAtIndex:i] objectForKey:@"y"] floatValue]);
        if (i<touchesArray.count-1) {
            CGContextAddLineToPoint(context, [[[touchesArray objectAtIndex:i+1] objectForKey:@"x"] floatValue],[[[touchesArray objectAtIndex:i+1] objectForKey:@"y"] floatValue]);
        }
        else{
            if (success) {
                CGContextAddLineToPoint(context, lineEndPoint.x,lineEndPoint.y);
            }
        }
        CGContextStrokePath(context);
    }
}
