有幸拜讀了[一生X命]分享的文章仿寫知乎日報-主頁面(Part 1),自己瞎搞一上午,封裝了一個基于導航欄navigationitem.titleview的簡單刷新控件。集成刷新和顯示Title,支持拓展成響應事件的圖片按鈕。效果圖還是用[一生X命]的吧。

目錄
- 布局
- 功能實現
- 對打破Block循環引用的簡單總結
布局思路
通過標題title去計算好Size,然后計算底層的容器視圖contenView的寬高再進行布局。標題居中,左側放菊花(高度20),右側放一個view(用于拓展),跟菊花的位置對稱。為了美觀,視圖之間留有space=2的空隙,如破圖:

** 這里有3種情況:**
- 用title計算的size.height小于菊花的高度
- size.height大于菊花的高度
- 傳入的title為nil 或者 @""時,將菊花居中
宏定義菊花的高度和空隙的寬度
#define JKACTIVITY_HEIGHT 20
#define JKSPACE 2
首先計算title的size
CGSize size = [title boundingRectWithSize:CGSizeMake(MAXFLOAT, 44)
                                      options:NSStringDrawingUsesLineFragmentOrigin
                                   attributes:@{NSFontAttributeName:contenView.titleLabel.font}
                                      context:nil].size;
CGSize newSize = [contenView.titleLabel sizeThatFits:size];// 進一取“整”,有約束時慎用此方法
再計算contentView的寬高以及titleLabel、菊花activityIndicator的中心坐標和寬高(以下是主要代碼,非全部)
    JPRefreshTitleView * contenView = [[JPRefreshTitleView alloc]init];

    contenView.viewHeight = newSize.height < JKACTIVITY_HEIGHT ? JKACTIVITY_HEIGHT : newSize.height;
    // 傳title時,會將title居中,傳入nil時,將activityIndicator居中。
    contenView.viewWidth  = size.width ? newSize.width + (2 * JKSPACE + JKACTIVITY_HEIGHT) * 2 : newSize.width + 2 * JKSPACE + JKACTIVITY_HEIGHT;

    CGPoint labelCenter = CGPointMake(JKACTIVITY_HEIGHT + 2 * JKSPACE + newSize.width/2.0, contenView.viewHeight/2.0);
    CGRect labelBounds = CGRectMake(0, 0, newSize.width, newSize.height);

    contenView.activityIndicator.bounds = CGRectMake(0, 0, JKACTIVITY_HEIGHT, JKACTIVITY_HEIGHT);
    contenView.activityIndicator.center = CGPointMake(JKSPACE + JKACTIVITY_HEIGHT/2, contenView.viewHeight/2.0);

    contenView.bounds = CGRectMake(0, 0, contenView.viewWidth, contenView.viewHeight);
    [contenView addSubview:contenView.titleLabel];
    [contenView addSubview:contenView.activityIndicator];
    viewController.navigationItem.titleView = contenView;
然后用CAShapeLayer和貝塞爾曲線創建2個圓圈,需要時再顯示
- (void)addCircleLayersWithColor:(UIColor *)color{

    self.backgroundLayer = [CAShapeLayer layer];
    self.backgroundLayer.anchorPoint = CGPointMake(0.5, 0.5);
    self.backgroundLayer.strokeColor = [UIColor lightGrayColor].CGColor;
    self.backgroundLayer.fillColor = [UIColor clearColor].CGColor;
    self.backgroundLayer.position  = self.activityIndicator.center;
    self.backgroundLayer.lineWidth = 1.5;
    self.backgroundLayer.strokeStart = 0;
    self.backgroundLayer.strokeEnd = 1.0;

    CGRect bounds = self.activityIndicator.bounds;
    //bounds.size.height -= 2;
    //bounds.size.width -= 2;   //對應cornerRadius:JKACTIVITY_HEIGHT/2.0-1
    self.backgroundLayer.bounds = bounds;

    UIBezierPath * backPath = [UIBezierPath bezierPathWithRoundedRect:bounds cornerRadius:JKACTIVITY_HEIGHT/2.0];
    self.backgroundLayer.path = backPath.CGPath;

    self.foregroundLayer = [CAShapeLayer layer];
    self.foregroundLayer.anchorPoint = CGPointMake(0.5, 0.5);
    self.foregroundLayer.strokeColor = color ? color.CGColor : [UIColor darkGrayColor].CGColor;
    self.foregroundLayer.fillColor = [UIColor clearColor].CGColor;
    self.foregroundLayer.position  = self.activityIndicator.center;
    self.foregroundLayer.lineWidth = 2;
    self.foregroundLayer.strokeStart = 0;
    self.foregroundLayer.strokeEnd = 0;
    self.foregroundLayer.bounds = bounds;
    self.foregroundLayer.path = backPath.CGPath;

    [self.layer addSublayer:self.backgroundLayer];
    [self.layer addSublayer:self.foregroundLayer];

    [self hideCircleLayer];
}

- (void)hideCircleLayer{
    self.backgroundLayer.hidden = YES;
    self.foregroundLayer.hidden = YES;
}

- (void)displayCircleLayer{
    self.backgroundLayer.hidden = NO;
    self.foregroundLayer.hidden = NO;
}
用于拓展的rightView屬性對外公開,但是重寫setter方法控制大小。通常在titleView上增加按鈕都會帶上文字,所以不考慮傳入空title時的布局,只需考慮左右對稱。
- (void)setRightView:(UIView *)rightView{
    if (_rightView) {
         [_rightView removeFromSuperview];
          _rightView = nil;
    }

    rightView.bounds = CGRectMake(0, 0, JKACTIVITY_HEIGHT, JKACTIVITY_HEIGHT);
    rightView.center = CGPointMake(self.viewWidth - JKACTIVITY_HEIGHT/2.0 + JKSPACE, self.viewHeight/2.0);
    _rightView = rightView;
    [self addSubview:_rightView];
}
實現功能
通過KVO監測scrollView/tableView/collectionView的contentOffset
**
對外公開的方法可以傳入viewController以及UIScrollView繼承體系對象。viewController用處不大,主要為了內部實現設置navgitionItem.titleView,引入scrollView是為了在控制器釋放后還能移除KVO,以及監測contentInset**。關鍵代碼如下,
@property (nonatomic, strong)UIScrollView * scrollView;

+ (JPRefreshTitleView *)showRefreshViewInViewController:(UIViewController *)viewController
                                  observableScrollView:(UIScrollView *)scrollView
                                                 title:(NSString *)title
                                                  font:(UIFont *)font
                                             textColor:(UIColor *)textColor
                                activityIndicatorColor:(UIColor *)activityIndicatorColor;

if (scrollView) [scrollView addObserver:contenView forKeyPath:@"contentOffset" options:NSKeyValueObservingOptionNew context:nil];

// 避免內存泄露
- (void)removeJPRefreshTitleView{
    [self stopRefresh];
    if(self.scrollView) {
         [self.scrollView removeObserver:self forKeyPath:@"contentOffset"];
          self.scrollView = nil;
    }
    if (self.rightView) self.rightView = nil;
}

- (void)dealloc{
    [self removeJPRefreshTitleView];
    JKLog(@"%@被釋放",[self class]);
}
實現KVO的回調方法,以實現實時監測ScrollView的滑動偏移。這里增加三個屬性配合使用,因為系統優化機制viewController.automaticallyAdjustsScrollViewInsets及手動設置contentInset都會改變距離頂部的偏移量,所有咱用marginTop來記錄scrollView/tableView/collectionView的contentInset.top,contentInset會影響內容的內嵌顯示,contentOffset則影響內容的偏移,而我們要監聽計算的實際滑動偏移是兩者之和,即CGFloat newoffsetY = offsetY + self.marginTop,最開始為0。刷新的臨界點threshold,向下拖動的偏移【絕對值或者距離】超過80松手后就刷新,實際數值是-80。
@property (nonatomic, assign)CGFloat marginTop;

@property (nonatomic, assign)CGFloat threshold;

@property (nonatomic, assign)CGFloat progress;

- (void)observeValueForKeyPath:(NSString *)keyPath ofObject:(id)object change:(NSDictionary<NSString *,id> *)change context:(void *)context{
    if ([keyPath isEqualToString:@"contentOffset"]) {

        // 實時監測scrollView.contentInset.top,存在系統優化機制時為-64,關閉后為0(不包括手動設置的情況)
        if (self.marginTop != self.scrollView.contentInset.top) {
            self.marginTop = self.scrollView.contentInset.top;
        }
        if (self.isRefreshing) return;

        CGFloat offsetY = [change[@"new"] CGPointValue].y;

        // 栗子:存在系統優化機制時scrollView.contentInset.top = 64,而scrollView.contenOffset.y= -64
        // 相加之和,即newoffsetY便是我們要算的實際偏移,最開始等于0(向下拖時,newoffsetY < 0)
        CGFloat newoffsetY = offsetY + self.marginTop;

        // -80<newoffsetY<0 即拖動距離大于0,小于80,重寫progress的setter方法進行進度條的邏輯處理

         if (newoffsetY > 0){   // 一直向上拖
            self.progress = 0; // KVO有點延遲,滑動過快會導致越過0點后progress >0。

        }else if (newoffsetY >= self.threshold && newoffsetY <= 0) {
            self.progress = newoffsetY/self.threshold;

        // 臨界點,松手后開始刷新
        }else if (newoffsetY < self.threshold && !self.scrollView.isDragging){
            [self startRefresh];
            self.progress = 0;

        }else{  // 超過臨界點,但是還在拖拽
            if (self.progress > 0 && self.progress < 1) {
                self.progress = 1;  // KVO有點延遲,拖拽過快會導致越過臨界點后progress <1。
            }
        }


    }else [super observeValueForKeyPath:keyPath ofObject:object change:change context:context];
}

// 重寫progress的setter方法,在這處理進度條圓圈的顯示和隱藏
- (void)setProgress:(CGFloat)progress{
    if (_progress == progress) {
        return;
    }
    _progress = progress;
    if (progress == 0) {
        [self hideCircleLayer];

    // 松手后才能隱藏
    } else if (progress == 1 && !self.scrollView.isDragging){
        [self hideCircleLayer];
    }else{
        [self displayCircleLayer];
    }

// 這里處理進度條回退的動畫,分拖拽回退和自動回退的動畫,分別使用線性和緩慢結束的效果,看起來比較流暢。
    [CATransaction begin];
    [CATransaction setDisableActions:NO];
    if (self.scrollView.isDragging) {
        [CATransaction setAnimationDuration:0.15];
        [CATransaction setAnimationTimingFunction:[CAMediaTimingFunction functionWithName:kCAMediaTimingFunctionLinear]];
    }else{
        [CATransaction setAnimationDuration:0.25];
        [CATransaction setAnimationTimingFunction:[CAMediaTimingFunction functionWithName:kCAMediaTimingFunctionEaseOut]];
    }
    self.foregroundLayer.strokeEnd = MIN(progress, 1);
    [CATransaction commit];
}
對Block循環引用的一點小總結
開發中很多時候都會用到Block,但是block容易引起循環引用。比如下面這種寫法,self強引用JPRefreshTitleView ,而JPRefreshTitleView 的refreshingBlock又會強引用self,就形成了循環引用,造成內存泄露。
    self.refrshView = [JPRefreshTitleView showRefreshViewInViewController:self
                                                     observableScrollView:self.tableView
                                                                    title:@"JPRefreshTitleView"
                                                                     font:[UIFont systemFontOfSize:18]
                                                                textColor:[UIColor blackColor]
                                                          refreshingBlock:^{

                                                              [self.tableView reloadData];
                                                              [self endRefresh];
                                                          }];
為了少敲點強弱轉換的代碼并在block里面直接用self,嘗試著在JPRefreshTitleView內部做點手腳,幾經折騰,最終還是選擇用轉換self強弱引用的方法。
為了打破循環引用,通常我們選擇轉換成weakSelf
__weak typeof(self) weakself = self;
但是這種寫法有個缺點,就是self過早釋放造成weakSelf置空,block回調容易crash。為了避免過早釋放self,可以在block里面進行強引用轉換。block執行完了后都會被釋放掉,這樣既能避免block循環引用,又能避免self過早釋放。
__strong typeof(weakself) strongself = weakself;
能不能再懶一點,少敲點代碼?當然可以,在網上搜到了強弱轉換的宏,但不知咋個回事,從網上拷貝的宏定義不能用,然后自己瞎搞了下,又能用了。需要弱轉換時輸入:
WeakSelf; 或者 Weak(self);
在block里面強引用輸入:
StrongSelf; 或者 Strong(self);
然后就可以直接用self了。其實這個self就是上面的strongself ,曲線救國,命名為self而已。當然上面的strongself 也能命名成self,于是就有下面三種混搭寫法:
    WeakSelf; // Weak(self); // __weak typeof(self) weakself = self;
    self.refrshView = [JPRefreshTitleView showRefreshViewInViewController:self
                                                     observableScrollView:self.tableView
                                                                    title:@"JPRefreshTitleView"
                                                                     font:[UIFont systemFontOfSize:18]
                                                                textColor:[UIColor blackColor]
                                                          refreshingBlock:^{

                           StrongSelf; // Strong(self); // __strong typeof(weakself) self = weakself;
                           [self.tableView reloadData];
                     }];
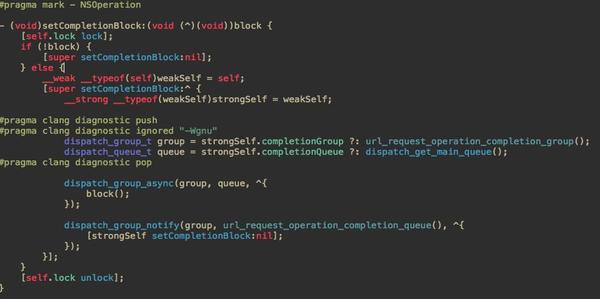
另外一種方法可以借鑒AFNetworking里面的用法,但是這種方法只適合一次性的Block,用完就會置為nil.即相當于在JPRefreshTitleView內部調用完refreshingBlock就執行refreshingBlock=nil;但是JPRefreshTitleView的block是多次調用的,所以不能用完一次就置為nil,只能選擇用強弱轉換self的方法。關于AFNetworking里面的用法可以參考知乎的一些答案:為什么系統的block,AFN網絡請求的block內使用self不會造成循環引用?
這是我修改后的宏定義,可以直接用(ARC模式親測可以,MRC沒測試)
#ifndef    weak_self
#if __has_feature(objc_arc)
#define WeakSelf __weak __typeof__(self) weakself = self;
#else
#define WeakSelf autoreleasepool{} __block __typeof__(self) blockSelf = self;
#endif
#endif
#ifndef    strong_self
#if __has_feature(objc_arc)
#define StrongSelf  __typeof__(weakself) self = weakself;
#else
#define StrongSelf try{} @finally{} __typeof__(blockSelf) self = blockSelf;
#endif
#endif


#ifndef    Weak
#if __has_feature(objc_arc)
#define Weak(object) __weak __typeof__(object) weak##object = object;
#else
#define Weak(object) autoreleasepool{} __block __typeof__(object) block##object = object;
#endif
#endif
#ifndef    Strong
#if __has_feature(objc_arc)
#define Strong(object) __typeof__(object) object = weak##object;
#else
#define Strong(object) try{} @finally{} __typeof__(object) object = block##object;
#endif
#endif
第一次在簡書上發表文章,其實也沒啥技術含量,但是開了個頭,就會繼續寫下去,初出茅廬,還望各位同行多多指教。有了前輩的思想,封裝起來并不難,通過KVO監聽偏移和實現刷新,注意Block循環引用和移除KVO就行。難理解的地方應該是計算實際偏移,存在優化機制和手動設置時會影響內嵌和偏移量,所以要通過抵消來計算實際偏移。PS: 手動設置tableView的contentInset需要在viewDidAppear方法里面實現。
GitHub
目前只支持監聽一個tableView,后續會繼續更新以支持監聽多個tableView。
