[TOC]
LaraDock能夠幫你在Docker上快速搭建Laravel應用。
就像Laravel Homestead一樣,但是Docker替換了Vagrant。
介紹
大家可以先看官方Laradock_README.md。使用方法很簡單,讓我們從此再也不需要使用Vagrant了。
特點
- 在PHP版本:7.0,5.6.5.5...之中可以簡單切換。
- 可選擇你最喜歡的數據庫引擎,比如:MySQL, Postgres, MariaDB...
- 可運行自己的軟件組合,比如:Memcached, HHVM, Beanstalkd...
- 所有軟件運行在不同的容器之中,比如:PHP-FPM, NGINX, PHP-CLI...
- 通過簡單的編寫
dockerfile容易定制任何容器。 - 所有鏡像繼承自一個官方基礎鏡像(Trusted base Images)
- 可預配置Laravel的Nginx環境
- 容易應用容器中的配置
- 干凈的結構化的Docker配置文件(
dockerfile) - 最新的Docker Compose 版本(
docker-compose) - 所有的都是可視化和可編輯的
- 快速的鏡像構建
- 每周都會有更新...
通過Laradock我們可以很輕松的搭建開發環境,并且可以定制自己環境的需求,并共享出來,例如:nginx的配置環境,如果是團隊開發Laradock將會幫助我們省去很多搭環境的工作,并保證大家的環境都是一樣的。
Docker
Docker 是一個開源項目,自動化部署應用程序軟件的容器,在Linux, Mac OS and Windows提供一個額外的抽象層和自動化的操作系統級的虛擬化。這部分內容大家去度娘、谷歌,這里復制官方簡介。
開始使用LaraDock
安裝
1 - 克隆 LaraDock 倉庫:
A) 如果你已經有一個Laravel項目,克隆這個倉庫在到Laravel根目錄
git submodule add https://github.com/LaraDock/laradock.git
如果你不是使用Git管理Laravel項目,您可以使用
git clone而不是git submodule。
B) 如果你沒有一個Laravel項目,你想Docker安裝Laravel,克隆這個源在您的機器任何地方上:
git clone https://github.com/LaraDock/laradock.git
這里我建議使用B方法,全局安裝
使用 (這里用mac作為例子)
官方文檔有說明如果你正在使用Docker Toolbox (VM)基于VitrulBox創建的實例,建議更新到Docker Native
1 - 運行容器: (在運行docker-compose命令之前,確認你在 laradock 目錄中
例子: 運行 NGINX 和 MySQL:
docker-compose up -d nginx mysql
你可以從以下列表選擇你自己的容器組合:
nginx, hhvm, php-fpm, mysql, redis, postgres, mariadb, neo4j, mongo, apache2, caddy, memcached, beanstalkd, beanstalkd-console, workspace.
說明: workspace 和 php-fpm 將運行在大部分實例中, 所以不需要在 up 命令中加上它們.
2 - 進入 Workspace 容器, 執行像 (Artisan, Composer, PHPUnit, Gulp, ...)等命令
docker-compose exec workspace bash
增加 --user=laradock (例如 docker-compose exec --user=laradock workspace bash) 作為您的主機的用戶創建的文件. (你可以從 docker-compose.yml修改 PUID (User id) 和 PGID (group id) 值 ).
3 - 編輯 Laravel 的配置.
如果你還沒有安裝Laravel項目,請查看 How to Install Laravel in a Docker Container.
打開 Laravel的 .env 文件 然后 配置 你的mysql的DB_HOST:
DB_HOST=mysql
注意定義DB_HOST的時候一定要寫成mysql,不然無法link到容器
4 - 打開瀏覽器訪問localhost (http://localhost/).
127.0.0.1 www.youresite.com
建議修改host文件
關于Laradock 使用教程詳情可以參考官方文檔,這里就介紹到這里,但當你一切都準備好之后你會發現為什么跑起來這么慢,我第一次跑的時候也很納悶,后來谷歌上查閱了很多資料后發現原來Laradock掛載的工作空間Workspace在docker內置的軟虛擬機中,I/O性能很低,這就尷尬了,但幸好有解決的辦法,下面介紹下d4m-nfs
安裝D4m-nfs
d4m-nfs 是docker的一個擴展,通過他可以把docker的file sharing掛載到本地,因為我用的是mac所以這里只介紹mac的掛載方法
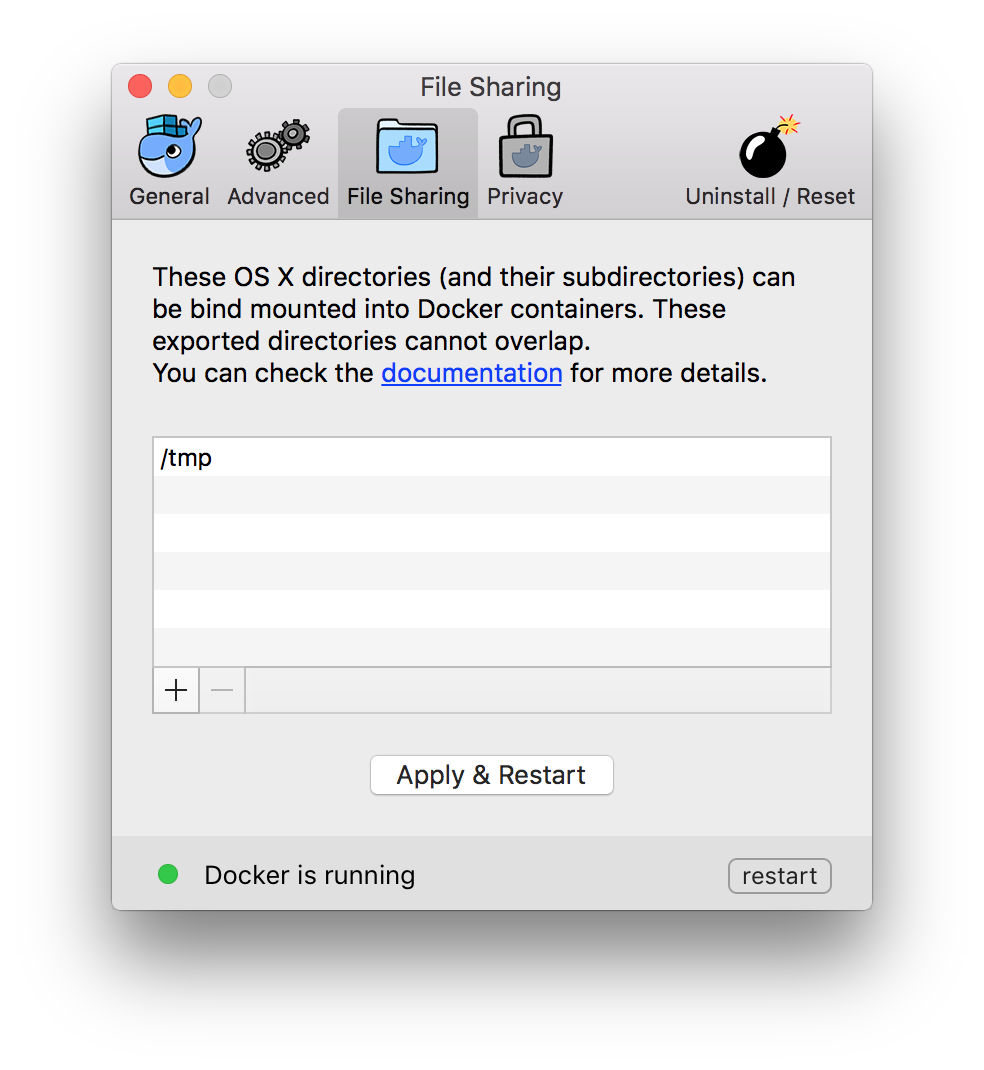
Step 1
在Docker中打開Preferences, 點擊File Sharing將其它目錄全部刪掉只保留/tmp目錄
Step 2
克隆 d4m-nfs 到 ~目錄下
git clone https://github.com/IFSight/d4m-nfs ~/d4m-nfs
Step 3
項目克隆下來后修改~/d4m-nfs/etc/d4m-nfs-mounts.txt文件,若文件不存在自己手動建一個
// 文檔中加入下面掛載目錄
/Users:/Users
/Volumes:/Volumes
/private:/private
Step 4
檢查系統文件/etc/exports,編輯文件并清空所有內容,cat /etc/exports
# d4m-nfs exports
"/Users" -alldirs -mapall=0:0 localhost
"/Volumes" -alldirs -mapall=0:0 localhost
"/private" -alldirs -mapall=0:0 localhost
Step 5
在~目錄下運行腳本
~/d4m-nfs/d4m-nfs.sh
腳本運行后程序開始初始化最后終端會展示以下內容
....
Please note:
* To connect to the D4M moby linux VM use: screen -r d4m
* To disconnect from the D4M moby linux VM tty screen session use Ctrl-a d.
* To run d4m-nfs faster and/or offline, leave the files in d4m-apk-cache and the hello-world image.
* If you switch between D4M stable and beta, you might need to remove files in d4m-apk-cache and the hello-world image.


# Use Stable Docker for Mac channel
Currently d4m-nfs is known to work on 'Docker version 1.12.3' and does not work on Docker for Mac beta (1.13).  Please use the stable channel of Docker for Mac https://docs.docker.com/docker-for-mac/

# ionotify for Sublime users
If you use Sublime, please checkout the plugin by Yves to help with auto reloads on file changes - https://github.com/yvess/sublime_d4m
通過命令進入掛載目錄的窗口
screen -r d4m
如果看到以下掛載項表示掛載成功
192.168.65.1:/Users/Lavekin /mnt nfs nolock,local_lock=all 0 0
192.168.65.1:/Users /Users nfs nolock,local_lock=all 0 0
192.168.65.1:/Volumes /Volumes nfs nolock,local_lock=all 0 0
192.168.65.1:/private /private nfs nolock,local_lock=all 0 0
Step 6
回到laradock目錄下將你的容器跑起來
docker-compose up -d nginx redis mysql

Creating network "laradock_default" with the default driver
Creating laradock_redis_1
Creating laradock_applications_1
Creating laradock_mysql_1
Creating laradock_workspace_1
Creating laradock_php-fpm_1
Creating laradock_nginx_1
看到以上運行日志恭喜你已將容器跑起來并掛載到本地了
