我的博客: Volley 源碼分析
Volley 的使用流程分析
官網示例
- 創建一個請求隊列
RequestQueue,并啟動隊列 - 創建一個請求
Request添加到請求隊列中
創建 RequestQueue 對象
final TextView mTextView = (TextView) findViewById(R.id.text);
...

// 實例化一個請求隊列
RequestQueue queue = Volley.newRequestQueue(this);
String url ="http://www.google.com";

// 創建一個期待類型為字符串類型的請求
StringRequest stringRequest = new StringRequest(Request.Method.GET, url,
            new Response.Listener<String>() {
    @Override
    public void onResponse(String response) {
        // Display the first 500 characters of the response string.
        mTextView.setText("Response is: "+ response.substring(0,500));
    }
}, new Response.ErrorListener() {
    @Override
    public void onErrorResponse(VolleyError error) {
        mTextView.setText("That didn't work!");
    }
});
// 將請求添加到請求隊列中
queue.add(stringRequest);
上面代碼片段的第5行,我們調用 Volley.newRequestQueue(this) 來創建一個請求隊列。Volley 中提供了兩種創建請求隊列的方法,newRequestQueue(Context context,HttpStack stack) 和 newRequestQueue(Context context)
public static RequestQueue newRequestQueue(Context context) {
//  在此方法內部會調用另一個 newRequestQueue 方法,第二個參數為 null 代表使用默認的 HttpStack 實現
    return newRequestQueue(context, null);
}
 public static RequestQueue newRequestQueue(Context context, HttpStack stack) {
    // 緩存文件目錄 data/data/packagename/cache/volley
    File cacheDir = new File(context.getCacheDir(), DEFAULT_CACHE_DIR);

    String userAgent = "volley/0";
    try {
        String packageName = context.getPackageName();
        PackageInfo info = context.getPackageManager().getPackageInfo(packageName, 0);
        userAgent = packageName + "/" + info.versionCode;
    } catch (NameNotFoundException e) {
    }

    if (stack == null) {
        if (Build.VERSION.SDK_INT >= 9) {
            stack = new HurlStack();//基于HttpClient
        } else {
            //基于HttpUrlConnection
            stack = new HttpClientStack(AndroidHttpClient.newInstance(userAgent));
        }
    }
    //利用HttpStack創建一個Network對象
    Network network = new BasicNetwork(stack);

    //創建一個RequestQueue對象,在構造函數中傳入緩存對象,網絡對象
    RequestQueue queue = new RequestQueue(new DiskBasedCache(cacheDir), network);
    //啟動隊列
    queue.start();

    return queue;
}
在上面代碼片段中的第2行可以看見,Volley 調用 getCacheDir() 方法來獲取緩存目錄,Volley 中的緩存文件會存儲在 /data/data/packagename/cache 目錄下面,并不是存儲在 SD 卡中的。
從12~18的代碼可以看見,Volley 當中有對 HttpStack 的默認實現,HttpStack 是真正用來執行請求的接口 ,根據版本號的不同,實例化不同的對象,在 Android2.3 版本之前采用基于 HttpClient 實現的 HttpClientStack 對象,不然則采用基于 HttpUrlConnection 實現的 HUrlStack。
之后我們通過 HttpStack 構建了一個 Network 對象,它會調用 HttpStack#performRequest() 方法來執行請求,并且將請求的結果轉化成 NetworkResponse 對象,NetworkResponse 類封裝了響應的響應碼,響應體,響應頭等數據。
接著我們會將之前構建的緩存目錄以及網絡對象傳入 RequestQueue(Cache cache, Network network) 的構造函數中,構造一個 RequestQueue 對象,然后調用隊列的 start()方法來啟動隊列,其實就是啟動隊列中的兩種線程:
//啟動隊列中所有的調度線程.
public void start() {
    stop();  // 確保停止所有當前正在運行的調度線程
    // 創建緩存調度線程,并啟動它,用來處理緩存隊列中的請求
    mCacheDispatcher = new CacheDispatcher(mCacheQueue,mNetworkQueue,mCache,mDelivery);
    mCacheDispatcher.start();

    // 創建一組網絡調度線程,并啟動它們,用來處理網絡隊列中的請求,默認線程數量為4,也可以通過RequestQueue的構造函數指定線程數量。
    for (int i = 0; i < mDispatchers.length; i++) {
        NetworkDispatcher networkDispatcher = new NetworkDispatcher(mNetworkQueue,mNetwork,mCache, mDelivery);
        mDispatchers[i] = networkDispatcher;
        networkDispatcher.start();
    }
}
在 start() 方法中,主要是啟動了兩種線程分別是 CacheDispatcher 和 NetworkDispatcher,它們都是線程類,顧名思義 CacheDispatcher 線程會處理緩存隊列中請求,NetworkDispatcher 處理網絡隊列中的請求,由此可見在我們調用 Volley 的公開方法創建請求隊列的時候,其實就是開啟了兩種線程在等待著處理我們添加的請求。
添加請求 add(Request)
之前我們已經創建了 RequestQueue 對象,現在我們只需要構建一個 Request 對象,并將它加入到請求隊列中即可。下面我們來看看 add(Request<T> request) 方法:
public <T> Request<T> add(Request<T> request) {
    // 將請求加入到當前請求隊列當中,毋庸置疑的我們需要將所有的請求集合在一個隊列中,方便我們做統一操作,例如:取消單個請求或者取消具有相同標記的請求...
    request.setRequestQueue(this);
    synchronized (mCurrentRequests) {
        mCurrentRequests.add(request);
    }

    // 給請求設置順序.
    request.setSequence(getSequenceNumber());
    request.addMarker("add-to-queue");

    // 如果請求是不能夠被緩存的,直接將該請求加入網絡隊列中.
    if (!request.shouldCache()) {
        mNetworkQueue.add(request);
        return request;
    }

    // 如果有相同的請求正在被處理,就將請求加入對應請求的等待隊列中去.等到相同的正在執行的請求處理完畢的時候會調用 finish()方法,然后將這些等待隊列中的請求全部加入緩存隊列中去,讓緩存線程來處理
    synchronized (mWaitingRequests) {
        String cacheKey = request.getCacheKey();
        if (mWaitingRequests.containsKey(cacheKey)) {
            // 有相同請求在處理,加入等待隊列.
            Queue<Request<?>> stagedRequests = mWaitingRequests.get(cacheKey);
            if (stagedRequests == null) {
                stagedRequests = new LinkedList<>();
            }
            stagedRequests.add(request);
            mWaitingRequests.put(cacheKey, stagedRequests);
            if (VolleyLog.DEBUG) {
                VolleyLog.v("Request for cacheKey=%s is in flight, putting on hold.", cacheKey);}
        } else {
            // 向mWaitingRequests中插入一個當前請求的空隊列,表明當前請求正在被處理
            mWaitingRequests.put(cacheKey, null);
            mCacheQueue.add(request);
        }
        return request;
    }
}
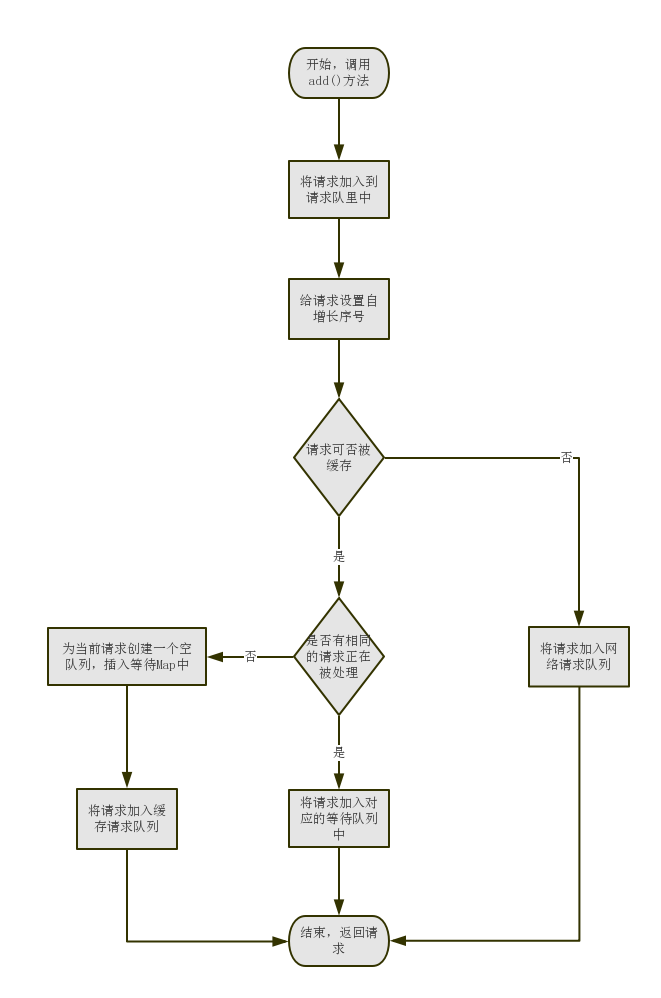
RequestQueue#add(Request) 方法的調用流程
處理請求 Cache/NetworkDispatcher
請求被加入緩存請求隊列或者是網絡請求隊列,在后臺我們的緩存處理線程,網絡處理線程,一直在運行著等待著請求的到來。我們先來看看 CacheDispatcher 線程是如何處理的:
CacheDispatcher
public CacheDispatcher(
    BlockingQueue<Request<?>> cacheQueue, BlockingQueue<Request<?>> networkQueue,
    Cache cache, ResponseDelivery delivery) {
    mCacheQueue = cacheQueue;
    mNetworkQueue = networkQueue;
    mCache = cache;
    mDelivery = delivery;
}
這是 CacheDispatcher 的構造函數,可以看見該對象內部持有緩存隊列,網絡隊列,緩存對象,響應投遞對象的引用。
@Override
public void run() {
    if (DEBUG) VolleyLog.v("start new dispatcher");
    Process.setThreadPriority(Process.THREAD_PRIORITY_BACKGROUND);

    // 初始化緩存,將緩存目錄下的所有緩存文件的摘要信息加載到內存中.
    mCache.initialize();

    //無線循環,意味著線程啟動之后會一直運行
    while (true) {
        try {
            // 從緩存隊列中取出一個請求,如果沒有請求則一直等待
            final Request<?> request = mCacheQueue.take();
            request.addMarker("cache-queue-take");

            // 如果當前請求已經取消,那就停止處理它
            if (request.isCanceled()) {
                request.finish("cache-discard-canceled");
                continue;
            }
            // 嘗試取出緩存實體對象
            Cache.Entry entry = mCache.get(request.getCacheKey());
            if (entry == null) {
                request.addMarker("cache-miss");
                // 沒有緩存,將當前請求加入網絡請求隊列,讓NetworkDispatcher進行處理.
                mNetworkQueue.put(request);
                continue;
            }

            // 如果緩存實體過期,任然將當前請求加入網絡請求隊列,讓NetworkDispatcher進行處理.
            if (entry.isExpired()) {
                request.addMarker("cache-hit-expired");
                request.setCacheEntry(entry);
                mNetworkQueue.put(request);
                continue;
            }

            // 將緩存實體解析成NetworkResponse對象.
            request.addMarker("cache-hit");
            Response<?> response = request.parseNetworkResponse(
            new NetworkResponse(entry.data, entry.responseHeaders));
            request.addMarker("cache-hit-parsed");

            if (!entry.refreshNeeded()) {
                // 緩存依舊新鮮,投遞響應.
                mDelivery.postResponse(request, response);
            } else {
                //緩存已經不新鮮了,我們可以進行響應投遞,然后將請求加入網絡隊列中去,進行新鮮度驗證,如果響應碼為 304,代表緩存新鮮可以繼續使用,不用刷新響應結果
                request.addMarker("cache-hit-refresh-needed");
                request.setCacheEntry(entry);

                // 標記當前響應為中間響應,如果經過服務器驗證緩存不新鮮了,那么隨后將有第二條響應到來.這意味著當前請求并沒有完成,只是暫時顯示緩存的數據,等到服務器驗證緩存的新鮮度之后才會將請求標記為完成
                response.intermediate = true;

                // 將響應投遞給用戶,然后加入網絡請求隊列中去.
                mDelivery.postResponse(request, response, new Runnable() {
                    @Override
                    public void run() {
                        try {
                            mNetworkQueue.put(request);
                        } catch (InterruptedException e) {
                            // Not much we can do about this.
                        }
                    }
                });
            }

        } catch (InterruptedException e) {
            // We may have been interrupted because it was time to quit.
            if (mQuit) {
                return;
            }
        }
    }
}
在代碼的注釋中基本上可以理清 CacheDispatcher 的工作流程,下面附上流程圖

CacheDispatcher#run() 方法內部流程
NetworkDispatcher
在 CacheDispatcher 當中我們會把一些不符合條件的請求加入網絡請求隊列中,下面我們來看看在 NetworkDispatcher 的 run() 方法中是怎么來處理這些請求的:
public NetworkDispatcher(BlockingQueue<Request<?>> queue,
    Network network, Cache cache,ResponseDelivery delivery) {
    mQueue = queue;
    mNetwork = network;
    mCache = cache;
    mDelivery = delivery;
}
這是 NetworkDispatcher 的構造函數,可以看見該對象內部持有網絡隊列,緩存對象,響應投遞對象,Network對象的引用。
@Override
    public void run() {
    Process.setThreadPriority(Process.THREAD_PRIORITY_BACKGROUND);
    while (true) {
        long startTimeMs = SystemClock.elapsedRealtime();
        Request<?> request;
        try {
            // 從網絡隊列中取出一個請求,沒有請求則一直等待.
            request = mQueue.take();
        } catch (InterruptedException e) {
        // We may have been interrupted because it was time to quit.
            if (mQuit) {
            return;
            }
            continue;
        }

        try {
            request.addMarker("network-queue-take");

            // 如果請求被取消的話,就結束當前請求,不再執行
            if (request.isCanceled()) {
                request.finish("network-discard-cancelled");
                continue;
            }
            addTrafficStatsTag(request);

            // 執行網絡請求.
            NetworkResponse networkResponse = mNetwork.performRequest(request);
            request.addMarker("network-http-complete");
            // 如果響應碼為304,并且我們已經傳遞了一次響應,不需要再傳遞一次驗證的響應,意味著本次請求處理完成。也就是說該請求的緩存是新鮮的,我們直接使用就可以了。
            if (networkResponse.notModified && request.hasHadResponseDelivered()) {
                request.finish("not-modified");
                continue;
            }

            // 在工作線程中想響應數據解析成我們需要的Response對象,之所以在工作線程進行數據解析,是為了避免一些耗時操作造成主線程的卡頓.
            Response<?> response = request.parseNetworkResponse(networkResponse);
            request.addMarker("network-parse-complete");
            // 如果允許,則將響應數據寫入緩存,這里的緩存是需要服務器支持的,這點我們接下來再說
            // TODO: Only update cache metadata instead of entire record for 304s.
            if (request.shouldCache() && response.cacheEntry != null) {
                mCache.put(request.getCacheKey(), response.cacheEntry);
                request.addMarker("network-cache-written");
            }

            // 傳遞響應數據.
            request.markDelivered();
            mDelivery.postResponse(request, response);
        } catch (VolleyError volleyError) {
            volleyError.setNetworkTimeMs(SystemClock.elapsedRealtime() - startTimeMs);
            parseAndDeliverNetworkError(request, volleyError);
        } catch (Exception e) {
            VolleyLog.e(e, "Unhandled exception %s", e.toString());
            VolleyError volleyError = new VolleyError(e);
            volleyError.setNetworkTimeMs(SystemClock.elapsedRealtime() - startTimeMs);
            mDelivery.postError(request, volleyError);
        }
    }
}
在代碼當中的第29行,我們調用 Network 對象的 performRequest(Request<?> request) 方法來執行網絡請求,并且返回我們需要的 NetworkResponse 對象。如果是304響應,并且我們已經傳遞過一次響應,就不需要在傳遞新的解析數據,不然我們將數據解析成 Reponse 對象,并傳遞給主線程進行回到處理,如果該請求允許被緩存,就將該請求的結果寫入緩存中去,這就是 Networkdispatcher 的工作流程。以下是 NetworkDispatcher 的流程圖:
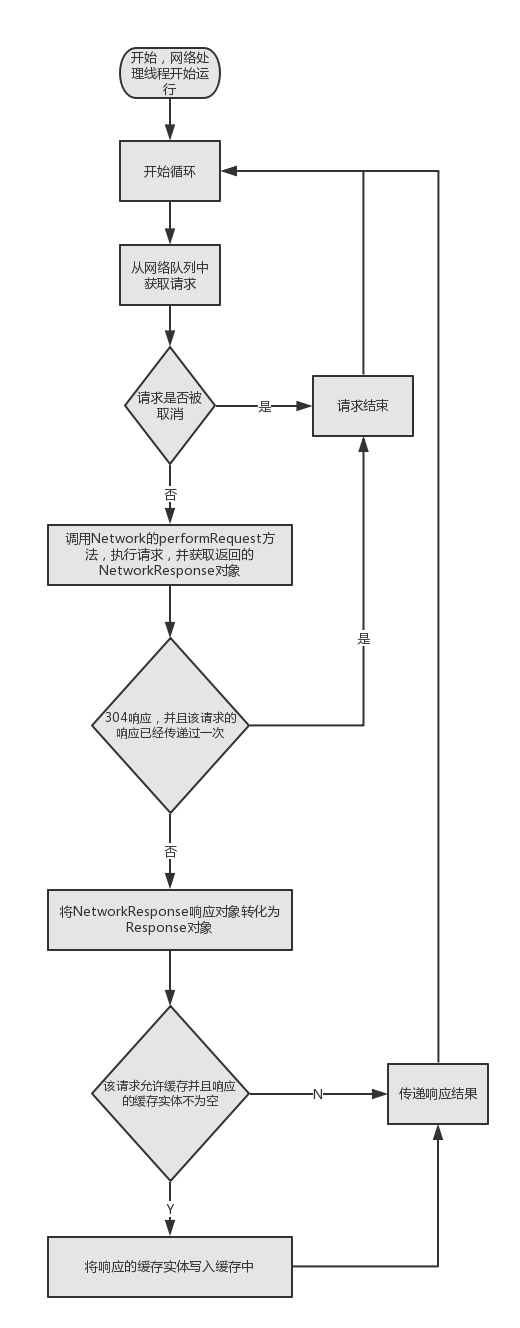
NetworkDispatcher的run() 方法
執行請求 performRequest
在上面 NetworkDispatcher 的代碼中第29行,會通過 Network 的 performRequest 方法來進行網絡請求:
public interface Network {
    /**
    * 執行指定的請求.
    * @param request 被處理的請求
    * @return 一個 NetworkResponse 對象,包含響應的數據,頭部以及響應碼等數據
    * @throws VolleyError on errors
    */
    NetworkResponse performRequest(Request<?> request) throws VolleyError;
}
Network 是一個接口,它的內部只有這一個方法,在 Volley 中我們最終調用的是它的實現類,BasicNetwork 的 performRequest() 方法,方法如下所示:
@Override
public NetworkResponse performRequest(Request<?> request) throws VolleyError {
    long requestStart = SystemClock.elapsedRealtime();//請求開始的時間
    while (true) {
        HttpResponse httpResponse = null;
        byte[] responseContents = null;
        Map<String, String> responseHeaders = Collections.emptyMap();
        try {
            // 收集頭部
            Map<String, String> headers = new HashMap<String, String>();
            //對于addCacheHeaders這個方法,我們也會在緩存的部分進行介紹
            addCacheHeaders(headers, request.getCacheEntry());//附加請求頭部,用來驗證緩存數據?
            httpResponse = mHttpStack.performRequest(request, headers);
            StatusLine statusLine = httpResponse.getStatusLine();
            int statusCode = statusLine.getStatusCode();

            responseHeaders = convertHeaders(httpResponse.getAllHeaders());
            // 驗證緩存的新鮮度.
            if (statusCode == HttpStatus.SC_NOT_MODIFIED) {
                //請求的資源沒有修改,意思可以使用緩存中的數據
                Cache.Entry entry = request.getCacheEntry();
                if (entry == null) {
                    return new NetworkResponse(HttpStatus.SC_NOT_MODIFIED, null,
                    responseHeaders, true,SystemClock.elapsedRealtime() -requestStart);
                }

                // A HTTP 304 response does not have all header fields. We
                // have to use the header fields from the cache entry plus
                // the new ones from the response.
                // http://www.w3.org/Protocols/rfc2616/rfc2616-sec10.html#sec10.3.5
                entry.responseHeaders.putAll(responseHeaders);
                return new NetworkResponse(HttpStatus.SC_NOT_MODIFIED, entry.data,
                            entry.responseHeaders, true,
                            SystemClock.elapsedRealtime() - requestStart);
            }

            // Some responses such as 204s do not have content.  We must check.
            if (httpResponse.getEntity() != null) {
                responseContents = entityToBytes(httpResponse.getEntity());
            } else {
                // Add 0 byte response as a way of honestly representing a
                // no-content request.
                responseContents = new byte[0];
            }

            // if the request is slow, log it. 請求持續時間
            long requestLifetime = SystemClock.elapsedRealtime() - requestStart;
            logSlowRequests(requestLifetime, request, responseContents, statusLine);

            if (statusCode < 200 || statusCode > 299) {
                throw new IOException();
            }
            //一條真正的網絡響應
            return new NetworkResponse(statusCode, responseContents, responseHeaders, false,SystemClock.elapsedRealtime() - requestStart);
        } catch (SocketTimeoutException e) {
            //......這部分代碼是用來進行請求重試的,我們隨后在做解析
        }
    }
}
在上面代碼的第12行,又會調用 HttpStack 對象的 performRequest() 方法去執行網絡請求,在 HttpStack 中才真正進行網絡請求,HttpStack 對象在我們一開始調用 Volley.newRequestQueue() 的方法時候初始化的,默認情況下,如果系統版本在 Android2.3 之前就會創建 HttpClientStack,之后就會創建 HUrlStack 對象,同樣我們也可以實現自己的 HttpStack對象,通過 Volley 的重載方法 newRequestQueue(Context,HttpStack) 將我們自定義的 HttpStack 傳入即可。
在代碼的18行,我們會進行新鮮度驗證,如果是304響應那么我們會直接利用緩存實體的數據。之后會將響應的數據組裝成一個 NetworkResponse 對象返回。
在回到之前 NetworkDispatcher 的代碼中,當我們獲得這個 NetworkResponse 對象之后,如果是304響應那我們的請求處理結束,不然的話就會調用 Request#parseNetworkResponse(NetworkResponse) 方法將 NetworkResponse 對象解析成我們需要的 Response 對象,這是一個抽象方法,由子類具體實現來解析成期望的響應類型,此方法在工作線程調用。如果該請求可以被緩存,就會將響應實體寫入緩存,標記請求被投遞,然后調用 ResponseDelivery 對象的 postResponse() 方法來將解析的結果投遞到主線程中,然后進行回調處理。
響應傳遞、回調 postResponse
響應結果投遞接口,主要負責將響應的結果/錯誤,投遞到主線程中,供回調函數處理:
public interface ResponseDelivery {
    /**
     * 傳遞從網絡或者緩存中解析的Response對象.
     */
    void postResponse(Request<?> request, Response<?> response);

    /**
     * 傳遞從網絡或者緩存中解析的Response對象.提供一個Runnable對象,會在傳遞之后執行
     */
    void postResponse(Request<?> request, Response<?> response, Runnable runnable);

    /**
     * 傳遞給定請求的Error
     */
    void postError(Request<?> request, VolleyError error);
}
它的內部實現類為 ExecutorDelivery,讓我們來看看 ExecutorDelivery 中的具體實現:
 private final Executor mResponsePoster;

 public ExecutorDelivery(final Handler handler) {
        // Make an Executor that just wraps the handler.
        mResponsePoster = new Executor() {
            @Override
            public void execute(Runnable command) {
                handler.post(command);
            }
        };
    }

@Override
public void postResponse(Request<?> request, Response<?> response, Runnable runnable) {
    request.markDelivered();
    request.addMarker("post-response");
    mResponsePoster.execute(new ResponseDeliveryRunnable(request, response, runnable));
}
我們會在 postResponse 方法中調用 mResponsePoster 對象的 execute 方法,緊接著通過 handler 對象發送一個消息,這個消息是 ResponseDeliveryRunnable 對象,它是 Runnable 的實現類,并且這個 Runnable 對象會在主線程被執行,為什么呢?這是因為 handler 是在 ExecutorDelivery 初始化的時候作為參數傳遞出來的,我們可以看一下該構造函數調用的時機:
 public RequestQueue(Cache cache, Network network, int threadPoolSize) {
    this(cache, network, threadPoolSize,
            new ExecutorDelivery(new Handler(Looper.getMainLooper())));
}
可以看見我們使用主線的 Looper 在構建一個 Handler對象,所以由該 Handler 對象發送的消息,都會在主線程被執行,不熟悉 Handler 機制的可以看下這篇文章 Android消息機制。
接著我們看看這個 ResponseDeliveryRunnable 類:
private class ResponseDeliveryRunnable implements Runnable {
    //......省略
    @SuppressWarnings("unchecked")
    @Override
    public void run() {
        // If this request has canceled, finish it and don't deliver.
        /** 如果請求已經取消的話,就不用在投遞了*/
        if (mRequest.isCanceled()) {
            mRequest.finish("canceled-at-delivery");
            return;
        }

        // Deliver a normal response or error, depending.
        if (mResponse.isSuccess()) {
            mRequest.deliverResponse(mResponse.result);
        } else {
            mRequest.deliverError(mResponse.error);
        }

        // If this is an intermediate response, add a marker, otherwise we're done
        // and the request can be finished.
        if (mResponse.intermediate) {
            mRequest.addMarker("intermediate-response");
        } else {
            mRequest.finish("done");
        }

        // If we have been provided a post-delivery runnable, run it.
        if (mRunnable != null) {
                mRunnable.run();
        }
      }
}
這個 Runnable 會在主線程執行,然后將響應結果傳遞給請求的回調函數。在代碼中的15,17行就是我們的回調函數,每一個請求的響應結果,不論是成功或者是失敗,都會傳遞到這兩個方法中,第15行的 deliverResponse 方法也是一個抽象方法,由子類實現,參照 Volley 提供的 StringRequest 可以看見,在這個方法中,我們最終將期望的對象傳遞給了 Response 中的 onResponse() 方法中,可以看 創建 RequestQueue 對象 這一段落的第一段代碼中的12行
StringRequest stringRequest = new StringRequest(Request.Method.GET, url,
            new Response.Listener<String>() {
    @Override
    public void onResponse(String response) {
        // Display the first 500 characters of the response string.
        mTextView.setText("Response is: "+ response.substring(0,500));
    }
}, new Response.ErrorListener() {
    @Override
    public void onErrorResponse(VolleyError error) {
        mTextView.setText("That didn't work!");
    }
});
請求的結果最終就會被傳遞這 onResponse,onErrorResponse 中。在這里貼一張 Volley 內部的 Response 轉換流程圖:
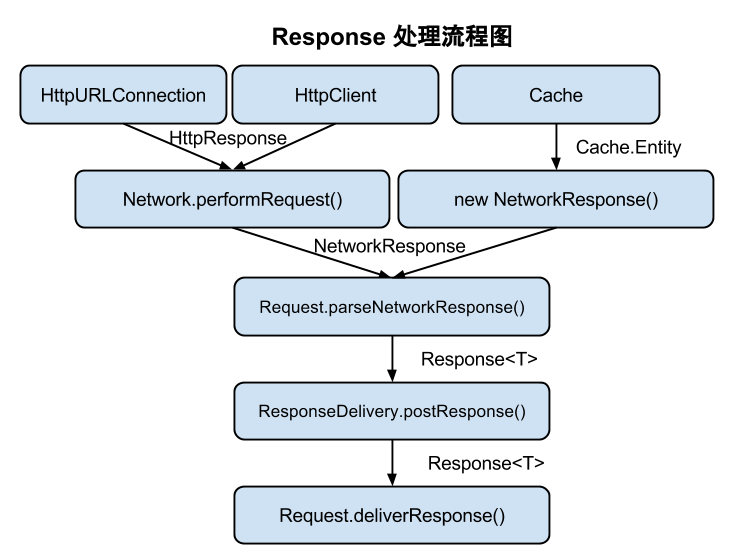
圖片取自codeKK Volley 源碼分析
請求完成 Request#finish(String)
在執行完我們的回調函數之后,會調用 Request 中的 finish() 方法標記請求完成,然后會將我們的請求從請求隊列中移除,以下代碼展示了兩處調用 finish() 的地方:
if (mResponse.intermediate) {
    mRequest.addMarker("intermediate-response");
} else {
    mRequest.finish("done");
}
if (networkResponse.notModified && request.hasHadResponseDelivered()) {
    request.finish("not-modified");
    continue;
}
他們的區別是,第一段代碼的 Response 是從網絡返回的數據,而第二段代碼是代表我們之前傳遞了需要驗證緩存新鮮度的緩存實體,經驗證后緩存新鮮,標記請求完成,大家可以查看一下 Response 的 intermediate 屬性被賦值的時機就明白了。
// Request中的finish()會調用 RequestQueue中的finish()方法
void finish(final String tag) {
    if (mRequestQueue != null) {
         mRequestQueue.finish(this);
    }
}
// RequestQueue#finish(Request)
<T> void finish(Request<T> request) {
    //從當前的請求隊列中移除該請求
    synchronized (mCurrentRequests) {
        mCurrentRequests.remove(request);
    }
    //調用該請求設置的回調函數
    synchronized (mFinishedListeners) {
        for (RequestFinishedListener<T> listener : mFinishedListeners) {
        listener.onRequestFinished(request);
        }
    }
    if (request.shouldCache()) {
        synchronized (mWaitingRequests) {
            String cacheKey = request.getCacheKey();
            Queue<Request<?>> waitingRequests = mWaitingRequests.remove(cacheKey);
            if (waitingRequests != null) {
                if (VolleyLog.DEBUG) {
                    VolleyLog.v("Releasing %d waiting requests for cacheKey=%s.",
                            waitingRequests.size(), cacheKey);
                }
                // Process all queued up requests. They won't be considered as in flight, but
                // that's not a problem as the cache has been primed by 'request'.
                mCacheQueue.addAll(waitingRequests);
            }
        }
    }
}
在移除已經完成的請求之后,如果該請求是可以緩存的,并且存在著等待該請求的等待隊列,就將隊列中的所有請求加入緩存隊列(mCacheQueue) 中去,讓緩存線程接著處理。
補充一點---取消請求
- 可以調用 Request 的 cancel() 方法來標記請求取消,這樣我們的回調函數永遠不會被調用
- 可以調用 RequstQueue 的 cancelAll(Object) 的方法來批量取消被打上 Object 標記的請求
- 可以調用 RequstQueue 的 cancelAll(RequestFilter) 的方法,按照自定義的過濾方法來取消符合過濾條件的請求
抽象的處理流程圖

通過 CacheDispatcher 和 NetworkDispatcher 兩種線程不斷的從 RequestQueue 中取出請求來處理,然后將獲取的數據在子線程解析成我們需要的結果,通過 ResponseDelivery 的 postResponse 方法將結果投遞到主線程中去,觸發回調。
請求緩存和重試機制
再此之前我們先看一下 Request 類中的一些重要屬性和方法:
Request<T>
所有請求的抽象類,T 類型代表請求期望的類型,也是響應最終被解析成的類型。支持 Get,Post,Put,Delete,Options,Trace,Head,Patch 共8種請求,提供 Low,Normal,Hight,Imediate 4種優先級。下面會挑出一些比較重要的字段和方法進行講解:
- mShouldCache,用于標識請求是否允許緩存,緩存需要客戶端和服務器的支持,這個字段僅僅代表客戶端是否支持緩存
- mShouldRetryServerErrors,默認值為 false,代表在服務器返回響應碼在 500~599的范圍內的話(服務器錯誤),不進行請求重試
- mCacheEntry,該請求的緩存實體,在 CacheDispatcher 處理 CacheQueue 中請求的時候,會判斷該請求之前是否有緩存存在,如果存在的話將緩存實體賦值給該字段。用于在服務器返回 304 響應的時候構建 NetworkResponse 對象
- mResponseDelivered,代表該請求的響應結果已經被投遞到主線程,只有在響應被傳遞給主線程的時候標記為 true,它的作用同樣是用來驗證緩存一致性
- abstract protected Response<T> parseNetworkResponse(NetworkResponse response);抽象方法,將請求返回的結果解析成請求期望的類型,具體的解析方式需要子類實現
-
abstract protected void deliverResponse(T response);抽象方法,也同樣需要子類自行實現,將解析后的結果傳遞給請求的回調函數
之前我們有提到過要實現請求緩存需要客戶端和服務器端共同的支持才行。
請求緩存
之前我們說過,緩存機制是需要客戶端和服務器端共同支持的。從客戶端的角度來說:需要實現 Http 緩存相關的語義;從服務器的角度來說:需要允許請求的資源被緩存;我們先來看一些有關于 Http 請求頭和響應頭的概念:
HTTP 響應頭
Cache-Control:指明當前資源的有效期,用來控制從緩存中取數據,還是需要將請求發送到服務器進行驗證,重新取回數據,該頭部有以下幾個值:
- no-cache:使用緩存前必須先向服務器確認其有效性
- no-store:不緩存響應的任何內容,相同的請求都會發送給服務器
- max-age:緩存有效性的最長時間
- must-revalidate:可緩存,但是使用的時候必需向源服務器驗證
- proxy-revalidate:要求中間緩存服務器對緩存的有效性進行確認
- stale-while-revalidate:在這段時間內,允許先使用緩存,但需要向服務器驗證緩存的有效性
Expires:資源失效的日期,如果和 max-age 同時存在,以 max-age 時間為準
ETag:可將資源以字符串形式做唯一性標識的方式,服務器會為每份資源分配對應的 Etag 值
Last-Modified:資源最終被修改的時間
HTTP 請求頭
If-None-Match:如果上一次響應的的響應頭部中帶有 ETag 響應頭,再次請求的時候會將 ETag 的值作為 If-None-Match 請求頭的值,當 If-None-Match 的值與請求資源的 Etag 不一致時,服務器會處理該請求,該字段用來獲取最新的資源
If-Modified-Since:如果上一次響應的響應頭部中帶有 Last-Modified 響應頭,那么再次請求的時候會將 Last-Modified 的值作為 If-Modified-Since 請求頭的值,在If-Modified-Since 字段指定的之后,資源發生了更新,服務器會接受該請求,否則返回 304 響應
Entry
Cache接口中的內部類,代表著緩存實體
- data,這是一個字節數組,其實也就是我們響應的 Content 部分
- etag,用來驗證緩存一致性的標記
- serverDate,數據從服務器返回的時間
- lastModified,訪問的服務器資源上次被修改的時間
- ttl,數據的過期時間,在(softTtl-ttl)這段時間內我們可以使用緩存,但是必須向服務器驗證緩存的有效性
- softTtl,數據的新鮮時間,緩存再次之前一直有效
- responseHeaders,響應頭部
- boolean isExpired(),判斷是否過期,ttl代表的時間小于當前時間就意味著過期了
- boolean refreshNeeded(),顧名思義,當softTtl代表的時間小于當前時間,就代表數據不新鮮了,需要刷新數據
下面我們來看看 Volley 中是怎么利用這些頭部信息來對響應結果進行緩存處理的:
在 NetworkDispatcher 的 run() 方法中有這樣一樣代碼
if (request.shouldCache() && response.cacheEntry != null) {
    mCache.put(request.getCacheKey(), response.cacheEntry);
    request.addMarker("network-cache-written");
}
想要緩存響應結果需要滿足兩個條件,第一條該請求允許緩存,我們創建的每一條請求都是默認支持緩存的;第二條就是響應對象中的緩存實體不為空。那么我們需要看一下緩存實體是在什么時候被創建的,在執行上述的 if 語句判斷之前會執行這么一句代碼 Response<?> response = request.parseNetworkResponse(networkResponse); 通過parseNetworkResponse 方法將 NetworkResponse 對象轉化為 Response 對象,parseNetworkResponse 方法是一個抽象方法,我們看一下 StringRequest 中是如何重寫該方法的:
@Override
protected Response<String> parseNetworkResponse(NetworkResponse response) {
    String parsed;
    try {
        parsed = new String(response.data, HttpHeaderParser.parseCharset(response.headers));
    } catch (UnsupportedEncodingException e) {
        parsed = new String(response.data);
    }
    return Response.success(parsed, HttpHeaderParser.parseCacheHeaders(response));
}
在代碼的最后一行,我們會發現 Response 中的 cacheEntry 字段的值來自于 HttpHeaderParser.parseCacheHeaders(response)方法的返回值,下面我們來看看該方法的內部實現:
public static Cache.Entry parseCacheHeaders(NetworkResponse response) {
    long now = System.currentTimeMillis();

    //提取響應頭部信息
    Map<String, String> headers = response.headers;

    long serverDate = 0;//資源返回時間
    long lastModified = 0;//資源上一次被修改的時間
    long serverExpires = 0;//資源的有效時間,以maxAge為主
    long softExpire = 0;//資源的新鮮時間,如果在該時間內,發起相同的請求,那么可以允許使用緩存的信息,不需要將請求發送給服務器。
    long finalExpire = 0;//緩存過期時間,在該時間之后的請求,都將發送給服務器,無法使用緩存。
    long maxAge = 0;//資源的有效時間,
    //在 staleWhileRevalidate 時間內,我們可以先用緩存數據展示給用戶,在向服務器驗證緩存的有效性
    long staleWhileRevalidate = 0;
    boolean hasCacheControl = false;//代表是否有 Cache-Control 頭部
    boolean mustRevalidate = false;

    String serverEtag = null;//資源在服務器中的標識
    String headerValue;

    headerValue = headers.get("Date");
    if (headerValue != null) {
        serverDate = parseDateAsEpoch(headerValue);
    }
    //獲取 Cache-Contral 頭部的相關信息
    headerValue = headers.get("Cache-Control");
    if (headerValue != null) {
        hasCacheControl = true;
        String[] tokens = headerValue.split(",");
        for (int i = 0; i < tokens.length; i++) {
            String token = tokens[i].trim();
            if (token.equals("no-cache") || token.equals("no-store")) {
            //如果出現了 no-cache,no-store指令,代表服務器不允許緩存響應,返回的 entry 對象為空
                return null;
            } else if (token.startsWith("max-age=")) {
            //如果出現了 max-age指令,那么服務器允許緩存該響應,并且給出響應的過期時間
                try {
                    maxAge = Long.parseLong(token.substring(8));
                } catch (Exception e) {
                }
            } else if (token.startsWith("stale-while-revalidate=")) {
            //這段時間處于新鮮時間和過期時間之間,在這段時間內發起的請求,都可以利用之前的緩存信息,但是需要將請求發送給服務器做驗證,如果是304 響應,則請求結束,不然將重新傳遞響應結果。
                try {
                    staleWhileRevalidate = Long.parseLong(token.substring(23));
                } catch (Exception e) {
                }
            } else if (token.equals("must-revalidate") || token.equals("proxy-revalidate")) {
            //代表不區分新鮮時間與過期時間,到了max-age指定的時間之后,請求都將發送給服務器用來驗證緩存的有效性。
                mustRevalidate = true;
            }
        }
    }

    headerValue = headers.get("Expires");
    if (headerValue != null) {
        serverExpires = parseDateAsEpoch(headerValue);
    }

    headerValue = headers.get("Last-Modified");
    if (headerValue != null) {
        lastModified = parseDateAsEpoch(headerValue);
    }

    serverEtag = headers.get("ETag");

    // 在 Cache-Control 和 Expires 頭部都存在的情況下,以Cache-Control為準
    if (hasCacheControl) {
        softExpire = now + maxAge * 1000;
        finalExpire = mustRevalidate
                    ? softExpire
                    : softExpire + staleWhileRevalidate * 1000;
    } else if (serverDate > 0 && serverExpires >= serverDate) {
    // Default semantic for Expire header in HTTP specification is softExpire.
        softExpire = now + (serverExpires - serverDate);
        finalExpire = softExpire;
    }

    Cache.Entry entry = new Cache.Entry();
    entry.data = response.data;
    entry.etag = serverEtag;
    entry.softTtl = softExpire;
    entry.ttl = finalExpire;
    entry.serverDate = serverDate;
    entry.lastModified = lastModified;
    entry.responseHeaders = headers;

    return entry;
}
這是一個靜態工具方法,用于提取響應頭部的信息,來構建一個 Cache.Entry 類型的緩存對象,針對該方法的分析都已經寫在注釋當中。現在我們已經了解了將響應轉化為緩存的部分,下面我們來看看,Volley 是如何使用緩存的,在上面我們介紹 CacheDispatcher 工作流程的時候已經大致看過了處理緩存請求的過程,下面我再針對緩存的部分具體分析一下,下面是 CacheDispatcher run() 方法的部分代碼:
Cache.Entry entry = mCache.get(request.getCacheKey());
if (entry == null) {
    mNetworkQueue.put(request);
    continue;
}
if (entry.isExpired()) {
    request.addMarker("cache-hit-expired");
    request.setCacheEntry(entry);
    mNetworkQueue.put(request);
    continue;
}
Response<?> response = request.parseNetworkResponse(
            new NetworkResponse(entry.data, entry.responseHeaders));
if (!entry.refreshNeeded()) {
    mDelivery.postResponse(request, response);
} else {
    request.setCacheEntry(entry);
    response.intermediate = true;
    mDelivery.postResponse(request, response, new Runnable() {
        @Override
        public void run() {
            try {
            mNetworkQueue.put(request);
            } catch (InterruptedException e) {
            }
        }
    });
}
先從緩存中取出緩存實體,然后通過 isExpired() 判斷該緩存有無過期,內部是通過 return this.ttl < System.currentTimeMillis(); 的形式來進行比較,ttl 的含義,在??的代碼中我們已經介紹過了,之后通過 return this.softTtl < System.currentTimeMillis();的方式來判斷實體是否需要刷新,softTtl的值我們同樣已經介紹過了,如果不需要刷新,那么我們就可以直接使用緩存,不然的話就需要向服務器驗證緩存的有效性。那么如何通知服務器來進行驗證呢,接下來我們看看執行請求的時候,在 BasicNetwork # performRequest() 中調用 HttpStack 執行請求執行,會調用 addCacheHeaders(headers, request.getCacheEntry()); 方法,用來附加請求頭部信息,我們看看該方法內部的實現:
private void addCacheHeaders(Map<String, String> headers, Cache.Entry entry) {
// If there's no cache entry, we're done.
    if (entry == null) {
    return;
    }

    if (entry.etag != null) {
        headers.put("If-None-Match", entry.etag);
    }
    if (entry.lastModified > 0) {
        Date refTime = new Date(entry.lastModified);
        headers.put("If-Modified-Since",DateUtils.formatDate(refTime));
    }
}
結合我們上面對請求頭的介紹,大家很容易明白這段代碼的意思,如果資源沒有發生改變,就會返回 304 響應碼,告訴我們可以使用之前的緩存,對緩存的分析就到這里。
Byte[] 緩存
再次看一下下面這段代碼:
// Some responses such as 204s do not have content.  We must check.
if (httpResponse.getEntity() != null) {
    responseContents = entityToBytes(httpResponse.getEntity());
} else {
    // Add 0 byte response as a way of honestly representing a
    // no-content request.
    responseContents = new byte[0];
}
這段代碼位于 BasicNetwork 的 performRequest() 方法中,用于將返回的 HttpEntity 對象轉化為 byte[] 對象,這個字節數組最后將用于被轉化為 T 類型的對象,也就是請求期望的對象,我們之所以沒有直接返回 HttpEntity 對象,而把它解析成 byte[] 就是為之后 Request 的子類進行解析提供便利。
接下來,我們看一下用于轉換數據的方法:
private byte[] entityToBytes(HttpEntity entity) throws IOException, ServerError {
    PoolingByteArrayOutputStream bytes =
     new PoolingByteArrayOutputStream(mPool, (int) entity.getContentLength());
    byte[] buffer = null;
    try {
        InputStream in = entity.getContent();
        if (in == null) {
            throw new ServerError();
        }
        buffer = mPool.getBuf(1024);
        int count;
        while ((count = in.read(buffer)) != -1) {
            bytes.write(buffer, 0, count);
        }
        return bytes.toByteArray();
    } finally {
        try {
            // Close the InputStream and release the resources by "consuming the content".
            entity.consumeContent();
        } catch (IOException e) {
            // This can happen if there was an exception above that left the entity in
            // an invalid state.
            VolleyLog.v("Error occurred when calling consumingContent");
        }
        mPool.returnBuf(buffer);
        bytes.close();
    }
}
上面的代碼中有兩種類型對象我們需要注意,一個是 PoolingByteArrayOutputStream 對象 bytes,另一個是 ByteArrayPool 對象 mPool。我們先說一下沒有這兩個對象之前的轉化方式,首先我們從 HttpEntity 打開是一個輸入流,然后構建一個緩沖字節數組 buffer,不斷的將輸入流的數據寫入 buffer 中,在通過 ByteArrayOutputStream 不斷的將 buffer 中的數據輸入到 ByteArrayOutputStream 中的 buf 字節數組中,如果 buf 的大小不夠,將會 new 出新的 byte[] 對象,賦值給 buf
在這個過程中,byte[] 對象被不斷的創建和銷毀,內存不斷的分配和回收,如果處理不斷可能會造成內存泄漏,消耗了系統資源,Volley 通過 ByteArrayPool 和 PoolingByteArrayOutputStream 來解決這個問題,先看一下 ByteArrayPool 的代碼:
public class ByteArrayPool {
    private final List<byte[]> mBuffersByLastUse = new LinkedList<byte[]>();//按照使用順序排列的Buffer緩存
    private final List<byte[]> mBuffersBySize = new ArrayList<byte[]>(64);//按照 byte[]大小排列的Buffer緩存

    /** 當前緩存池中緩存的總大小 */
    private int mCurrentSize = 0;

    /**
     * 緩存池上限,達到這個限制之后,最近最長時間未使用的 byte[]       * 將被丟棄
     */
    private final int mSizeLimit;

    /** 通過 buffer 的大小進行比較 */
    protected static final Comparator<byte[]> BUF_COMPARATOR = new Comparator<byte[]>() {
        @Override
        public int compare(byte[] lhs, byte[] rhs) {
            return lhs.length - rhs.length;
        }
    };
    public ByteArrayPool(int sizeLimit) {
        mSizeLimit = sizeLimit;
    }

    // 從緩存池中獲取所需的 byte[],如果沒有大小合適的 byte[],將新new一個 byte[] 對象
    public synchronized byte[] getBuf(int len) {
        for (int i = 0; i < mBuffersBySize.size(); i++) {
            byte[] buf = mBuffersBySize.get(i);
            if (buf.length >= len) {
                mCurrentSize -= buf.length;
                mBuffersBySize.remove(i);
                mBuffersByLastUse.remove(buf);
                return buf;
            }
        }
        return new byte[len];
    }

    // 將使用后的 byte[] 返還給 緩存池
    public synchronized void returnBuf(byte[] buf) {
        if (buf == null || buf.length > mSizeLimit) {
            return;
        }
        mBuffersByLastUse.add(buf);
        int pos = Collections.binarySearch(mBuffersBySize, buf, BUF_COMPARATOR);
        if (pos < 0) {
            pos = -pos - 1;
        }
        mBuffersBySize.add(pos, buf);
        mCurrentSize += buf.length;
        trim();
    }

    // 對緩存池數據進行修剪
    private synchronized void trim() {
        while (mCurrentSize > mSizeLimit) {
            byte[] buf = mBuffersByLastUse.remove(0);
            mBuffersBySize.remove(buf);
            mCurrentSize -= buf.length;
        }
    }

}
簡單的來說就是,ByteArrayPool 通過在內存中維護了兩組 byte[] 對象,來減少重復創建 byte[] 的次數。當我們需要使用 byte[] 的時候,通過 Pool 來獲取一個 byte[],當使用完畢的時候,再將該字節數組返回給 Pool。
在來看看 PoolingByteArrayOutputStream 的代碼,他是 ByteArrayOutputStream 的子類,內部使用了 ByteArrayPool 來代替 new Byte[]操作,提高性能:
public class PoolingByteArrayOutputStream extends ByteArrayOutputStream {
    /**
     * 默認的 buf 大小
     */
    private static final int DEFAULT_SIZE = 256;

    private final ByteArrayPool mPool;

    /**
     * 如果寫入的數據超出 buf 的大小,將會擴展 buf 的大小,之前通過 new Byte[] 來分配更大的空間,現在通過 ByteArrayPool 提供,避免創建對象
     */
    public PoolingByteArrayOutputStream(ByteArrayPool pool) {
        this(pool, DEFAULT_SIZE);
    }
    public PoolingByteArrayOutputStream(ByteArrayPool pool, int size) {
        mPool = pool;
        buf = mPool.getBuf(Math.max(size, DEFAULT_SIZE));
    }
    //關閉輸出流,將使用的 buf 歸還到緩沖池中
    @Override
    public void close() throws IOException {
        mPool.returnBuf(buf);
        buf = null;
        super.close();
    }

    // GC 的時候調用,我們不能保證高方法的觸發時機,所以最好手動調用 close 方法
    @Override
    public void finalize() {
        mPool.returnBuf(buf);
    }

    /**
     * 擴展 Buf 的大小
     */
    private void expand(int i) {
        // 判斷 buffer 能否處理更多的byte,不能的話將要擴展 buffer 的大小
        if (count + i <= buf.length) {
            return;
        }
        byte[] newbuf = mPool.getBuf((count + i) * 2);
        System.arraycopy(buf, 0, newbuf, 0, count);
        mPool.returnBuf(buf);
        buf = newbuf;
    }

    @Override
    public synchronized void write(byte[] buffer, int offset, int len) {
        expand(len);
        super.write(buffer, offset, len);
    }

    @Override
    public synchronized void write(int oneByte) {
        expand(1);
        super.write(oneByte);
    }
}
內部的操作很簡單,在每次寫入的時候都會檢查 buffer 大小是否合適,是否需要擴展,在輸出流結束的時候,我們需要手動顯示調用 close 方法,來歸還從 ByteArrayPool 中擴展的 byte[]
請求重試
RetryPolicy
RetryPolicy 接口,代表著請求重試的行為:
public interface RetryPolicy {
    //當前超時的時間
    int getCurrentTimeout();
    //當前重試的次數
    int getCurrentRetryCount();

    /**
     * 準備重試
     * 當拋出 VolleyError 即意味著停止重試
     */
    void retry(VolleyError error) throws VolleyError;
}
在我們初始化 Request 的時候,會給 Request 設置一個默認的重試策略 DefaultRetryPolicy 下面我們來看看它的代碼:
DefaultRetryPolicy
public class DefaultRetryPolicy implements RetryPolicy {
    /** 當前超時毫秒數. */
    private int mCurrentTimeoutMs;

    /** 當前重試次數. */
    private int mCurrentRetryCount;

    /** 最大重試次數. */
    private final int mMaxNumRetries;

    /** 超時乘積因子,用來累計計算超時時間. */
    private final float mBackoffMultiplier;

    /** 默認超時時間 */
    public static final int DEFAULT_TIMEOUT_MS = 2500;

    /** 默認重試次數 */
    public static final int DEFAULT_MAX_RETRIES = 1;

    /** 默認超時乘積因子 */
    public static final float DEFAULT_BACKOFF_MULT = 1f;

    public DefaultRetryPolicy() {
        this(DEFAULT_TIMEOUT_MS, DEFAULT_MAX_RETRIES, DEFAULT_BACKOFF_MULT);
    }

    public DefaultRetryPolicy(int initialTimeoutMs, int maxNumRetries, float backoffMultiplier) {
        mCurrentTimeoutMs = initialTimeoutMs;
        mMaxNumRetries = maxNumRetries;
        mBackoffMultiplier = backoffMultiplier;
    }

    /**
     * 返回當前超時時間
     */
    @Override
    public int getCurrentTimeout() {
        return mCurrentTimeoutMs;
    }

    /**
     * 返回當前重試次數.
     */
    @Override
    public int getCurrentRetryCount() {
        return mCurrentRetryCount;
    }

    /**
     * 返回超時乘積因子.
     */
    public float getBackoffMultiplier() {
        return mBackoffMultiplier;
    }

    /**
     * 為下一次重試計算重試時間
     * @param error 上一次請求的錯誤.
     */
    @Override
    public void retry(VolleyError error) throws VolleyError {
        mCurrentRetryCount++;
        //累計下一次重試的時間
        mCurrentTimeoutMs += (mCurrentTimeoutMs * mBackoffMultiplier);
        if (!hasAttemptRemaining()) {
            throw error;
        }
        //拋出參數中傳入的錯誤,就代表停止重試
    }

    /**
     * 判斷是否允許下一次重試
     */
    protected boolean hasAttemptRemaining() {
        return mCurrentRetryCount <= mMaxNumRetries;
    }
}
默認的重試策略也挺簡單的,每一次累計超時的時間,然后判斷是否到達重試的上限,如果達到上限,就拋出入參的 VolleyError 代表停止重試,那么為什么拋出傳入的參數,就可以停止重試了呢,我們繼續看看 BasicNetwork 中的 performRequest() 方法:
public NetworkResponse performRequest(Request<?> request) throws VolleyError {
    while (true) {
        try{

              //........省略

        } catch (SocketTimeoutException e) {
            attemptRetryOnException("socket", request, new TimeoutError());
        } catch (ConnectTimeoutException e) {
            attemptRetryOnException("connection", request, new TimeoutError());
        } catch (MalformedURLException e) {
            throw new RuntimeException("Bad URL " + request.getUrl(), e);
        } catch (IOException e) {
            int statusCode;
            if (httpResponse != null) {
                statusCode = httpResponse.getStatusLine().getStatusCode();
            } else {
                throw new NoConnectionError(e);
            }
            VolleyLog.e("Unexpected response code %d for %s", statusCode, request.getUrl());
            NetworkResponse networkResponse;
            if (responseContents != null) {
                networkResponse = new NetworkResponse(statusCode, responseContents,responseHeaders, false, SystemClock.elapsedRealtime() - requestStart);
                if (statusCode == HttpStatus.SC_UNAUTHORIZED ||
                    statusCode == HttpStatus.SC_FORBIDDEN) {
                    attemptRetryOnException("auth",
                    request, new AuthFailureError(networkResponse));
                } else if (statusCode >= 400 && statusCode <= 499) {
                    // Don't retry other client errors.
                    throw new ClientError(networkResponse);
                } else if (statusCode >= 500 && statusCode <= 599) {
                    if (request.shouldRetryServerErrors()) {
                        attemptRetryOnException("server",
                        request, new ServerError(networkResponse));
                    } else {
                        throw new ServerError(networkResponse);
                    }
                } else {
                    // 3xx? No reason to retry.
                    throw new ServerError(networkResponse);
                }
            } else {
                attemptRetryOnException("network", request, new NetworkError());
            }
        }
    }
}
這部分的代碼我們在上面分析 BasicNetwork 的代碼的時候已經介紹過了,當時省略了 catch 塊中的代碼,catch 塊中的代碼就是用來實現請求重試的。
當捕獲到 SocketTimeoutException 和 ConnectTimeoutException 異常的時候調用 attemptRetryOnException() 方法來進行重試,該方法中會調用 retryPolicy.retry(exception);方法,該方法我們已經分析過了,是用來計算請求超時時間,以及是否達到重試上限,如果可以重試,那么該方法執行完,會繼續下一次循環,再次發起請求;當達到重試上線,無法進行重試的時候我們會拋出 VolleyError 的實例,在 BasicNetwork#performRequest() 中我們沒有捕獲 VolleyError 異常,因次會跳出循環,停止重試,該方法執行結束,在外部 NetworkDispatcher 的 run() 方法中捕獲了該異常,將異常結果傳遞到主線程中供回調函數處理。
- ConnectTimeoutException 表示請求超時
- SocketTimeoutException 表示響應超時
在代碼中同樣對 AuthFailureError 以及服務器異常提供了重試操作。
一些總結
- Volley 可以幫助我們完成請求的自動調度處理,我們只需要將 Request 加入 RequestQueue 就可以了
- 提供了多個并發線程幫助處理請求,但是不適合大文件下載,因為在響應解析的過程中,會將所有響應的數據保存在內存中
- 提供了緩存(一定程度上符合 HTTP 語義)
- 支持請求的優先級,可以方便的取消請求(根據 Tag 或者自定義的過濾規則)
- 提供了請求重試機制,可以自定義重試機制(簡單,方便)
- Volley 面向接口編程,采用組合(少用繼承)的形式提供功能,可以自定義 Network,HttpStack,Cache 等實現,擴展性很高
