Demo github地址: https://github.com/liuzhiyi1992/ZYThumbnailTableView
本人博客原文:http://zyden.vicp.cc/zythumbnailtableview/
歡迎轉載,請注明出處,謝謝
后期會更新oc版本
可展開型預覽TableView,開放接口,完全自由定制
雖然最近很忙,天天被html+css虐待,但是在許多朋友的壓力下,最近還是抽空完成了一個新輪子ZYThumbnailTableView。以下嚴格按照小學語文老師教的方式排版:
Summary:
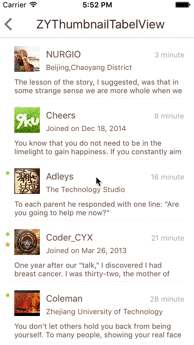
tableView的皮膚,類似一個小型app的強大交互心臟,四肢高度解耦高度自由定制,每個cell其實都是一個業務的縮略view,原諒我語文不太好不懂表達,這樣的縮略view下文就叫做thumbnailView,可以根據上下手勢展開更多的功能視圖塊,這些視圖塊已經開放了接口,支持使用者自己diy提供創建,同時接口中帶的參數基本滿足使用者需要的交互,當然tableviewCell也是完全自由diy的,規矩,先上效果圖。

工作特點:tableViewCell充當一個縮略內容的容器,初始內容展示局限于cellHeight,當cell被點擊后,根據縮略view內容重新計算出完整的高度,裝入另外一個容器中完整展示出來,并且可以上下拖拽擴展出上下功能視圖。
自由定制:看見的除了功能以外,全部視圖都開放接口靈活Diy,tableViewCell,頭部擴展視圖(topView),底部擴展視圖(bottomView)都是自己提供。
使用簡單:只需要把自己的tableViewCell,topView,bottomView配置給ZYThumbnailTableViewController對象。
profile(可略過):
Block:
- ConfigureTableViewCellBlock = () -> UITableViewCell?
- UpdateTableViewCellBlock = (cell: UITableViewCell, -indexPath: NSIndexPath) -> Void
- CreateTopExpansionViewBlock = (indexPath: NSIndexPath) -> UIView
- CreateBottomExpansionViewBlock = () -> UIView
Define:
- NOTIFY_NAME_DISMISS_PREVIEW
通知名(讓展現出來的thumbnailView消失) - MARGIN_KEYBOARD_ADAPTATION
自動處理鍵盤遮擋輸入控件后,鍵盤與輸入控件保持的間距(自動處理鍵盤遮擋事件使用ZYKeyboardUtil實現 - TYPE_EXPANSION_VIEW_TOP
處理展開抖動事件時,頂部擴展控件的標識 - TYPE_EXPANSION_VIEW_BOTTOM
處理展開抖動事件時,底部擴展控件的標識
Property:
開放:
- tableViewCellHeight
- tableViewDataList
- tableViewCellReuseId
- tableViewBackgroudColor
- keyboardAdaptiveView 你自定義控件里如果有希望不被鍵盤遮擋的輸入控件,賦值給他,會幫你==自動處理遮蓋事件==
私有: - mainTableView
- clickIndexPathRow 記錄被點擊cell的indexPath row
- spreadCellHeight 存儲thumbnailCell展開后的真實高度
- cellDictionary 存儲所有存活中的cell
- thumbnailView 縮略view
- thumbnailViewCanPan 控制縮略view展開(擴展topView&buttomView)手勢是否工作
- animator UI物理引擎控制者
- expandAmplitude view展開時抖動動作的振幅
- keyboardUtil 自動處理鍵盤遮擋事件工具對象ZYKeyboardUtil
Delegate func:
- optional func zyTableViewDidSelectRow(tableView: UITableView, indexPath: NSIndexPath)
對外會用到的func:
- dismissPreview()
讓thumbnailView消失,在TopView,BottomView等沒有zyThumbnailTableView對象的地方可以使用通知NOTIFY_NAME_DISMISS_PREVIEW - reloadMainTableView()
重新加載tableView
Usage:
------結合Demo介紹使用方法:
創建ZYThumbnailTableViewController對象:
zyThumbnailTableVC = ZYThumbnailTableViewController()
配置tableViewCell必須的參數:cell高,cell的重用標志符,tableView的數據源等
zyThumbnailTableVC.tableViewCellReuseId = "DIYTableViewCell"
zyThumbnailTableVC.tableViewCellHeight = 100.0
//當然cell高可以在任何時候動態配置
zyThumbnailTableVC.tableViewDataList = dataList
zyThumbnailTableVC.tableViewBackgroudColor = UIColor.whiteColor()
//背景顏色可不設置,默認為白色
接下來給ZYTableView配置你自己的tableViewCell,當然除了createCell外還可以在里面進行其他額外的操作,不過這個Block只會在需要生成cell的時候被調用,而重用cell并不會
//--------insert your diy tableview cell
zyThumbnailTableVC.configureTableViewCellBlock = {
    return DIYTableViewCell.createCell()
}
配置cell的update方法,tableView配置每個cell必經之處,除了updateCell可以添加額外的操作。這里要注意updateCell的時候建議盡量使用zyThumbnailTableVC對象里的數據源datalist,同時要注意時刻保證VC對象里的數據源為最新,接口回調更改數據源時不要忘了對zyThumbnailTableVC.tableViewDataList的更新。
zyThumbnailTableVC.updateTableViewCellBlock =  { [weak self](cell: UITableViewCell, indexPath: NSIndexPath) -> Void in
    let myCell = cell as? DIYTableViewCell
    //Post是我的數據model
    guard let dataSource = self?.zyThumbnailTableVC.tableViewDataList[indexPath.row] as? Post else {
        print("ERROR: illegal tableview dataSource")
        return
    }
    myCell?.updateCell(dataSource)
}
配置你自己的頂部擴展視圖 & 底部擴展視圖(expansionView)
- 兩個Block均提供indexPath參數,只是因為我的BottomView的業務暫時不需要識別對應的是哪個cell,所以使用時把參數省略掉了。
- 這里還有一個對zyThumbnailTableVC.keyboardAdaptiveView的賦值,是因為我的BottomView中包含有TextField,正如上文所說,
ZYKeyboardUtil會自動幫我處理鍵盤遮擋事件。(==注意==:賦值給keyboardAdaptiveView的和我往Block里送的是同一個對象)
//--------insert your diy TopView
zyThumbnailTableVC.createTopExpansionViewBlock = { [weak self](indexPath: NSIndexPath) -> UIView in
    //Post是我的數據model
    let post = self?.zyThumbnailTableVC.tableViewDataList[indexPath.row] as! Post
    let topView = TopView.createView(indexPath, post: post)!
    topView.delegate = self;
    return topView
}

let diyBottomView = BottomView.createView()!
//--------let your inputView component not cover by keyboard automatically (animated) (ZYKeyboardUtil)
zyThumbnailTableVC.keyboardAdaptiveView = diyBottomView.inputTextField;
//--------insert your diy BottomView
zyThumbnailTableVC.createBottomExpansionViewBlock = { _ in
    return diyBottomView
}
結合ZYKeyboardUtil工作的效果:
就這樣,屬于你自己的thumbnailtableView就完成了。展開,關閉,基本功能上都能使用,但是如果在topView,bottomView中有什么交互功能之類的,就要在自己的頭部尾部擴展控件和自定義的tableViewCell里面完成了,ZYThumbnailTableView提供cell的
indexPath貫通三者通訊交流。回看下Demo中的交互是怎樣利用
indexPath的: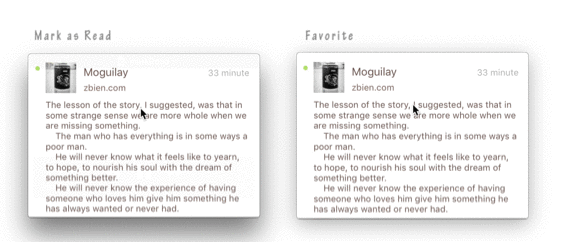
- 標記為已讀后,小圓點會消失
- 標識為喜歡后,會在對應的cell旁邊出現一個星星
createView的時候我將從createTopExpansionViewBlock參數中得到的indexPath儲存在我的topView對象中,當favorite按鈕被點擊時就可以indexPath為憑據利用代理改變對應數據源里的對應狀態,同時在下次createView時根據indexPath取得對應的數據源來顯示。如果這些交互會更新一些與cell相關的數據,還可以在代理方法中調用zyThumbnailTableVC.reloadMainTableView()讓tableView重新加載一遍。
//TopView---------------------------------------------
class func createView(indexPath: NSIndexPath, post: Post) -> TopView? {
    //--------do something
    view.indexPath = indexPath
    return view
}

//touch up inside---------------------------------------------
@IBAction func clickFavoriteButton(sender: UIButton) {
    //--------do something
    delegate.topViewDidClickFavoriteBtn?(self)
}

//代理方法---------------------------------------------
func topViewDidClickFavoriteBtn(topView: TopView) {
    let indexPath = topView.indexPath
    //Post是我的數據model
    let post = zyThumbnailTableVC.tableViewDataList[indexPath.row] as! Post
    post.favorite = !post.favorite
    zyThumbnailTableVC.reloadMainTableView()
}
還有對于導航條樣式處理的話,Demo中直接在外面對zyThumbnailTableView對象的navigationItem做處理,亦或者可以在我的源代碼中讓ZYThumbnailTabelViewController繼承你封裝過導航欄樣式的父類。
func configureZYTableViewNav() {
        let titleView = UILabel(frame: CGRectMake(0, 0, 200, 44))
        titleView.text = "ZYThumbnailTabelView"
        titleView.textAlignment = .Center
        titleView.font = UIFont.systemFontOfSize(20.0);
        //503f39
        titleView.textColor = UIColor(red: 63/255.0, green: 47/255.0, blue: 41/255.0, alpha: 1.0)
        zyThumbnailTableVC.navigationItem.titleView = titleView
    }
==今天一次跟那么Block接觸,還是那一句,注意循環引用問題。==
附上一張層級示意圖:
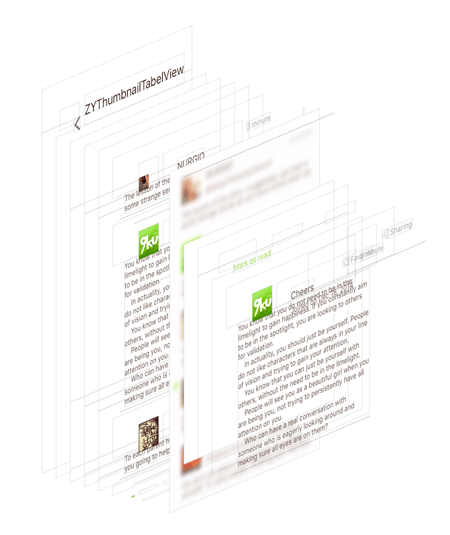
感謝我們公司的UI朋友,設計上的強迫癥要趕上我代碼上的強迫癥了。
CocoaPods:
pod 'ZYThumbnailTableView', '~> 0.2.1'
Relation:
@liuzhiyi1992 on Github
License:
ZYThumbnailTableView is released under the MIT license. See LICENSE for details.
輪子不一定適合所有人,但是希望分享造輪子上螺絲的過程,和扳手螺絲刀的更多使用技巧,毫無保留,全在代碼里了。交流,快樂!
Demo & 源代碼
有什么問題可以在github中提交issues交流,謝謝
