第一節(jié):初識(shí)Angular-CLI
第二節(jié):登錄組件的構(gòu)建
第三節(jié):建立一個(gè)待辦事項(xiàng)應(yīng)用
第四節(jié):進(jìn)化!模塊化你的應(yīng)用
第五節(jié):多用戶版本的待辦事項(xiàng)應(yīng)用
第六節(jié):使用第三方樣式庫(kù)及模塊優(yōu)化用
第七節(jié):給組件帶來(lái)活力
Rx--隱藏在Angular 2.x中利劍
Redux你的Angular 2應(yīng)用
第八節(jié):查缺補(bǔ)漏大合集(上)
第九節(jié):查缺補(bǔ)漏大合集(下)
第八章:查缺補(bǔ)漏大合集(上)
這一章其實(shí)是我在前七章讀者評(píng)論和私信交流時(shí)發(fā)現(xiàn)很多點(diǎn)我是要么漏掉了,要么自己理解有誤。那這第八和第九章就來(lái)做一個(gè)小總結(jié)吧。本章我們討論如何在Angular2中引入第三方JS庫(kù)、惰性加載路由和子路由。
第三方JS類庫(kù)的引入
這個(gè)是許多人的困惑,我們?cè)贏ngular2中使用了TypeScript,但大量的類庫(kù)是沒(méi)有TypeScript怎么辦?其實(shí)不用擔(dān)心,非常簡(jiǎn)單。但在講方法前,我們最好還是理解一下背景。
為什么JS不能直接使用
由于TypeScript是一個(gè)強(qiáng)類型語(yǔ)言,所以對(duì)于第三方類庫(kù),我們需要知道它們的JavaScript里面的暴露給外部使用的這些對(duì)象和方法的類型定義是什么。
這個(gè)類型定義文件長(zhǎng)什么樣呢?我們來(lái)看一看,你可以進(jìn)入工程下的node_modules中的 @angular/common/src/directives/ng_class.d.ts:
import { DoCheck, ElementRef, IterableDiffers, KeyValueDiffers, Renderer } from '@angular/core';
/**
 * @ngModule CommonModule
 *
 * @whatItDoes Adds and removes CSS classes on an HTML element.
 *
 * @description
 *
 * The CSS classes are updated as follows, depending on the type of the expression evaluation:
 * - `string` - the CSS classes listed in the string (space delimited) are added,
 * - `Array` - the CSS classes declared as Array elements are added,
 * - `Object` - keys are CSS classes that get added when the expression given in the value
 *              evaluates to a truthy value, otherwise they are removed.
 *
 * @stable
 */
export declare class NgClass implements DoCheck {
    private _iterableDiffers;
    private _keyValueDiffers;
    private _ngEl;
    private _renderer;
    private _iterableDiffer;
    private _keyValueDiffer;
    private _initialClasses;
    private _rawClass;
    constructor(_iterableDiffers: IterableDiffers, _keyValueDiffers: KeyValueDiffers, _ngEl: ElementRef, _renderer: Renderer);
    klass: string;
    ngClass: string | string[] | Set<string> | {
        [klass: string]: any;
    };
    ngDoCheck(): void;
    private _cleanupClasses(rawClassVal);
    private _applyKeyValueChanges(changes);
    private _applyIterableChanges(changes);
    private _applyInitialClasses(isCleanup);
    private _applyClasses(rawClassVal, isCleanup);
    private _toggleClass(klass, enabled);
}
可以看到這個(gè)文件其實(shí)就是用來(lái)做類型定義聲明的,我們一般把這種以 .d.ts 后綴結(jié)尾的文件叫做類型定義文件(Type Definition)。有了這個(gè)聲明定義,我們就可以在TypeScript中使用了。這個(gè)文件看起來(lái)也挺麻煩的,事實(shí)上真正需要你自己動(dòng)手寫的類庫(kù)很少。我們來(lái)看一下一般的集成第三方類庫(kù)的過(guò)程是什么樣子的。
標(biāo)準(zhǔn)的JS庫(kù)引入方法
我們拿百度的echarts (https://github.com/ecomfe/echarts)圖表類庫(kù)的集成來(lái)說(shuō)明一下。我們先安裝其npm包,在命令行窗口輸入 npm install --save echarts ,然后我們安裝其類型定義文件,在命令行窗口輸入 npm install --save-dev @types/echarts 。然后。。就沒(méi)有然后了。這么簡(jiǎn)單嗎?是滴。
注意兩件事,首先我們安裝時(shí)使用了 --save-dev 開關(guān),因?yàn)檫@個(gè)類型定義文件只對(duì)開發(fā)時(shí)有用,它并不是我們工程的依賴,只是為了編寫時(shí)的方便。
第二件事我們使用了 @types/echarts 這樣一個(gè)有點(diǎn)怪的名稱,其實(shí)是這樣的,微軟維護(hù)了一個(gè)海量的類型定義數(shù)據(jù)中心,這個(gè)就是 @types。那么我們?yōu)榱藢ふ襡charts就會(huì)在 @types 這個(gè)目錄下搜索它的二級(jí)目錄。
這樣安裝之后,你可以在本地工程目錄下的 node_modules/@types/echarts/index.d.ts 找到echarts的定義:
// Type definitions for echarts
// Project: http://echarts.baidu.com/
// Definitions by: Xie Jingyang <https://github.com/xieisabug>
// Definitions: https://github.com/DefinitelyTyped/DefinitelyTyped

declare namespace ECharts {
    function init(dom:HTMLDivElement|HTMLCanvasElement, theme?:Object|string, opts?:{
        devicePixelRatio?: number
        renderer?: string
    }):ECharts;

   …//此處省略大部分聲明,可以查閱本地文件
}

declare module "echarts" {
    export = ECharts;
}
一般情況下,到這步就結(jié)束了,此時(shí)我們可以試驗(yàn)一下是否可以使用了,在一個(gè)組件文件中嘗試引入echarts,如果你看到了智能提示中有你希望引入的類庫(kù)中的方法或?qū)ο螅蔷鸵磺许樌酉聛?lái)就可以正常使用這個(gè)類庫(kù)了。

引入庫(kù)的特殊情況
但有的時(shí)候,我們執(zhí)行第二步 npm install --save-dev @types/echarts 時(shí),會(huì)發(fā)現(xiàn)沒(méi)有找到對(duì)應(yīng)的類型定義文件。這個(gè)時(shí)候怎么辦呢?
這時(shí)候要分兩種情況看,首先應(yīng)該去檢查一下node_modules目錄中的你要使用的類庫(kù)子目錄(本例中是echarts)中是否有類型定義文件,因?yàn)橛械念悗?kù)會(huì)把類型定義文件直接打包在npm的包中。比如我們前幾章接觸的angular-uuid,這個(gè)類庫(kù)其實(shí)就是直接把類型定義文件打包在npm package中的。看下圖,如果是這種情況,那么我們什么都不需要做,直接使用就好了。

當(dāng)然還有一種情形就是,這樣也找不到,或者這個(gè)類庫(kù)是我們的團(tuán)隊(duì)已有的、自己寫的等等情況。這時(shí)候就得自己寫一下,也很簡(jiǎn)單,在 src/typings.d.ts 中加上一行:
declare module 'echarts';
然后在要使用此類庫(kù)的組件中引入:
import * as echarts from 'echarts';
后面就可以正常使用了,當(dāng)然這種添加方式是沒(méi)有智能提示和自動(dòng)完成的,你需要自己保證調(diào)用的正確性。如果覺得不爽,還是希望有提示、類型檢查等等,那就得自己寫一個(gè)類型定義文件了,可以參考 https://basarat.gitbooks.io/typescript/content/docs/types/ambient/d.ts.html 去編寫自己的類型定義文件。
惰性路由和子路由
惰性路由
在需求和功能不斷添加和修改之后,應(yīng)用的尺寸將會(huì)變得更大。在某一個(gè)時(shí)間點(diǎn),我們將達(dá)到一個(gè)頂點(diǎn),應(yīng)用 將會(huì)需要過(guò)多的時(shí)間來(lái)加載。這會(huì)帶來(lái)一定的性能問(wèn)題。
如何才能解決這個(gè)問(wèn)題呢?Angular2引進(jìn)了異步路由,我們可以惰性加載指定的模塊或組件。這樣給我們帶來(lái)了下列好處:
- 可以繼續(xù)開發(fā)我們的新功能,但不再增加初始加載文件的大小。
- 只有在用戶請(qǐng)求時(shí)才加載特定模塊。
- 為那些只訪問(wèn)應(yīng)用程序某些區(qū)域的用戶加快加載速度
還是我們一起打造一個(gè)例子說(shuō)明一下,之后大家就可以清楚的理解這個(gè)概念了。我們新建一個(gè)叫Playground的module。打開一個(gè)命令行窗口,輸入 ng g m playgorund ,這樣Angular CLI非常聰明的幫我們建立了PlaygroundModule,不光如此,它還幫我們建立了一個(gè)PlaygroundComponent。因?yàn)橐话銇?lái)說(shuō),我們新建一個(gè)模塊肯定會(huì)至少有一個(gè)組件的。
由于要做惰性加載,我們并不需要在根模塊AppModule中引入這個(gè)模塊,所以我們檢查一下根模塊 src/app/app.module.ts 中是否引入了PlaygroundModule,如果有,請(qǐng)去掉。
首先為PlaygroundModule建立自己模塊的路由,我們?nèi)绻袷谿oogle的代碼風(fēng)格建議的話,那么就應(yīng)該為每個(gè)模塊建立獨(dú)立的路由文件。
const routes: Routes = [
  { path: '', component: PlaygroundComponent },
];

@NgModule({
  imports: [ RouterModule.forChild(routes) ],
  exports: [ RouterModule ],
})
export class PlaygroundRoutingModule { }
在src/app/app-routing.module.ts中我們要添加一個(gè)惰性路由指向PlaygroundModule
import { NgModule }     from '@angular/core';
import { Routes, RouterModule } from '@angular/router';
import { LoginComponent } from './login/login.component';
import { AuthGuardService } from './core/auth-guard.service';

const routes: Routes = [
  {
    path: '',
    redirectTo: 'login',
    pathMatch: 'full'
  },
…
  {
    path: 'playground',
    loadChildren: 'app/playground/playground.module#PlaygroundModule',
  }
];

@NgModule({
  imports: [
    RouterModule.forRoot(routes)
  ],
  exports: [
    RouterModule
  ]
})
export class AppRoutingModule {}
在這段代碼中我們看到一個(gè)新面孔,loadChildren 。路由器用 loadChildren 屬性來(lái)映射我們希望惰性加載的模塊文件,這里是 PlaygroundModule 。路由器將接收我們的 loadChildren 字符串,并把它動(dòng)態(tài)加載進(jìn) PlaygroundModule ,它的路由被動(dòng)態(tài)合并到我們的配置中,然后加載所請(qǐng)求的路由。但只有在首次加載該路由時(shí)才會(huì)這樣做,后續(xù)的請(qǐng)求都會(huì)立即完成。
app/playground/playground.module#PlaygroundModule 這個(gè)表達(dá)式是這樣的規(guī)則:模塊的路徑#模塊名稱
現(xiàn)在我們回顧一下,在應(yīng)用啟動(dòng)時(shí),我們并沒(méi)有加載PlaygroundModule,因?yàn)樵贏ppModule中沒(méi)有它的引用。但是當(dāng)你在瀏覽器中手動(dòng)輸入 http://localhost:4200/playground 時(shí),系統(tǒng)在此時(shí)加載 PlaygroundModule。
子路由
程序復(fù)雜了之后,一層的路由可能就不會(huì)夠用了,在一個(gè)模塊內(nèi)部由于功能較復(fù)雜,需要再劃分出二級(jí)甚至更多級(jí)別的路徑。這種情況下我們就需要Angular2提供的一個(gè)內(nèi)建功能叫做:子路由。
我們向來(lái)認(rèn)為例子是最好的說(shuō)明,所以還是來(lái)做一個(gè)小功能:現(xiàn)在我們需要對(duì)一個(gè)叫playground的路徑下添加子路由,子路由有2個(gè):one和two。其中one下面還有一層路徑叫three。形象的表示一下,就像下面的結(jié)構(gòu)一樣。
/playground---|
              |/one
              |--------|three
              |/two
那么我們還是先在項(xiàng)目工程目錄輸入 ng g c playground/one,然后再執(zhí)行 ng g c playground/two ,還有一個(gè)three,所以再來(lái):ng g c playground/three 。
現(xiàn)在我們有了三個(gè)組件,看看怎么處理路由吧,原有的模塊路由文件如下:
import { NgModule } from '@angular/core';
import { Routes, RouterModule } from '@angular/router';

import { PlaygroundComponent } from './playground.component';

const routes: Routes = [
  {
    path: '',
    component: PlaygroundComponent
  },
];

@NgModule({
  imports: [ RouterModule.forChild(routes) ],
  exports: [ RouterModule ],
})
export class PlaygroundRoutingModule { }
我們首先需要在模塊的根路由下添加one和two,Angular2在路由定義數(shù)組中對(duì)于每個(gè)路由定義對(duì)象都有一個(gè)屬性叫做children,這里就是指定子路由的地方了。所以在下面代碼中我們把one和two都放入了children數(shù)組中。
import { NgModule } from '@angular/core';
import { Routes, RouterModule } from '@angular/router';

import { PlaygroundComponent } from './playground.component';
import { OneComponent } from './one/one.component';
import { TwoComponent } from './two/two.component';

const routes: Routes = [
  {
    path: '',
    component: PlaygroundComponent,
    children: [
      {
        path: 'one',
        component: OneComponent,
      },
      {
        path: 'two',
        component: TwoComponent
      }
    ]
  },
];

@NgModule({
  imports: [ RouterModule.forChild(routes) ],
  exports: [ RouterModule ],
})
export class PlaygroundRoutingModule { }
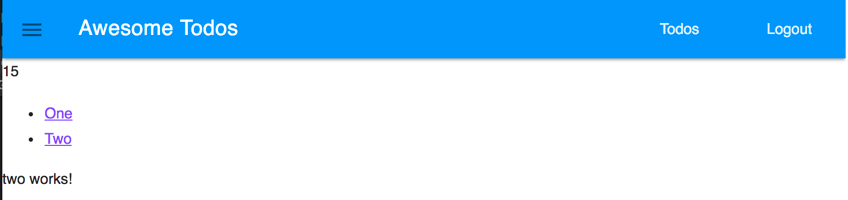
這只是定義了路由數(shù)據(jù),我們還需要在某個(gè)地方顯示路由指向的組件,那么這里面我們還是在PlaygroundComponent的模版中把路由插座放入吧。
<ul>
  <li><a routerLink="one">One</a></li>
  <li><a routerLink="two">Two</a></li>
</ul>

<router-outlet></router-outlet>
現(xiàn)在我們?cè)囼?yàn)一下,打開瀏覽器輸入 http://localhost:4200/playground 我們看到兩個(gè)鏈接,你可以分別點(diǎn)一下,觀察地址欄。應(yīng)該可以看到,點(diǎn)擊one時(shí),地址變成 http://localhost:4200/playground/one 在我們放置路由插座的位置也會(huì)出現(xiàn)one works。當(dāng)然點(diǎn)擊two時(shí)也會(huì)有對(duì)應(yīng)的改變。這說(shuō)明我們的子路由配置好用了!
當(dāng)然有的時(shí)候還需要更深的層級(jí)的子路由,其實(shí)也很簡(jiǎn)單。就是重復(fù)我們剛才做的就好,只不過(guò)要在對(duì)應(yīng)的子路由節(jié)點(diǎn)上。下面我們還是演練一下,在點(diǎn)擊one之后我們希望到達(dá)一個(gè)有子路由的頁(yè)面(也就是子路由的子路由)。于是我們?cè)贠neComponent節(jié)點(diǎn)下又加了children,然后把ThreeComponent和對(duì)應(yīng)的路徑寫入
import { NgModule } from '@angular/core';
import { Routes, RouterModule } from '@angular/router';

import { PlaygroundComponent } from './playground.component';
import { OneComponent } from './one/one.component';
import { TwoComponent } from './two/two.component';
import { ThreeComponent } from './three/three.component';

const routes: Routes = [
  {
    path: '',
    component: PlaygroundComponent,
    children: [
      {
        path: 'one',
        component: OneComponent,
        children: [
          {
            path: 'three',
            component: ThreeComponent
          }
        ]
      },
      {
        path: 'two',
        component: TwoComponent
      }
    ]
  },
];

@NgModule({
  imports: [ RouterModule.forChild(routes) ],
  exports: [ RouterModule ],
})
export class PlaygroundRoutingModule { }
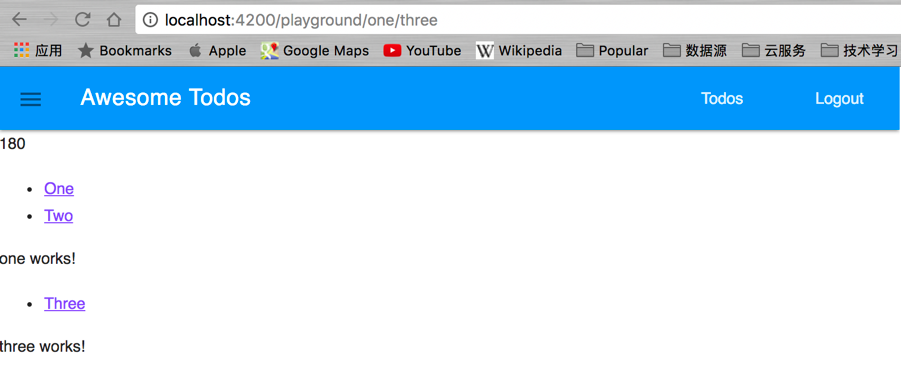
當(dāng)然,還是一樣,我們需要改造一下OneComponent的模版以便于它可以顯示子路由的內(nèi)容。改動(dòng) src/app/playground/one/one.component.html 為如下內(nèi)容
<p>
  one works!
</p>
<ul>
  <li><a routerLink="three">Three</a></li>
</ul>
<router-outlet></router-outlet>
這回我們看到如果在瀏覽器中輸入 http://localhost:4200/playground/one/three 會(huì)看到如圖所示的結(jié)果:
經(jīng)過(guò)這個(gè)小練習(xí),相信再?gòu)?fù)雜的路由你也可以搞定了。但是我要說(shuō)一句,個(gè)人不是很推薦過(guò)于復(fù)雜的路由(復(fù)雜這里指層級(jí)嵌套太多)。層級(jí)多了之后意味著這個(gè)模塊太大了,負(fù)責(zé)了過(guò)多它不應(yīng)該負(fù)責(zé)的事情。也就是說(shuō)當(dāng)要使用子路由時(shí),一定多問(wèn)自己幾遍,這樣做是必須的嗎?可以用別的方式解決嗎?是不是我的模塊改拆分了?
本章代碼: https://github.com/wpcfan/awesome-tutorials/tree/master/angular2/ng2-tut
慕課網(wǎng) Angular 視頻課上線: http://coding.imooc.com/class/123.html?mc_marking=1fdb7649e8a8143e8b81e221f9621c4a&mc_channel=banner
紙書出版了,比網(wǎng)上內(nèi)容豐富充實(shí)了,歡迎大家訂購(gòu)!
京東鏈接:https://item.m.jd.com/product/12059091.html?from=singlemessage&isappinstalled=0
第一節(jié):初識(shí)Angular-CLI
第二節(jié):登錄組件的構(gòu)建
第三節(jié):建立一個(gè)待辦事項(xiàng)應(yīng)用
第四節(jié):進(jìn)化!模塊化你的應(yīng)用
第五節(jié):多用戶版本的待辦事項(xiàng)應(yīng)用
第六節(jié):使用第三方樣式庫(kù)及模塊優(yōu)化用
第七節(jié):給組件帶來(lái)活力
Rx--隱藏在Angular 2.x中利劍
Redux你的Angular 2應(yīng)用
第八節(jié):查缺補(bǔ)漏大合集(上)
第九節(jié):查缺補(bǔ)漏大合集(下)
