Glide — 通知欄和桌面小控件的圖片加載
原文:Loading Images into Notifications and RemoteViews
作者:Norman Peitek
翻譯:Dexter0218
上篇文章,我們講解了Glide中加載圖片到target的基礎。如果你還沒有看,在看這篇文章之前,建議看看前面的基礎。這篇文章繼續介紹兩個特別用途的target:通知欄和桌面小控件。如果你需要用到里面任意一個,繼續閱讀!
Glide 系列概覽
- 入門簡介
- 高級加載
- 適配器(ListView, GridView)
- 占位圖& 淡入淡出動畫
- 圖片大小 & 縮放
- 播放GIF & 視頻
- 緩存基礎
- 請求優先級
- 縮略圖
- 回調:定制view中使用SimpleTarget和ViewTarget
- 通知欄和桌面小控件的圖片加載
- 異常: 調試和報錯處理
- 自定義變換
- 用animate()定制動畫
- 整合網絡協議棧
- 用Modules定制Glide
- Glide Module 案例: 接受自簽名HTTPS證書
- Glide Module 案例: 自定義緩存
- Glide Module 案例: 通過加載自定義大小圖片優化
- 動態使用 Model Loaders
- 如何旋轉圖片
- 系列綜述
加載圖片到通知欄
系統通知的圖標為用戶傳遞了重要的內容。用NotificationCompat.Builder為通知圖片傳遞一個圖片是最直接方式,但是這個圖片必須是Bitmap格式的。如果這個圖片已經在手機上,那沒問題。但,如果這個圖片還不在手機上,需要從網絡下載,想要用這個標準的工具是不現實的。
這時候輪到Glide出場了。在上篇文章中,我們學習了如何用SimpleTarget下載圖片。理論上,你可以利用那個方法加載圖片到你的系統通知中。但沒必要那樣,因為Glide通過一個方便的NotificationTarget提供了更舒服的方式。
Notification Target
讓我們看下代碼。你已經知道Glide里的target如何工作,我們不再過多介紹了。為了在系統通知里顯示一個大圖,你可以使用RemoteView,并顯示一個定制的通知。
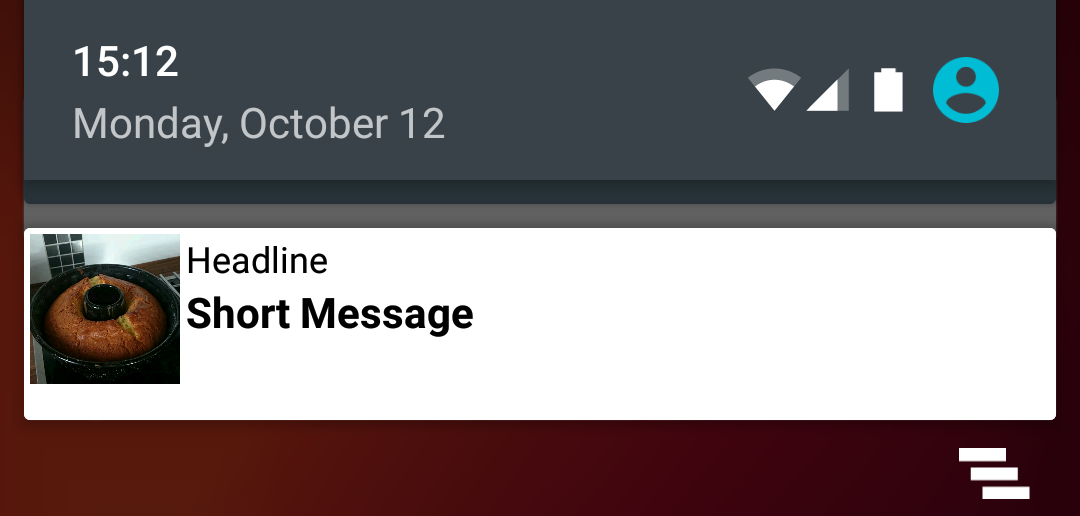
我們自定義的通知布局非常簡單:
<?xml version="1.0" encoding="utf-8"?>
<LinearLayout
    xmlns:android="http://schemas.android.com/apk/res/android"
    android:layout_width="match_parent"
    android:layout_height="wrap_content"
    android:background="@android:color/white"
    android:orientation="vertical">

    <LinearLayout
        android:layout_width="match_parent"
        android:layout_height="wrap_content"
        android:orientation="horizontal"
        android:padding="2dp">

        <ImageView
            android:id="@+id/remoteview_notification_icon"
            android:layout_width="50dp"
            android:layout_height="50dp"
            android:layout_marginRight="2dp"
            android:layout_weight="0"
            android:scaleType="centerCrop"/>

        <LinearLayout
            android:layout_width="0dp"
            android:layout_height="wrap_content"
            android:layout_weight="1"
            android:orientation="vertical">

            <TextView
                android:id="@+id/remoteview_notification_headline"
                android:layout_width="match_parent"
                android:layout_height="wrap_content"
                android:ellipsize="end"
                android:singleLine="true"
                android:textSize="12sp"/>

            <TextView
                android:id="@+id/remoteview_notification_short_message"
                android:layout_width="match_parent"
                android:layout_height="wrap_content"
                android:ellipsize="end"
                android:paddingBottom="2dp"
                android:singleLine="true"
                android:textSize="14sp"
                android:textStyle="bold"/>

        </LinearLayout>
    </LinearLayout>

</LinearLayout>
下面的代碼用上面的布局文件創建了一個自定義的通知。
final RemoteViews rv = new RemoteViews(context.getPackageName(), R.layout.remoteview_notification);

rv.setImageViewResource(R.id.remoteview_notification_icon, R.mipmap.future_studio_launcher);

rv.setTextViewText(R.id.remoteview_notification_headline, "Headline");
rv.setTextViewText(R.id.remoteview_notification_short_message, "Short Message");

// build notification
NotificationCompat.Builder mBuilder =
    new NotificationCompat.Builder(context)
        .setSmallIcon(R.mipmap.future_studio_launcher)
        .setContentTitle("Content Title")
        .setContentText("Content Text")
        .setContent(rv)
        .setPriority( NotificationCompat.PRIORITY_MIN);

final Notification notification = mBuilder.build();

// set big content view for newer androids
if (android.os.Build.VERSION.SDK_INT >= 16) {
    notification.bigContentView = rv;
}

NotificationManager mNotificationManager = (NotificationManager) context.getSystemService(Context.NOTIFICATION_SERVICE);
mNotificationManager.notify(NOTIFICATION_ID, notification);
這段代碼創建了三個重要的對象,Notification和RemoteView和常量NOTIFICATION_ID。我們需要這些去創建notification target:
private NotificationTarget notificationTarget;

...

notificationTarget = new NotificationTarget(
    context,
    rv,
    R.id.remoteview_notification_icon,
    notification,
    NOTIFICATION_ID);
最后,我們需要與以前一樣調用Glide,將target作為.into()的參數傳入:
Glide
    .with( context.getApplicationContext() ) // safer!
    .load( eatFoodyImages[3] )
    .asBitmap()
    .into( notificationTarget );
結果是只要圖片被加載了,我們定制的通知欄就會顯示。真棒 :)
應用小控件
我們再來研究另外一個target。應用小控件在Android系統里已經有相當長的一段時間了。如果你的app的小控件包含圖片,你肯定會感興趣。Glide的AppWidgetTarget可以幫助你讓這些簡單明了。
我們一起看一個簡單的AppWidgetProvider的例子:
public class FSAppWidgetProvider extends AppWidgetProvider {

    private AppWidgetTarget appWidgetTarget;

    @Override
    public void onUpdate(Context context, AppWidgetManager appWidgetManager,
                         int[] appWidgetIds) {

        RemoteViews rv = new RemoteViews(context.getPackageName(), R.layout.custom_view_futurestudio);

        appWidgetTarget = new AppWidgetTarget( context, rv, R.id.custom_view_image, appWidgetIds );

        Glide
                .with( context.getApplicationContext() ) // safer!
                .load( GlideExampleActivity.eatFoodyImages[3] )
                .asBitmap()
                .into( appWidgetTarget );

        pushWidgetUpdate(context, rv);
    }

    public static void pushWidgetUpdate(Context context, RemoteViews rv) {
        ComponentName myWidget = new ComponentName(context, FSAppWidgetProvider.class);
        AppWidgetManager manager = AppWidgetManager.getInstance(context);
        manager.updateAppWidget(myWidget, rv);
    }
}
最重要的代碼是AppWidgetTarget對象的聲明和Glide的構造。好消息:你不必覆寫onResourceReady方法定制AppWidgetTarget。Glide為你自動處理了一切!非常出色!
展望
這篇文章中,我們完結了target的探索。你已經學會了如何異步加載各種目的圖片,包括ImageView、Notiation,Bitmap回調等等。
后面的文章,我們要學習如何處理報錯。出錯時會發生什么?當URL不存在或者非法?敬請期待。
