編譯過程
如果需要弄清整個編譯過程,那還得好好復習下編譯原理。這里只是通過一個小例子討論大致過程。
準備好一個helloworld的c文件。內容最好簡單如下:
#include <stdio.h>
int main(int argc, char *argv[])
{
    printf("Hello World!\n");
    return 0;
}
編譯命令
$ gcc helloworld.c // 編譯
$ ./a.out // 執行
Hello World!
gcc命令其實依次執行了四步操作:
-
預處理(Preprocessing)
- 預處理用于將所有的#include頭文件以及宏定義替換成其真正的內容,預處理之后得到的仍然是文本文件,但文件體積會大很多。
- 命令:
gcc -E -I./ helloworld.c -o helloworld.i或者直接用cpp helloworld.c -I./ -o helloworld.i - 參數說明:
-
-E是讓編譯器在預處理之后就退出,不進行后續編譯過程; -
-I指定頭文件目錄,這里指定的是我們自定義的頭文件目錄; -
-o指定輸出文件名。
-
- 經過預處理之后代碼體積會大很多。如下是預處理之后的部分內容。
# 1 "helloworld.c" # 1 "<built-in>" 1 # 1 "<built-in>" 3 # 330 "<built-in>" 3 # 1 "<command line>" 1 # 1 "<built-in>" 2 # 1 "helloworld.c" 2 typedef unsigned char __uint8_t; typedef short __int16_t; typedef unsigned short __uint16_t; typedef int __int32_t; typedef unsigned int __uint32_t; typedef long long __int64_t; typedef unsigned long long __uint64_t; typedef struct _opaque_pthread_attr_t __darwin_pthread_attr_t; typedef struct _opaque_pthread_cond_t __darwin_pthread_cond_t; typedef struct _opaque_pthread_condattr_t __darwin_pthread_condattr_t; typedef unsigned long __darwin_pthread_key_t; typedef struct _opaque_pthread_mutex_t __darwin_pthread_mutex_t; typedef struct _opaque_pthread_mutexattr_t __darwin_pthread_mutexattr_t; FILE *fopen(const char * restrict __filename, const char * restrict __mode) __asm("_" "fopen" ); int fprintf(FILE * restrict, const char * restrict, ...) __attribute__((__format__ (__printf__, 2, 3))); int fputc(int, FILE *); int fputs(const char * restrict, FILE * restrict) __asm("_" "fputs" ); size_t fread(void * restrict __ptr, size_t __size, size_t __nitems, FILE * restrict __stream); FILE *freopen(const char * restrict, const char * restrict, FILE * restrict) __asm("_" "freopen" ); int fscanf(FILE * restrict, const char * restrict, ...) __attribute__((__format__ (__scanf__, 2, 3))); int fseek(FILE *, long, int); int fsetpos(FILE *, const fpos_t *); long ftell(FILE *); size_t fwrite(const void * restrict __ptr, size_t __size, size_t __nitems, FILE * restrict __stream) __asm("_" "fwrite" ); int getc(FILE *); int getchar(void); char *gets(char *); void perror(const char *); int printf(const char * restrict, ...) __attribute__((__format__ (__printf__, 1, 2))); int putc(int, FILE *); int putchar(int); int puts(const char *); int remove(const char *); int rename (const char *__old, const char *__new); void rewind(FILE *); int scanf(const char * restrict, ...) __attribute__((__format__ (__scanf__, 1, 2))); void setbuf(FILE * restrict, char * restrict); int setvbuf(FILE * restrict, char * restrict, int, size_t); int sprintf(char * restrict, const char * restrict, ...) __attribute__((__format__ (__printf__, 2, 3))) __attribute__((__availability__(swift, unavailable, message="Use snprintf instead."))); int sscanf(const char * restrict, const char * restrict, ...) __attribute__((__format__ (__scanf__, 2, 3))); FILE *tmpfile(void); __attribute__((__availability__(swift, unavailable, message="Use mkstemp(3) instead."))) __attribute__((deprecated("This function is provided for compatibility reasons only. Due to security concerns inherent in the design of tmpnam(3), it is highly recommended that you use mkstemp(3) instead."))) ... 中間很多內容這里省略 extern int __vsnprintf_chk (char * restrict, size_t, int, size_t, const char * restrict, va_list); # 499 "/Applications/Xcode.app/Contents/Developer/Platforms/MacOSX.platform/Developer/SDKs/MacOSX10.12.sdk/usr/include/stdio.h" 2 3 4 # 2 "helloworld.c" 2 int main(){ printf("Hello World!\n"); return 0; } -
編譯(Compilation),
- 這里的編譯不是指程序從源文件到二進制程序的全部過程,而是指將經過預處理之后的程序轉換成特定匯編代碼(assembly code)的過程。
- 命令:gcc -S -I./ helloworld.c -o helloworld.s
- 參數:
-S為了編譯之后停止。后面的兩個參數含義和預處理的時候一樣 - 經過編譯之后的內容如下。
.section __TEXT,__text,regular,pure_instructions .macosx_version_min 10, 12 .globl _main .p2align 4, 0x90 _main: ## @main .cfi_startproc ## BB#0: pushq %rbp Ltmp0: .cfi_def_cfa_offset 16 Ltmp1: .cfi_offset %rbp, -16 movq %rsp, %rbp Ltmp2: .cfi_def_cfa_register %rbp subq $16, %rsp leaq L_.str(%rip), %rdi movl $0, -4(%rbp) movb $0, %al callq _printf xorl %ecx, %ecx movl %eax, -8(%rbp) ## 4-byte Spill movl %ecx, %eax addq $16, %rsp popq %rbp retq .cfi_endproc .section __TEXT,__cstring,cstring_literals L_.str: ## @.str .asciz "Hello World!\n" .subsections_via_symbols -
匯編(Assemble),
- 匯編過程將上一步的匯編代碼轉換成機器碼(machine code),這一步產生的文件叫做目標文件,是二進制格式。如果有多個文件需要為每一個源文件產生一個目標文件。
- 命令:as helloworld.s -o helloworld.o 或者 gcc -c helloworld.s -o helloworld.o
-
鏈接(Linking)。
- 鏈接過程將多個目標文以及所需的庫文件(.so等)鏈接成最終的可執行文件(executable file)。
- 命令:ld -o helloworld.out helloworld.o
**.o**.o。格式其實就是ld(選項)(參數)參數就是需要連接的目標文件。由于這里沒有生成其他目標文件,所以這段不會連接成功的。具體的命令可以看這里ld命令
走完上面的步驟可以得到如下幾個文件。

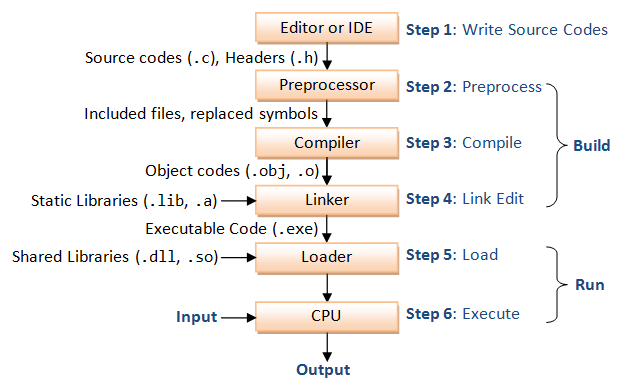
其實我們平時寫代碼的到得到可執行文件的整個過程可以用下圖來概括。
預處理器
上面把基本的編譯過程講完了,現在就開始進入今天的正題。
預處理前的操作
再進行預處理前,編譯器會對源代碼記性一些翻譯過程。其中有幾點需要知道:
- 源代碼中的資費映射到元字符集。使得C外觀更加國際化
- 預處理表達式的長度為一邏輯行。
- 查找反斜杠后緊跟換行符的實例并刪除。也即是預處理會刪除反斜杠和換行符的組合。
-
類似
printf("Hello, \
               World!\n");
兩行物理行變為一行
printf("Hello,World!\n");經過測試在Xcode中會上面的形式會比項目多很多空格。 其實這就是為什么我們能夠用宏定義定義函數的原理。
文本劃分為預處理語言符號、空白字符及注釋序列。注意編譯器會有空格代替注釋
-
預處理指令
所有預處理指令都是以#開頭。關于#define和const定義常量的區別也是需要值得注意的地方。#define做的是暴力替換,而const是針對性的。
語言符號及字符型符號
- 字符型符號:額外的空格當成替換文本的一部分,空格也是主體的一部分。
- 語言符號:空格只是分隔主體的符號。
例子#define TEST 4 * 8
- 字符型符號將TEST替換為
4 * 8 - 語言符號將TEST替換為
4 * 8
C編譯器把宏主體當成的是字符型符號
判斷宏定義想不相同通過語言定義符號來確定。比如#define TEST 48和上面的就不是相同的宏定義因為它只有一個語言符號4*8。上面有三個分別是4、空格、8*
define中使用參數
使用參數很簡單,就是#define TEST(X) X*X。規則如下:

特別需要注意的是宏參數和函數參數的區別,宏參數是進行嚴格的特換。這如果使用不懂就會出現非常嚴重的錯誤。
使用#參數:宏參數創建字符串
| 宏定義 | 調用 | 結果 |
|---|---|---|
#define TESTPF(x) printf("test "#x" * "#x"=%d\n",(x)*(x)); |
TESTPF(5 + 5) |
test 5 + 5 * 5 + 5=100 |
#define TESTPF(x) printf("test x * x=%d\n",(x)*(x)); |
TESTPF(5 + 5); |
test x * x=100 |
可以看到#參數的作用就是把字符串中的x也進行了替換。
使用##參數:預處理粘合劑
##作用是把兩個語言符號組合為單個語言符號。
例子:
#define XNAME(n) x##n
#define PRINT_XN(n) printf("x"#n" = %d \n");

int XNAME(1) = 1;
int XNAME(2) = 2;
PRINT_XN(1);
PRINT_XN(2);

結果:
x1 = 1606416096
x2 = 4352
...和__VA_ARGS__:可變宏
這個其實在iOS開發中還是用得挺多的。
例子
#define PR(...) printf(__VA_ARGS__)

PR("DD");
PR("D=%d,F=%d\n",12,22);

結果:
DDD=12,F=22
特別注意。省略號必須在最后一個參數位置。根據這個道理,有些同學可能就能聯想到某些語言可變參數的位置為什么一定要在最后把。比如python
文件包含
預處理器發現#include指令后,會尋找跟在后面的文件,把這個文件中的內容包含到當前文件中。

頭文件
OC中有.h和.m文件,這和C里面的.h和.c是同一個道理。所以這里就不多說了。具體看圖。

其他預處理指令
-
#undef取消已定義的宏 -
#if如果給定條件為真,則編譯下面代碼 -
#elif如果前面的#if給定條件不為真,當前條件為真,則編譯下面代碼 -
#endif結束一個#if……#else條件編譯塊 -
#ifdef如果宏已經定義,則編譯下面代碼 -
#ifndef如果宏沒有定義,則編譯下面代碼 -
#pragma指令沒有正式的定義。編譯器可以自定義其用途。典型的用法是禁止或允許某些煩人的警告信息。
上面這些預處理指令,用得比較頻繁。大家應該不陌生。還多一些平時用得不多的。
-
#line指令可以改變編譯器用來指出警告和錯誤信息的文件號和行號。 -
#error停止編譯并顯示錯誤信息
預處理宏
C標準制定的一些預處理宏。

額外補充一個__func__預定義標識符。這個是C99標準提供的。用于標識當前函數。
上面這些預處理宏經常用于打印一些日志信息。
擴展閱讀
C programming Tutorial Introduction to C Programming (for Novices & First-Time Programmers)
C/C++預處理指令#define,#ifdef,#ifndef,#endif…
