前言
前一陣子,都說東半球的人都在忙著抓妖怪,西半球的人都在忙著搞藝術(shù)照。對(duì),這后者就是很是流行的Prisma。Prisma的流行,說明大家心中還是保留著對(duì)藝術(shù)的追求。
而我,也按耐不住,趕緊嘗試了一番。由于自己的一點(diǎn)警戒心里,所以猜測(cè)Prisma會(huì)不會(huì)把圖片上傳到服務(wù)器呢?于是,就做了一次斷網(wǎng)測(cè)試。果真,報(bào)了斷網(wǎng)錯(cuò)誤而且圖片一直處于上傳中。所以,可以肯定的是:Prisma的圖片處理是放在服務(wù)端的。不出所料,之后經(jīng)常會(huì)出現(xiàn)服務(wù)器過載的問題。但是看著Prisma處理好的圖片,真是佩服不已(其實(shí)很是希望他們的圖片處理是放在前端,也好逆向一下,哈哈)。
對(duì)于Prisma的圖片藝術(shù)處理,只能是嘆為觀止。但是,仍然按耐不住想要重寫一下Prisma的沖動(dòng)。于是,重寫了Prisma所有的界面功能。
在重寫的中發(fā)現(xiàn),Prisma的優(yōu)秀并不僅僅只是對(duì)于圖片的藝術(shù)處理。作為一個(gè)開發(fā)者,自然而然就會(huì)關(guān)注它的每個(gè)細(xì)節(jié) ——真是細(xì)思極恐啊,Prisma在細(xì)節(jié)的處理上十分的認(rèn)真。界面簡(jiǎn)潔易用,圖片的操作細(xì)節(jié)到位。也因此,遇到了很多坑。接下來就整理一下重寫過程中涉及到的問題與坑。
Prisma的構(gòu)建是采用StoryBoard與xib,語言是Swift。因此,重寫的項(xiàng)目也是采用Swift結(jié)合StroyBoard、xib
項(xiàng)目架構(gòu)
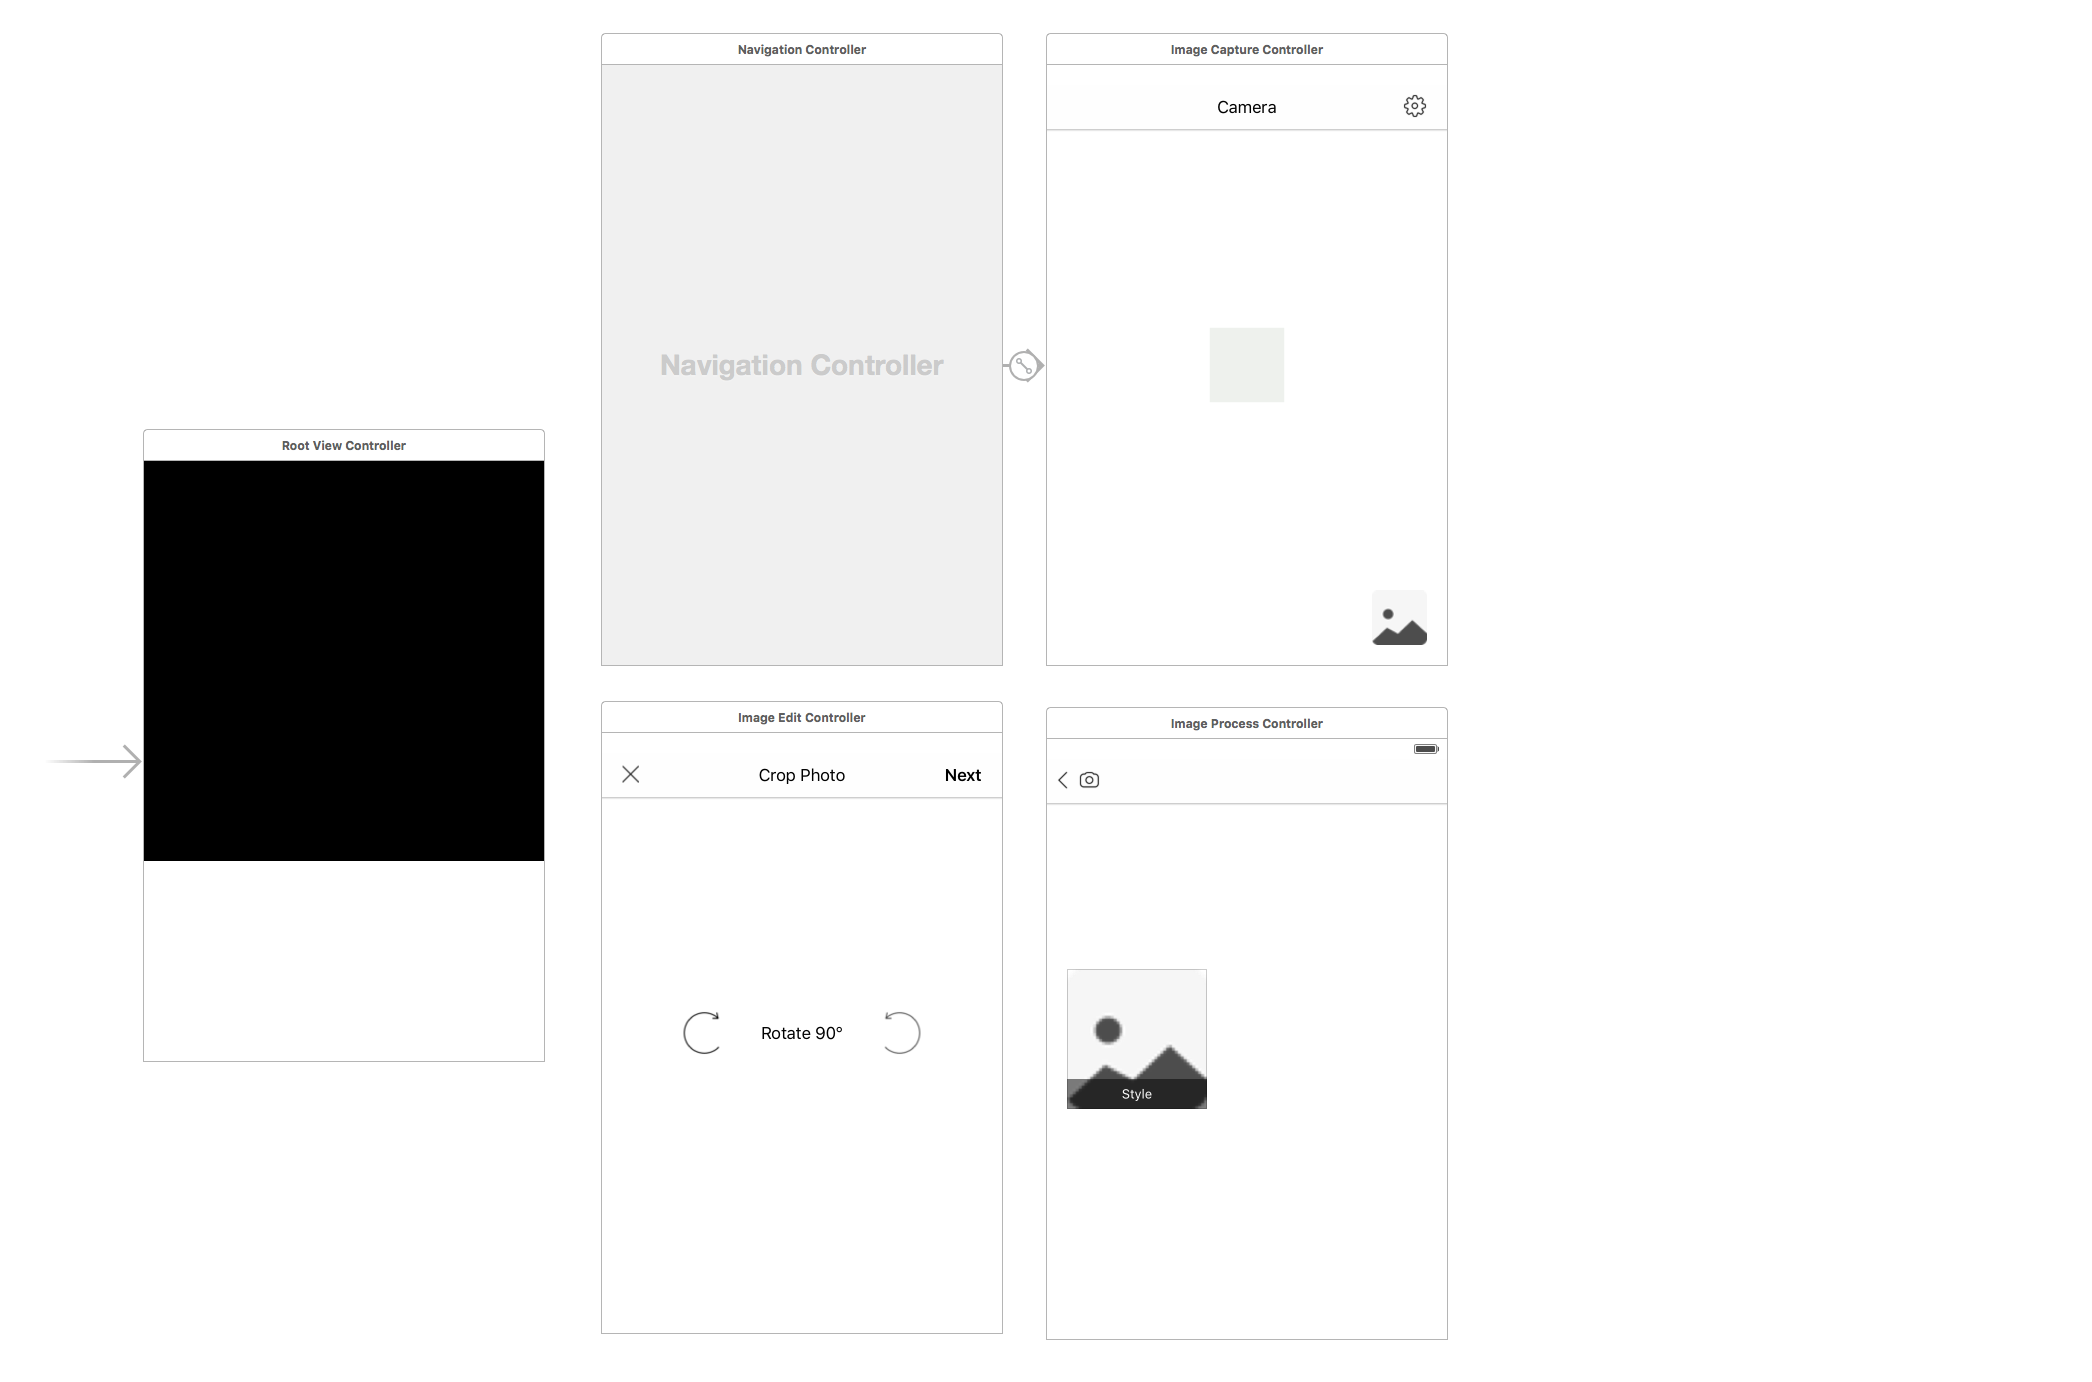
通過分析Prisma的界面構(gòu)造,以及Playload中的文件。個(gè)人認(rèn)為,Prisma的布局是采用如下方式:
- RootViewController作為跟視圖控制器,相機(jī)窗口以及圖片編輯圖片藝術(shù)合成窗口都放在屏幕的上方,采用1 :1的比例設(shè)置
- 由于Prisma底部操作界面看上去十分像一個(gè)導(dǎo)航控制器,于是大膽的采用導(dǎo)航控制器作為底部操作界面。——這樣,在界面跳轉(zhuǎn)上方便不少,但是也存在一些坑,接下來會(huì)具體的分析。
那么,接下來就來各個(gè)擊破,解決每個(gè)問題。
自定義相機(jī)
先貼上Prisma所用的Frameworks:
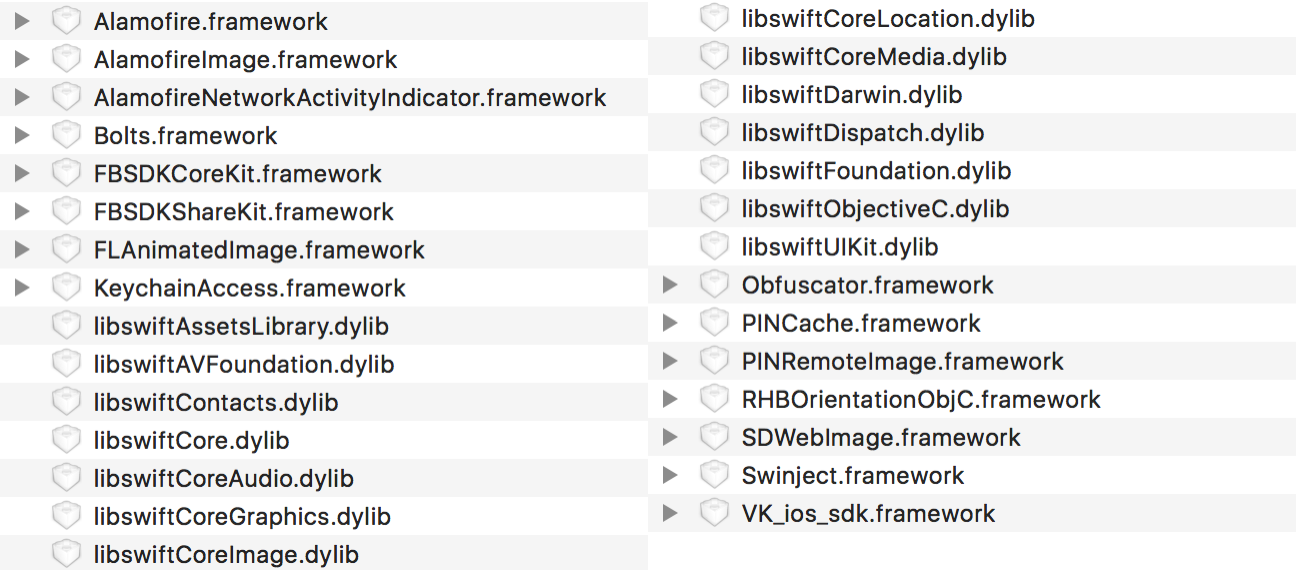
從上圖中可以看出Prisma中使用的框架有哪些。我們可以看到,Prisma采用的圖像采集框架是AVFoundation。而自定義相機(jī)也正是使用的此框架中的:
- AVCaptureSession 相機(jī)的會(huì)話管理類,負(fù)責(zé)視頻圖片的管理功能
- AVCaptureDeviceInput 圖像采集輸入設(shè)備
- AVCaptureStillImageOutput 照片流輸出
- AVCaptureVideoPreviewLayer 圖像預(yù)覽圖層,用于實(shí)時(shí)呈現(xiàn)攝像頭采集景象
設(shè)備初始化
現(xiàn)在,在聲明相關(guān)屬性之后,開始初始化相機(jī)相關(guān)
func initAVCapture() {
    // Device
    let device = AVCaptureDevice.defaultDeviceWithMediaType(AVMediaTypeVideo)

    try! device.lockForConfiguration()
    if device.hasFlash {
        device.flashMode = AVCaptureFlashMode.Off
    }
    if device.isFocusModeSupported(.AutoFocus) {
        device.focusMode = .AutoFocus
    }
    if device.isWhiteBalanceModeSupported(.AutoWhiteBalance) {
        device.whiteBalanceMode = .AutoWhiteBalance
    }
    if device.exposurePointOfInterestSupported {
        device.exposureMode = .ContinuousAutoExposure
    }
    device.unlockForConfiguration()

    // Input & Output
    // When init AVCaptureDeviceInput first, system will show alert to confirm the authentication from user.
    // But the best way is send the acces request manual. see `requestAccessForMediaType`
    deviceIntput = try! AVCaptureDeviceInput(device: device)
    stillImageOutPut = AVCaptureStillImageOutput()

    // Output settings
    stillImageOutPut?.outputSettings = [AVVideoCodecKey:AVVideoCodecJPEG, AVVideoScalingModeKey:AVVideoScalingModeResize]

    if session.canAddInput(deviceIntput) {
        session.addInput(deviceIntput)
    }
    if session.canAddOutput(stillImageOutPut) {
        session.addOutput(stillImageOutPut)
    }

    session.sessionPreset = AVCaptureSessionPresetPhoto
    // Preview
    previewLayer = AVCaptureVideoPreviewLayer.init(session: session)
    previewLayer?.videoGravity = AVLayerVideoGravityResizeAspectFill

    // Set root vc avcapture preview layer
    photoPisplayBoard?.setAVCapturePreviewLayer(previewLayer!)
}
這里面有幾個(gè)坑值得注意:
- 在配置
AVCaptureDevice的時(shí)候,需要鎖定設(shè)備,防止有其他的操作訪問設(shè)備AVCaptureDevice的focusMode屬性有三個(gè)參數(shù),分別是Locked、AutoFocus與ContinuousAutoFocus。顧名思義,分別是鎖定(就是只是對(duì)焦一個(gè)死的點(diǎn)),自動(dòng),持續(xù)自動(dòng)。值得注意的是,自動(dòng)模式只是在切換設(shè)備的時(shí)候自動(dòng)對(duì)焦一次;持續(xù)對(duì)焦才會(huì)在設(shè)備移動(dòng)后根據(jù)相位檢測(cè)持續(xù)對(duì)焦AVCaptureStillImageOutput需要配置參數(shù)outputSettings,設(shè)置輸出配置為JPEG- 最后一個(gè)就是
AVCaptureVideoPreviewLayer預(yù)覽圖層了,預(yù)覽圖層是有自己的frame的,并不是設(shè)定的layer的frame。因此,我們需要設(shè)置填充模式,這里采用AVLayerVideoGravityResizeAspectFill,就是左右填充對(duì)齊(實(shí)際上上下多出來的被cliptobounds了)
最后,只要開啟相機(jī)就行了
override func viewWillAppear(animated: Bool) {
    session.startRunning()
}
這里會(huì)涉及到一個(gè)權(quán)限認(rèn)證的問題:
當(dāng)然在我們第一次,是第一次哦,初始化
AVCaptureDeviceInput的時(shí)候,系統(tǒng)會(huì)彈出一次權(quán)限許可的alert,因此第一次可以不用做認(rèn)證。但是這個(gè)權(quán)限彈框只有一次,假如用戶拒絕了,第二次進(jìn)入后我們?cè)俪跏蓟蜁?huì)導(dǎo)致崩潰。因此,最好的方式,還是主動(dòng)做一次權(quán)限認(rèn)證判斷
/// Capture authorization
class func captureAuthorization(shouldCapture: ((Bool)-> Void)!) {

    let captureStatus = AVCaptureDevice.authorizationStatusForMediaType(AVMediaTypeVideo)
    switch captureStatus {
    case.NotDetermined:
        AVCaptureDevice.requestAccessForMediaType(AVMediaTypeVideo, completionHandler: { (granted:  Bool) -> Void in
            shouldCapture(granted)
        })
        break
    case.Authorized:
        shouldCapture(true)
        break
    default:
        shouldCapture(false)
        break
    }
}
攝像頭切換
@IBAction func changeFlash(sender: AnyObject) {
    var image: UIImage? = nil

    let device = AVCaptureDevice.defaultDeviceWithMediaType(AVMediaTypeVideo)
    try! device.lockForConfiguration()
    if device.hasFlash {
        switch device.flashMode {
        case .Off:
            device.flashMode = .On
            currentFlashMode = .On
            image = UIImage.init(named: "flash-on")
            break
        case .On:
            device.flashMode = .Auto
            currentFlashMode = .Auto
            image = UIImage.init(named: "flash-auto")
            break
        case .Auto:
            device.flashMode = .Off
            currentFlashMode = .Off
            image = UIImage.init(named: "flash")
            break
        }
        // Flash baritem
        let letButton = navigationBar.topItem!.leftBarButtonItem?.customView as? UIButton
        letButton?.setImage(image, forState: UIControlState.Normal)
    }
    device.unlockForConfiguration()
}
這里同樣要鎖定設(shè)備再進(jìn)行操作。接下來細(xì)節(jié)來了:
- 我本以為,flash什么的操作按鈕直接是
UIBarButtonItem就可以了。但是,由于前置攝像頭不支持flash,所以,在前置轉(zhuǎn)臺(tái)下Prisma會(huì)將flash按鈕置灰。而UIBarButtonItem無法通過同一張圖片(對(duì),就是同一張圖片,Prisma只是用了一張一個(gè)狀態(tài)的圖片)來設(shè)置enabled的置灰裝填。因此這里,我采用一個(gè)button作為leftBarButtonItem的customView,便可以實(shí)現(xiàn)了- 另一個(gè)問題是,
UIBarButtonItem會(huì)在渲染圖片的時(shí)候,根據(jù)本身的tintColor對(duì)圖片處理,不能保證原圖。所以,我們?cè)O(shè)置的圖片需要做一次render處理image = image?.imageWithRenderingMode(UIImageRenderingMode.AlwaysOriginal)。當(dāng)然,最簡(jiǎn)單的模式是在Assets.xcassets中對(duì)圖片渲染模式設(shè)置,如圖:

手動(dòng)對(duì)焦
// Tap header to focus
func tapToChangeFocus(tap: UITapGestureRecognizer) {
    guard !isUsingFrontFacingCamera else {
        return
    }
    // Location
    let point = tap.locationInView(photoPisplayBoard?.displayHeaderView)

    // Show square
    showSquareBox(point)

    // Change focus
    //        let pointInCamera = convertToPointOfInterestFromViewCoordinates(point)
    let pointInCamera = previewLayer!.captureDevicePointOfInterestForPoint(point)
    let device = deviceIntput?.device
    try! device!.lockForConfiguration()

    if device!.focusPointOfInterestSupported {
        device!.focusPointOfInterest = pointInCamera
    }
    if device!.isFocusModeSupported(.ContinuousAutoFocus) {
        device!.focusMode = .ContinuousAutoFocus
    }
    if device!.exposurePointOfInterestSupported {
        device?.exposureMode = .ContinuousAutoExposure
        device?.exposurePointOfInterest = pointInCamera
    }
    device?.subjectAreaChangeMonitoringEnabled = true
    device!.focusPointOfInterest = pointInCamera

    device!.unlockForConfiguration()
}
手動(dòng)對(duì)焦,就是通過點(diǎn)擊設(shè)置設(shè)備的感興趣的點(diǎn),同時(shí),增加一個(gè)方框的動(dòng)畫。下面是坑:
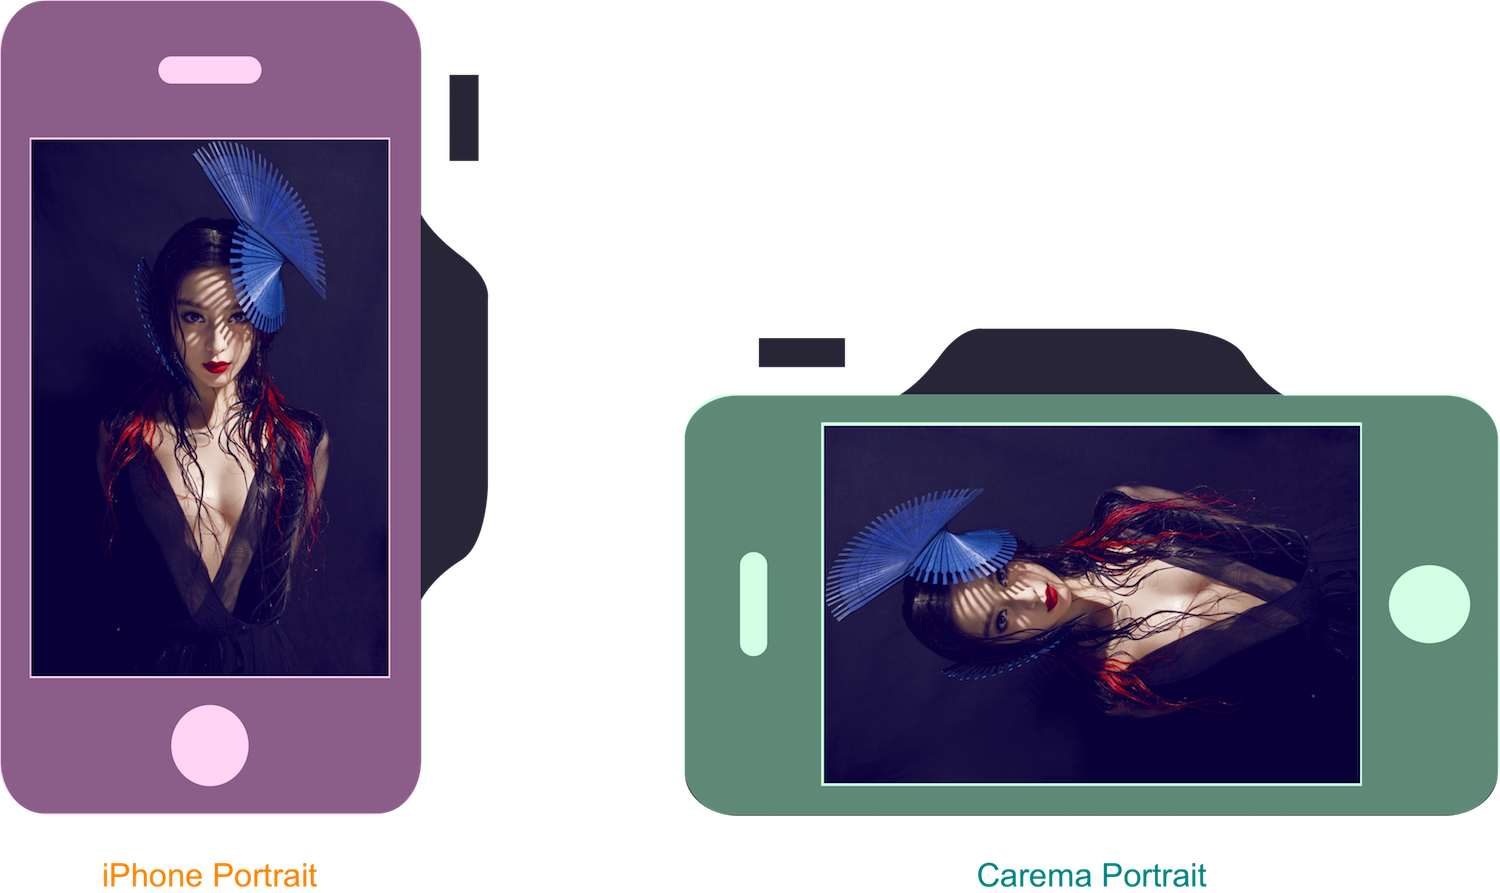
- 由于相機(jī)的位置關(guān)系,當(dāng)我們正常豎著放置手機(jī)的時(shí)候,其實(shí),相機(jī)是側(cè)立的。因?yàn)椋琲Phone的相機(jī)默認(rèn)是橫屏home鍵在右為正常位置,就像一個(gè)真正的相機(jī)的位置一樣。而這一點(diǎn),在后面還會(huì)用到處理圖片方向上
- 設(shè)備的感興趣的點(diǎn)的坐標(biāo)是從左上角的{0,0}到右下角的{1,1}。而由于設(shè)備相機(jī)方向問題,豎屏?xí)r,右上角就是相機(jī)坐標(biāo)系的左上角
我們可以通過計(jì)算將點(diǎn)擊屏幕的點(diǎn)轉(zhuǎn)化為相機(jī)坐標(biāo)系的點(diǎn),然而幸運(yùn)的是,系統(tǒng)提供了一個(gè)方法captureDevicePointOfInterestForPoint()可以直接幫我們轉(zhuǎn)化
另外,關(guān)于相機(jī)設(shè)備方向的資料可以參考如何處理iOS中照片的方向
捕獲圖片
重頭戲,也是坑最大的地方。怎樣捕獲相機(jī)的圖片并輸出
@IBAction func capturePhoto(sender: AnyObject) {

    // Disable the capture button
    captureButton.enabled = false

    let stillImageConnection = stillImageOutPut?.connectionWithMediaType(AVMediaTypeVideo)
    // let curDeviceOrientation = UIDevice.currentDevice().orientation
    // let avCaptureOrientation = FMDeviceOrientation.avOrientationFromDeviceOrientation(curDeviceOrientation)
    let avCaptureOrientation = AVCaptureVideoOrientation(rawValue: UIDevice.currentDevice().orientation.
    if stillImageConnection!.supportsVideoOrientation {
        stillImageConnection!.videoOrientation = avCaptureOrientation
    }
    stillImageConnection!.videoScaleAndCropFactor = 1

    stillImageOutPut?.captureStillImageAsynchronouslyFromConnection(stillImageConnection, completionHandler: { (imageDataSampleBuffer: CMSampleBufferRef!, error: NSError!) in
        let jpegData = AVCaptureStillImageOutput.jpegStillImageNSDataRepresentation(imageDataSampleBuffer)

        if var image = UIImage(data: jpegData) {

            // Fix orientation & crop image
            image = image.fixOrientation()
            image = PMImageManger.cropImageAffterCapture(image,toSize: self.previewLayer!.frame.size)

            // Fix interface orientation
            if !self.orientationManger.deviceOrientationMatchesInterfaceOrientation() {
                let interfaceOrientation = self.orientationManger.orientation()
                image = image.rotateImageFromInterfaceOrientation(interfaceOrientation)
            }

            // Mirror the image
            if self.isUsingFrontFacingCamera {
                image = UIImage.init(CGImage: image.CGImage!, scale: image.scale, orientation: UIImageOrientation.UpMirrored)

                let imageV = UIImageView.init(frame: self.previewLayer!.bounds)
                imageV.image = image
                self.view.addSubview(imageV)
            }

            // Save photo
            let authorStatus = ALAssetsLibrary.authorizationStatus()
            if  authorStatus == ALAuthorizationStatus.Restricted || authorStatus == ALAuthorizationStatus.Denied {
                return
            }

            let library = ALAssetsLibrary()
            if self.isUsingFrontFacingCamera {
                let attachments = CMCopyDictionaryOfAttachments(kCFAllocatorDefault,imageDataSampleBuffer,kCMAttachmentMode_ShouldPropagate)
                //            let attachments = CMGetAttachment(imageDataSampleBuffer, kCGImagePropertyExifDictionary, nil)
                library.writeImageToSavedPhotosAlbum(image.CGImage!, metadata: attachments as? [NSObject:AnyObject] , completionBlock: { (url: NSURL!, error: NSError!) in

                })
            }else {
                library.writeImageToSavedPhotosAlbum(image.CGImage, orientation: ALAssetOrientation.UpMirrored, completionBlock: { (url: NSURL!, error: NSError!) in

                })
            }

            // Go to style vc
            self.photoPisplayBoard?.setState(.SingleShow, image: image, selectedRect: CGRectZero, zoomScale:1, animated: false)
            let storyBoard = UIStoryboard.init(name: "Main", bundle: nil)
            let styleVC = storyBoard.instantiateViewControllerWithIdentifier("styleImageController") as? PMImageProcessController
            styleVC?.fromCapture = true
            self.navigationController?.pushViewController(styleVC!, animated: true)
        }

        // Stop session
        self.session.stopRunning()
    })
}
為了保證圖片的方向,我們?cè)谳敵鰣D片的時(shí)候,我們需要通知AVCaptureStillImageOutput當(dāng)前設(shè)備的方向,這里獲得AVCaptionConnection來設(shè)置當(dāng)前設(shè)備的方向,將當(dāng)前設(shè)備的方向同步到相機(jī)視頻上。(有人討論說當(dāng)設(shè)備橫屏的時(shí)候,要將傳給相機(jī)視頻的方向取相反的方向,但測(cè)試,實(shí)際上,只要傳入當(dāng)前設(shè)備的方向,告知相機(jī)當(dāng)前設(shè)備的真正方向就可以了)
這里有個(gè)大坑:由于Prisma只是支持Portrait模式,所以獲取到的當(dāng)前設(shè)備的方向總是Portrait的,即豎屏的。那么這時(shí)候傳遞給相機(jī)的后,相機(jī)認(rèn)為的方向其實(shí)向右旋轉(zhuǎn)了90度,因?yàn)榍懊嫖覀冋f了,相機(jī)的正常方向是橫屏向左
所以,在輸出的image時(shí),image被賦值的方向就是向右旋轉(zhuǎn)90度:UIImageOrientation.Right(相機(jī)理解的方向)。此時(shí),保存出來的圖片就會(huì)是向左旋轉(zhuǎn)90度的(圖片要放正嘛,想象相機(jī)放正的樣子)
根據(jù)以上的情況,我們對(duì)于剛剛捕獲的圖片進(jìn)行orientation的處理fixOrientation(),這樣圖片就是我們預(yù)想中拍攝的方向了。接下來要對(duì)圖片進(jìn)行裁切處理
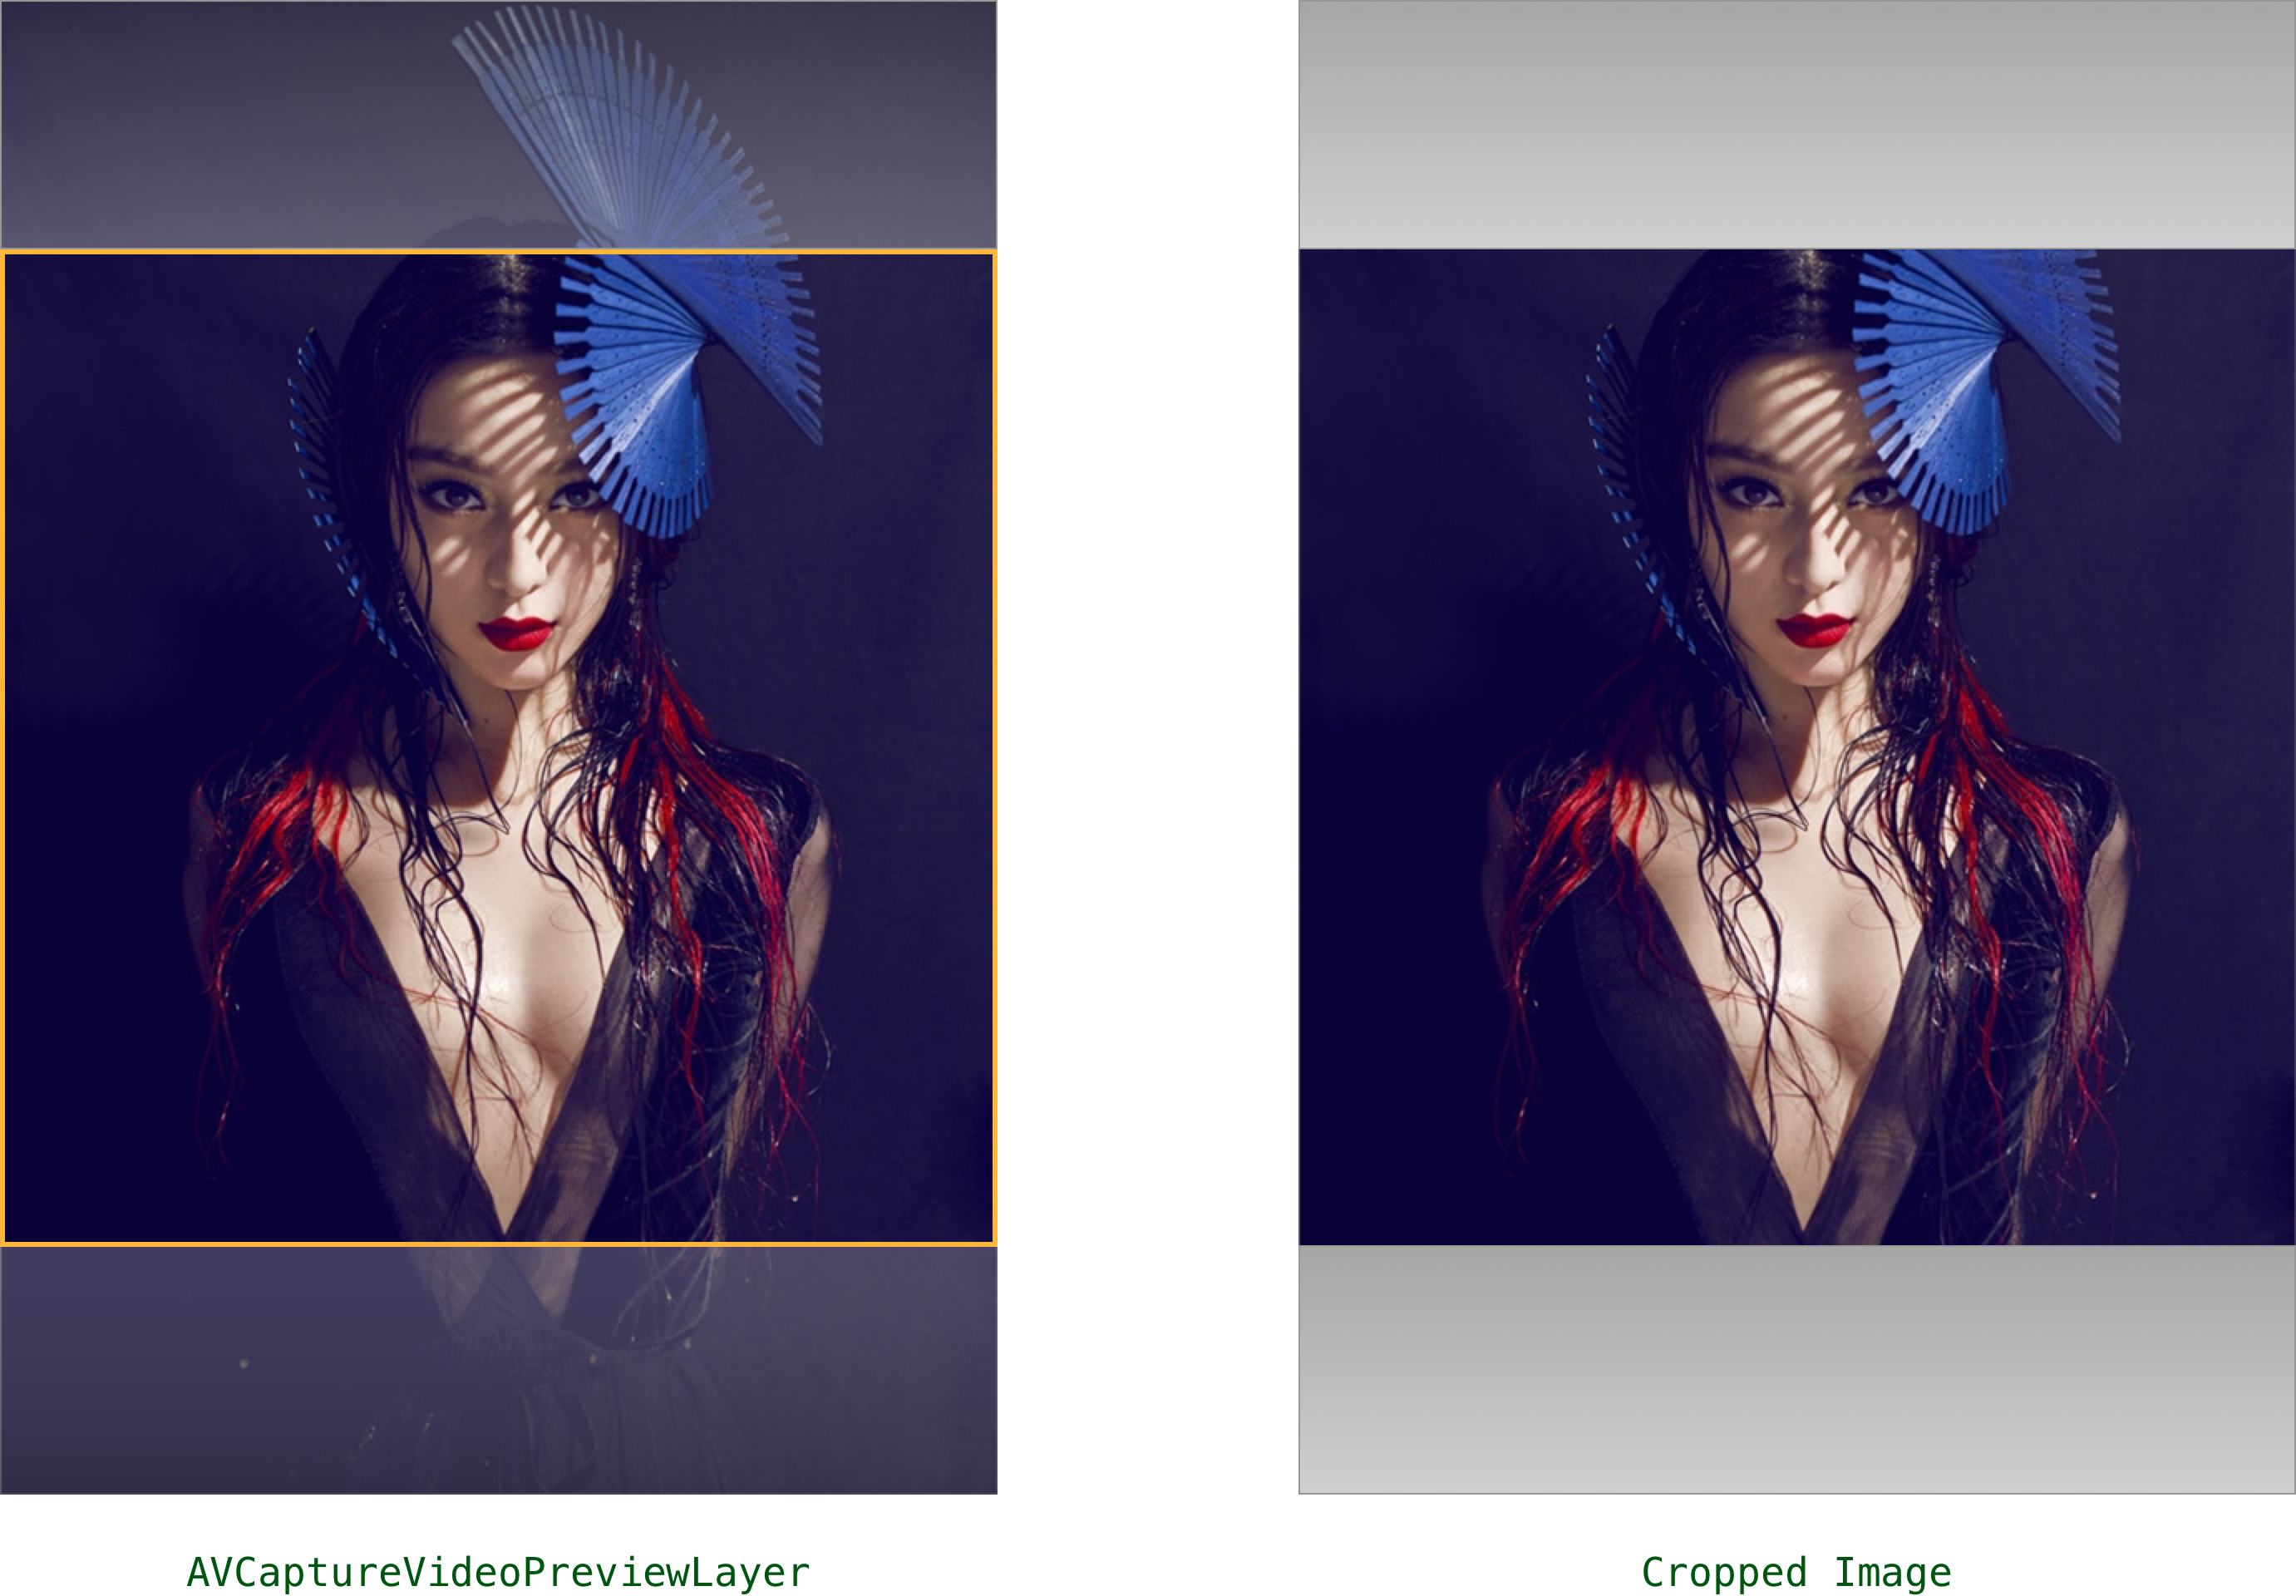
上面我們說過
AVCaptureVideoPreviewLayer是有自己的size frame的,并不是我們?cè)O(shè)置的1 :1的大小,而是左右填充居中的。所以我們要對(duì)圖片進(jìn)行一次裁切處理。
這樣,我們就得到了我們想要拍攝的圖像了。
除此之外,由于Prisma只是支持Portrait方向。所以,當(dāng)我們橫屏向右拍攝的時(shí)候,此時(shí)device的方向依然是Portrait(plist中設(shè)置的方向決定設(shè)備的方向),相機(jī)仍然是認(rèn)為側(cè)立向右的,這樣,即便我們通過fixOrientation()恢復(fù)到正確的方向,由于橫屏向右的緣故,圖片就會(huì)變成向左轉(zhuǎn)動(dòng)90度(雖然,屏幕橫屏向右,但對(duì)于相機(jī)來說任然是側(cè)立向右。而此時(shí),屏幕頂部閃光燈一側(cè)的位置正好是橫屏下圖片的右側(cè),所以在正過來之后就會(huì)出現(xiàn)圖片右側(cè)成為圖片頂部的狀況)
這時(shí),我們需要通過重力感應(yīng)的方式,獲取屏幕界面的方向 ——是真正的屏幕界面的方向,不是UIDevice的方向
這里定義一個(gè)類FMDeviceOrientation,包含CMMotionManager屬性,通過下面的方法獲取方向:
private func actualDeviceOrientationFromAccelerometer() -> UIDeviceOrientation {
    let acceleration = motionManager.accelerometerData!.acceleration
    if acceleration.z < -0.75 {
        return UIDeviceOrientation.FaceUp
    }

    if acceleration.z > 0.75 {
        return UIDeviceOrientation.FaceDown
    }

    let scaling = 1.0 / (fabs(acceleration.x) + fabs(acceleration.y))

    let x = acceleration.x * scaling
    let y = acceleration.y * scaling

    if x < -0.5 {
        return UIDeviceOrientation.LandscapeLeft
    }

    if x > 0.5 {
        return UIDeviceOrientation.LandscapeRight
    }

    if y > 0.5 {
        return UIDeviceOrientation.PortraitUpsideDown
    }

    return UIDeviceOrientation.Portrait
}
這里獲取的就是我們看到的界面的方向,比如,手機(jī)豎屏就是Portrait,右側(cè)橫屏就是LandScapeRight。
我們知道了當(dāng)前界面的方向,就可以通過判斷界面的方向與設(shè)備的方向是否一致來決定是否對(duì)圖片做進(jìn)一步的旋轉(zhuǎn)操作。比如:
現(xiàn)在,右側(cè)橫屏拍攝一張圖片,出來的效果是向左旋轉(zhuǎn)90度。此時(shí),我們也可以通過fixOrientation()的方式再次處理,但是需要做參數(shù)調(diào)整:
此時(shí)圖片向左旋轉(zhuǎn)90度,正好跟沒有處理原始圖片是的方向一樣。相機(jī)坐標(biāo)系認(rèn)為豎屏是向右側(cè)立,image的方向也是Right了,出來的圖片也是向左旋轉(zhuǎn)90度。所以,我們?cè)O(shè)定圖片的方向參數(shù)也是Right,調(diào)用
fixOrientation(imageOrientation: UIImageOrientation),這樣我們假定圖片是相機(jī)向右側(cè)立拍攝,通過fix后,就會(huì)得到正常的圖片。因此也得出結(jié)論:
界面的方向是哪個(gè)方向,我們?cè)俅握{(diào)用fixOrientation(imageOrientation: UIImageOrientation)后,就再傳入哪個(gè)方向就可以了
完整過程如下:
// Fix orientation & crop image
image = image.fixOrientation()
image = PMImageManger.cropImageAffterCapture(image,toSize: self.previewLayer!.frame.size)

// Fix interface orientation
if !self.orientationManger.deviceOrientationMatchesInterfaceOrientation() {
    let interfaceOrientation = self.orientationManger.orientation()
    image = image.rotateImageFromInterfaceOrientation(interfaceOrientation)
}
最終,我們的到了我們想要的圖片。根據(jù)配置,進(jìn)行是否保存相冊(cè)就好了。(Prisma細(xì)節(jié)的對(duì)于拍攝按鈕都做了縮放點(diǎn)擊處理,這里對(duì)于實(shí)現(xiàn)過程就不做介紹了)
實(shí)現(xiàn)效果如下
自定義相機(jī)參考資料iOS上相機(jī)捕獲
相冊(cè)選擇
從上面Prisma的框架可以看出,Prisma使用的相冊(cè)框架是AssetsLibrary,在iOS8之后,系統(tǒng)增加了相冊(cè)框架Photos,因此,這里我是采用Photos框架實(shí)現(xiàn)相冊(cè)功能
PrsimaImagePicker
這是一個(gè)獨(dú)立的模塊,可以單獨(dú)使用。最初,打算重寫Prisma也是因?yàn)橄矚g上Prisma有意思的圖片選擇器,而決定自己也要做一個(gè)。
首先,分析Prisma圖片選擇器的結(jié)構(gòu):
- 頂部是一個(gè)單獨(dú)的view用于作為大圖的呈現(xiàn),與圖片的簡(jiǎn)單縮放編輯
- 下面是展示一個(gè)相冊(cè)內(nèi)的所有照片,點(diǎn)擊后,大圖切換。并且根據(jù)點(diǎn)擊的位置與大圖的位置不同,會(huì)做一個(gè)交互調(diào)整。首先保證所選圖片在大圖底部對(duì)齊,其次是所選圖片如果遮擋會(huì)自動(dòng)全部顯露
- 在交互上,底部列表單獨(dú)滑動(dòng)。當(dāng)手勢(shì)移動(dòng)到大圖底部邊緣的時(shí)候,大圖跟隨滑動(dòng),從而增加可視面積
通過以上的功能分析,決定采用約束動(dòng)畫的方式實(shí)現(xiàn)大圖與列表的位置關(guān)系,這樣,我只需改變頂部大圖的位置,就可以自然的改變底部列表的高度,來達(dá)到列表面積的變化。
另一點(diǎn),通過操作可以發(fā)現(xiàn),Prisma中對(duì)于底部列表與頂部大圖header的手勢(shì)處理是連貫的:在滑動(dòng)底部列表同時(shí)滑動(dòng)頂部header時(shí),頂部header到達(dá)頂部后,底部列表仍然可以有慣性的向上滾動(dòng)。所以,一開始想要使用UIDynimc的方式給列表與header添加一個(gè)共用的手勢(shì)來處理,后來覺得這個(gè)很是麻煩,效果可能也會(huì)不盡人意。于是,采用了另一種方式:Method Swizzle
運(yùn)行時(shí),交換
UIScrollView的PanGestureRecognizer的action方法(這個(gè)action的獲得可以通過打印手勢(shì)才獲取),然后給UIScrollView增加一個(gè)手勢(shì)滑動(dòng)操作的回調(diào)。這樣,就可以在UIScrollView滾動(dòng)的時(shí)候同時(shí)處理頂部大圖header的位置了
這里有個(gè)細(xì)節(jié)值得注意的是,由于采用約束做動(dòng)畫。在UIKit動(dòng)作畫處理的時(shí)候,不能單純的改變約束的值,因?yàn)椋@樣只是通知系統(tǒng),約束改變已經(jīng)處于可以重新布局的狀態(tài)。所以,我們要主動(dòng)調(diào)用setNeedsLayout來布局UI,否則是沒有動(dòng)畫效果的,如下:
UIView.animateWithDuration(self.constParams.backHeaderAnimationDuration, delay: 0, options: [UIViewAnimationOptions.AllowUserInteraction, UIViewAnimationOptions.CurveLinear], animations: {
     self.headerTopConstraints.constant = 0
     self.view.layoutIfNeeded()
     }, completion: { (finish: Bool) in

})
實(shí)現(xiàn)的效果
這樣,圖片選擇功能界面的重點(diǎn)就完成了。接下來需要處理相冊(cè)了
獲取相冊(cè)圖片
導(dǎo)入Photos框架,需要使用的類有:
- PHAssetCollection 相冊(cè)相關(guān)的類,處理可以根據(jù)參數(shù)獲取所有的相冊(cè)
- PHAsset 保存一個(gè)相冊(cè)照片信息,獲取某個(gè)相冊(cè)中的照片
- PHFetchResult 處理相冊(cè)照片后返回的結(jié)果,通過這個(gè)結(jié)果獲取具體的相冊(cè)內(nèi)容或者照片內(nèi)容
首先,同樣需要獲取系統(tǒng)權(quán)限的認(rèn)證
/// Photolibrary authorization
class func photoAuthorization(canGoAssets: ((Bool)-> Void)!) {

    let PhotoStatus: PHAuthorizationStatus = PHPhotoLibrary.authorizationStatus()
    switch (PhotoStatus) {
    case .NotDetermined:
        PHPhotoLibrary.requestAuthorization { (status: PHAuthorizationStatus) in
            dispatch_async(dispatch_get_main_queue(), {
                switch (status) {
                case .Authorized:
                    canGoAssets(true)
                    break
                default:
                    canGoAssets(false)
                    break
                }
            })
        }
        break
    case .Authorized:
        canGoAssets(true)
        break
    default:
        canGoAssets(false)
        break
    }
}
認(rèn)證之后,就獲取系統(tǒng)所有的相冊(cè)(或者我們想要獲取的相冊(cè))
相冊(cè)獲取通過
public class func fetchAssetCollectionsWithType(type: PHAssetCollectionType, subtype: PHAssetCollectionSubtype, options: PHFetchOptions?) -> PHFetchResult接口枚舉返回的PHFetchResult來獲取相冊(cè),其中PHAssetCollectionType與PHAssetCollectionSubtype配合可以獲取我們制定的相冊(cè)
var photoGroups:[PHAssetCollection] = [PHAssetCollection]()

// Camera
let cameraRoll: PHAssetCollection = (PHAssetCollection.fetchAssetCollectionsWithType(.SmartAlbum, subtype: .SmartAlbumUserLibrary, options: nil).lastObject as? PHAssetCollection)!
if cameraRoll.photosCount > 0 {
    photoGroups.append(cameraRoll)
}

// Favorites
let favorites: PHFetchResult = PHAssetCollection.fetchAssetCollectionsWithType(.SmartAlbum, subtype: .SmartAlbumFavorites, options: nil)
favorites.enumerateObjectsWithOptions(.Reverse) { (obj, index: Int, stop: UnsafeMutablePointer<ObjCBool>) in
    let collection = obj as! PHAssetCollection
    guard collection.photosCount > 0 else {
        return
    }
    photoGroups.append(collection)
}
這里需要介紹一下獲取相冊(cè)的類型,根據(jù)不同的類型才能獲取我們想要的相冊(cè)
enum PHAssetCollectionType : Int {
    case Album //從 iTunes 同步來的相冊(cè),以及用戶在 Photos 中自己建立的相冊(cè)
    case SmartAlbum //經(jīng)由相機(jī)得來的相冊(cè)
    case Moment //Photos 為我們自動(dòng)生成的時(shí)間分組的相冊(cè)
}

enum PHAssetCollectionSubtype : Int {
    case AlbumRegular //用戶在 Photos 中創(chuàng)建的相冊(cè),也就是我所謂的邏輯相冊(cè)
    case AlbumSyncedEvent //使用 iTunes 從 Photos 照片庫或者 iPhoto 照片庫同步過來的事件。然而,在iTunes 12 以及iOS 9.0 beta4上,選用該類型沒法獲取同步的事件相冊(cè),而必須使用AlbumSyncedAlbum。
    case AlbumSyncedFaces //使用 iTunes 從 Photos 照片庫或者 iPhoto 照片庫同步的人物相冊(cè)。
    case AlbumSyncedAlbum //做了 AlbumSyncedEvent 應(yīng)該做的事
    case AlbumImported //從相機(jī)或是外部存儲(chǔ)導(dǎo)入的相冊(cè),完全沒有這方面的使用經(jīng)驗(yàn),沒法驗(yàn)證。
    case AlbumMyPhotoStream //用戶的 iCloud 照片流
    case AlbumCloudShared //用戶使用 iCloud 共享的相冊(cè)
    case SmartAlbumGeneric //文檔解釋為非特殊類型的相冊(cè),主要包括從 iPhoto 同步過來的相冊(cè)。由于本人的 iPhoto 已被 Photos 替代,無法驗(yàn)證。不過,在我的 iPad mini 上是無法獲取的,而下面類型的相冊(cè),盡管沒有包含照片或視頻,但能夠獲取到。
    case SmartAlbumPanoramas //相機(jī)拍攝的全景照片
    case SmartAlbumVideos //相機(jī)拍攝的視頻
    case SmartAlbumFavorites //收藏文件夾
    case SmartAlbumTimelapses //延時(shí)視頻文件夾,同時(shí)也會(huì)出現(xiàn)在視頻文件夾中
    case SmartAlbumAllHidden //包含隱藏照片或視頻的文件夾
    case SmartAlbumRecentlyAdded //相機(jī)近期拍攝的照片或視頻
    case SmartAlbumBursts //連拍模式拍攝的照片,在 iPad mini 上按住快門不放就可以了,但是照片依然沒有存放在這個(gè)文件夾下,而是在相機(jī)相冊(cè)里。
    case SmartAlbumSlomoVideos //Slomo 是 slow motion 的縮寫,高速攝影慢動(dòng)作解析,在該模式下,iOS 設(shè)備以120幀拍攝。不過我的 iPad mini 不支持,沒法驗(yàn)證。
    case SmartAlbumUserLibrary //這個(gè)命名最神奇了,就是相機(jī)相冊(cè),所有相機(jī)拍攝的照片或視頻都會(huì)出現(xiàn)在該相冊(cè)中,而且使用其他應(yīng)用保存的照片也會(huì)出現(xiàn)在這里。
    case Any //包含所有類型
}
注意這里的type與subtype要對(duì)應(yīng)
獲取目標(biāo)相冊(cè)之后,就要獲取某個(gè)相冊(cè)下的所有照片了
照片獲取需要使用
PHAsset的public class func fetchAssetsInAssetCollection(assetCollection: PHAssetCollection, options: PHFetchOptions?) -> PHFetchResult接口,同樣枚舉返回的PHFetchResult獲取圖片內(nèi)容
/// Get photos from an album
class func photoAssetsForAlbum(collection: PHAssetCollection) -> [PHAsset] {
    var photoAssets:[PHAsset] = [PHAsset]()

    let asstes: PHFetchResult = PHAsset.fetchAssetsInAssetCollection(collection, options: nil)
    asstes.enumerateObjectsWithOptions(NSEnumerationOptions.Reverse) { (obj, index: Int, stop: UnsafeMutablePointer<ObjCBool>) in
        photoAssets.append(obj as! PHAsset)
    }
    return photoAssets
}
相冊(cè)完成之后的效果如下
照片縮放旋轉(zhuǎn)編輯
說到這里,縮放什么的只是采用UIScrollView就可以了。不過,有意思的是,Prisma真是細(xì)節(jié)做的很到位。
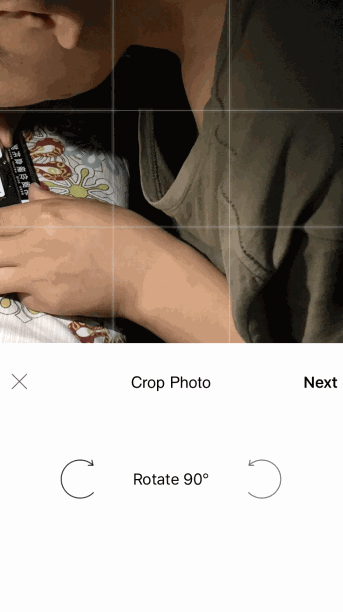
- 在圖片選擇模式下,會(huì)有個(gè)隱藏的九宮格,拖動(dòng)圖片的時(shí)候格子標(biāo)尺會(huì)顯示。照片編輯模式下,常顯示格子標(biāo)尺
- 一開始只是認(rèn)為Prisma的九宮格是一個(gè)像素的白線構(gòu)成,但是當(dāng)我們?yōu)g覽白色照片的時(shí)候,會(huì)發(fā)現(xiàn),一個(gè)像素的線的底部有一個(gè)淺淺的灰色半透明的線,以便白色照片下仍可以觀察。而在深色系照片上則是很難發(fā)現(xiàn)它的存在(細(xì)節(jié)處理真是到位)
- 同時(shí),無論怎樣滑動(dòng)圖片。格子標(biāo)尺總是自適應(yīng)照片與屏幕的邊緣,只顯示在圖片在屏幕中的位置
為了達(dá)到這個(gè)效果,首先需要畫一個(gè)九宮格,采用自定義view重寫drawRect畫一像素的線
func drawLine(context: CGContext, color: UIColor, width: CGFloat) {
    let width1 = CGFloatPixelRound(bounds.size.width/3)
    let width2 = CGFloatPixelRound(bounds.size.width/3 * 2)
    let height1 = CGFloatPixelRound(bounds.size.height/3)
    let height2 = CGFloatPixelRound(bounds.size.height/3 * 2)

    // H line 1
    CGContextSetStrokeColorWithColor(context, color.CGColor)
    CGContextMoveToPoint(context, 0, height1 + lineOffset)
    CGContextAddLineToPoint(context, bounds.size.width, height1 + lineOffset)
    CGContextSetLineWidth(context, width)
    CGContextStrokePath(context)

    CGContextSaveGState(context)

    // H line 2
    CGContextSetStrokeColorWithColor(context, color.CGColor)
    CGContextMoveToPoint(context, 0, height2 + lineOffset)
    CGContextAddLineToPoint(context, bounds.size.width, height2 + lineOffset)
    CGContextSetLineWidth(context, width)
    CGContextStrokePath(context)

    CGContextRestoreGState(context)
    CGContextSaveGState(context)


    // V line 1
    CGContextSetStrokeColorWithColor(context, color.CGColor)
    CGContextMoveToPoint(context, width1 + lineOffset, 0)
    CGContextAddLineToPoint(context, width1 + lineOffset, bounds.size.height)
    CGContextSetLineWidth(context, width)
    CGContextStrokePath(context)

    CGContextRestoreGState(context)
    CGContextSaveGState(context)

    // V line 2
    CGContextSetStrokeColorWithColor(context, color.CGColor)
    CGContextMoveToPoint(context, width2 + lineOffset, 0)
    CGContextAddLineToPoint(context, width2 + lineOffset, bounds.size.height)
    CGContextSetLineWidth(context, width)
    CGContextStrokePath(context)
}
其次,格子view需要添加在ScrollView的父視圖上,并觀察ScrollView的contentOffset,對(duì)圖片的移動(dòng)進(jìn)行跟蹤改變格子的位置與大小。
同時(shí),需要增加ScrollView縮放的回調(diào),來處理縮放中格子的變化
這里一開始,把格子放在ScrollView的圖片上。縮放中,圖片的frame的變化并不是看上去的樣子,而是根據(jù)scale做了坐標(biāo)系的仿射變換,看上去大小變了,而frame是做了scale的處理的。而這樣,不好處理,所以格子要加在ScrollView的父視圖上
實(shí)現(xiàn)的效果如下
照片的旋轉(zhuǎn)就簡(jiǎn)單了,動(dòng)畫改變transform就可以了。不過,有一點(diǎn)是,在旋轉(zhuǎn)編輯進(jìn)入下一步的時(shí)候我們需要通過記錄的圖片的位置以及圖片的縮放大小來對(duì)圖片做一次旋轉(zhuǎn)截圖處理
Prisma對(duì)于選擇圖片后進(jìn)入編輯頁面的處理,也是保留了imagePicker選擇圖片時(shí)的縮放狀態(tài)與位置(很人性)
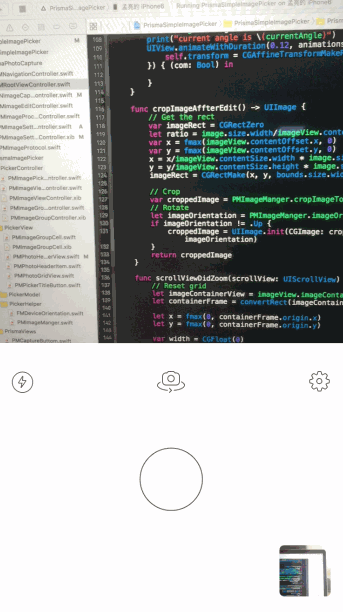
func cropImageAffterEdit() -> UIImage {
    // Get the rect
    var imageRect = CGRectZero
    let ratio = image.size.width/imageView.contentSize.width
    var x = fmax(imageView.contentOffset.x, 0)
    var y = fmax(imageView.contentOffset.y, 0)
    x = x/imageView.contentSize.width * image.size.width
    y = y/imageView.contentSize.height * image.size.height
    imageRect = CGRectMake(x, y, bounds.size.width * ratio, bounds.size.height * ratio)

    // Crop
    var croppedImage = PMImageManger.cropImageToRect(self.image, toRect: imageRect)
    // Rotate
    let imageOrientation = PMImageManger.imageOrientationFromDegress(currentAngle)
    if imageOrientation != .Up {
        croppedImage = UIImage.init(CGImage: croppedImage.CGImage!, scale: croppedImage.scale, orientation: imageOrientation)
    }
    return croppedImage
}
實(shí)現(xiàn)效果如下
操作菜單
Prisma對(duì)于底部操作菜單的處理,通常會(huì)簡(jiǎn)單的使用UIScrollView來實(shí)現(xiàn),但是在分析過程中,發(fā)現(xiàn)無論是操作界面頂部的按鈕位置,界面轉(zhuǎn)場(chǎng),還是通過邊緣側(cè)滑返回上看,都覺得Prisma采用的是自定義UINavigationController的轉(zhuǎn)場(chǎng)效果來實(shí)現(xiàn)的。所以,我這里也是通過自定義導(dǎo)航控制器實(shí)現(xiàn)操作界面功能
首先,自定義導(dǎo)航控制器,遵從UIViewControllerAnimatedTransitioning與UINavigationControllerDelegate代理自定義轉(zhuǎn)場(chǎng)效果,取消轉(zhuǎn)場(chǎng)中的層級(jí)變化。
其次,在自定義的導(dǎo)航控制你中添加一個(gè)平移手勢(shì),并且取消系統(tǒng)邊緣返回手勢(shì)。達(dá)到控制手勢(shì)滑動(dòng)返回。
最后,由于導(dǎo)航控制器共用一個(gè)UINavigationBar,會(huì)有頂部菜單的過度動(dòng)畫。為了取消這個(gè)過度動(dòng)畫,影藏導(dǎo)航欄,給每個(gè)Controller單獨(dú)添加一個(gè)UINavigationbar,這樣就可以無過渡的切換Controller了(同時(shí),這個(gè)方式還可以用來實(shí)現(xiàn)網(wǎng)易音樂等的轉(zhuǎn)場(chǎng)效果)
實(shí)現(xiàn)效果如下
通過,重寫Prisma,讓自己更加感受到了Prisma的魅力。這一樣一個(gè)極其注重細(xì)節(jié)的公司,做出一個(gè)藝術(shù)圖片處理的APP,怎么能夠不活?因此,也讓我更加理解注重細(xì)節(jié)的魅力。作為一個(gè)開發(fā)者,也應(yīng)該要有一顆產(chǎn)品的心,對(duì)自己的項(xiàng)目負(fù)責(zé),認(rèn)真對(duì)待每一個(gè)細(xì)節(jié)(題外啰嗦了,哈哈??)。
