Glide的使用
Glide是google開發用于Android加載媒體的類庫,包括圖片,gif,video,已經在很多項目中使用,靈活快速。下面我們看如何使用它,如果有什么不對的請不吝指教
-
導入到項目中
dependencies { compile fileTree(include: ['*.jar'], dir: 'libs') testCompile 'junit:junit:4.12' compile 'com.android.support:appcompat-v7:24.1.1' compile 'com.github.bumptech.glide:glide:3.7.0' compile 'com.android.support:support-v4:24.1.1' }Glide同樣需要Android Support Library v4,請記得加上support-v4,不過現在項目基本都包含support-v4。
-
加載圖片
Glide.with(this).load("http://inthecheesefactory.com/uploads/source/glidepicasso/cover.jpg") .asBitmap() .into(mImageView); -
Glide的生命周期
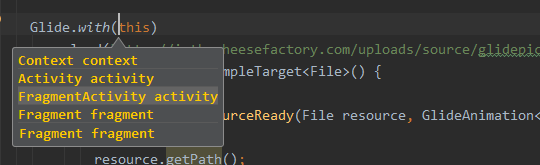 glide-with
Glide.with()不僅僅只是Context還可以是Activity,Fragment等,傳入后自動適配,Glide加載圖片是會隨著Activity,Fragment的生命周期,具體可以參考LifecycleListener,所以推薦使用Activity,Fragment. -
設置圖片大小
.override(200,200)可以設置加載圖片大小,但是實際大小不一定是200x200,通過源碼分析下:在
BitmapRequestBuilder中默認的private Downsampler downsampler = Downsampler.AT_LEAST;/** * Load and scale the image uniformly (maintaining the image's aspect ratio) so that the smallest edge of the * image will be between 1x and 2x the requested size. The larger edge has no maximum size. */ public static final Downsampler AT_LEAST = new Downsampler() { @Override protected int getSampleSize(int inWidth, int inHeight, int outWidth, int outHeight) { return Math.min(inHeight / outHeight, inWidth / outWidth); } @Override public String getId() { return "AT_LEAST.com.bumptech.glide.load.data.bitmap"; } };然后在
Downsampler中的decode方法中,獲取的Bitmap大小變成1/sampleSize,倍數通過getSampleSize計算所得,options.inTempStorage = bytesForOptions; final int[] inDimens = getDimensions(invalidatingStream, bufferedStream, options); final int inWidth = inDimens[0]; final int inHeight = inDimens[1]; final int degreesToRotate = TransformationUtils.getExifOrientationDegrees(orientation); final int sampleSize = getRoundedSampleSize(degreesToRotate, inWidth, inHeight, outWidth, outHeight); final Bitmap downsampled = downsampleWithSize(invalidatingStream, bufferedStream, options, pool, inWidth, inHeight, sampleSize, decodeFormat); // BitmapFactory swallows exceptions during decodes and in some cases when inBitmap is non null, may catch // and log a stack trace but still return a non null bitmap. To avoid displaying partially decoded bitmaps, // we catch exceptions reading from the stream in our ExceptionCatchingInputStream and throw them here. final Exception streamException = exceptionStream.getException(); if (streamException != null) { throw new RuntimeException(streamException); } Bitmap rotated = null; if (downsampled != null) { rotated = TransformationUtils.rotateImageExif(downsampled, pool, orientation); if (!downsampled.equals(rotated) && !pool.put(downsampled)) { downsampled.recycle(); } }inSampleSize 是 BitmapFactory.Options的屬性,應該大家都知道。然后再看看怎么生成
.override(200,200),如果沒有設置Glide默認是FitCenter,查看FitCenter可以看到圖片截取方式。public class FitCenter extends BitmapTransformation { public FitCenter(Context context) { super(context); } public FitCenter(BitmapPool bitmapPool) { super(bitmapPool); } @Override protected Bitmap transform(BitmapPool pool, Bitmap toTransform, int outWidth, int outHeight) { return TransformationUtils.fitCenter(toTransform, pool, outWidth, outHeight); } @Override public String getId() { return "FitCenter.com.bumptech.glide.load.resource.bitmap"; } }--
   public static Bitmap fitCenter(Bitmap toFit, BitmapPool pool, int width, int height) {
          if (toFit.getWidth() == width && toFit.getHeight() == height) {
              if (Log.isLoggable(TAG, Log.VERBOSE)) {
                  Log.v(TAG, "requested target size matches input, returning input");
              }
              return toFit;
          }
          final float widthPercentage = width / (float) toFit.getWidth();
          final float heightPercentage = height / (float) toFit.getHeight();
          final float minPercentage = Math.min(widthPercentage, heightPercentage);

          // take the floor of the target width/height, not round. If the matrix
          // passed into drawBitmap rounds differently, we want to slightly
          // overdraw, not underdraw, to avoid artifacts from bitmap reuse.
          final int targetWidth = (int) (minPercentage * toFit.getWidth());
          final int targetHeight = (int) (minPercentage * toFit.getHeight());

          if (toFit.getWidth() == targetWidth && toFit.getHeight() == targetHeight) {
              if (Log.isLoggable(TAG, Log.VERBOSE)) {
                  Log.v(TAG, "adjusted target size matches input, returning input");
              }
              return toFit;
          }

          Bitmap.Config config = getSafeConfig(toFit);
          Bitmap toReuse = pool.get(targetWidth, targetHeight, config);
          if (toReuse == null) {
              toReuse = Bitmap.createBitmap(targetWidth, targetHeight, config);
          }
          // We don't add or remove alpha, so keep the alpha setting of the Bitmap we were given.
          TransformationUtils.setAlpha(toFit, toReuse);

          if (Log.isLoggable(TAG, Log.VERBOSE)) {
              Log.v(TAG, "request: " + width + "x" + height);
              Log.v(TAG, "toFit:   " + toFit.getWidth() + "x" + toFit.getHeight());
              Log.v(TAG, "toReuse: " + toReuse.getWidth() + "x" + toReuse.getHeight());
              Log.v(TAG, "minPct:   " + minPercentage);
          }

          Canvas canvas = new Canvas(toReuse);
          Matrix matrix = new Matrix();
          matrix.setScale(minPercentage, minPercentage);
          Paint paint = new Paint(PAINT_FLAGS);
          canvas.drawBitmap(toFit, matrix, paint);

          return toReuse;
      }
這里算出圖片的大小:
          final float widthPercentage = width / (float) toFit.getWidth();
          final float heightPercentage = height / (float) toFit.getHeight();
          final float minPercentage = Math.min(widthPercentage, heightPercentage);
測試中我們使用的圖片是1080x540,最終生成了200x100.設置
approximate()對應Downsampler.AT_LEAST,asIs()對應Downsampler.NONE,atMost()對應Downsampler.AT_MOST,具體情況可查看Downsampler
-
圖片緩存策略
測試加載的圖片大小為1080x540,如果使用了
.override(200,200)默認緩存一張200x100的圖片,也就是默認存儲結果RESULT,如果想要改變緩存的策略可以這樣設置:.diskCacheStrategy(DiskCacheStrategy.ALL)DiskCacheStrategy 分別有以下幾種選擇,
ALL緩存原圖和截取后的圖,NONE不緩存,SOURCE只緩存原圖,RESULT緩存截取后的圖:public enum DiskCacheStrategy { /** Caches with both {@link #SOURCE} and {@link #RESULT}. */ ALL(true, true), /** Saves no data to cache. */ NONE(false, false), /** Saves just the original data to cache. */ SOURCE(true, false), /** Saves the media item after all transformations to cache. */ RESULT(false, true); private final boolean cacheSource; private final boolean cacheResult; DiskCacheStrategy(boolean cacheSource, boolean cacheResult) { this.cacheSource = cacheSource; this.cacheResult = cacheResult; } /** * Returns true if this request should cache the original unmodified data. */ public boolean cacheSource() { return cacheSource; } /** * Returns true if this request should cache the final transformed result. */ public boolean cacheResult() { return cacheResult; } }查看本地緩存如下:
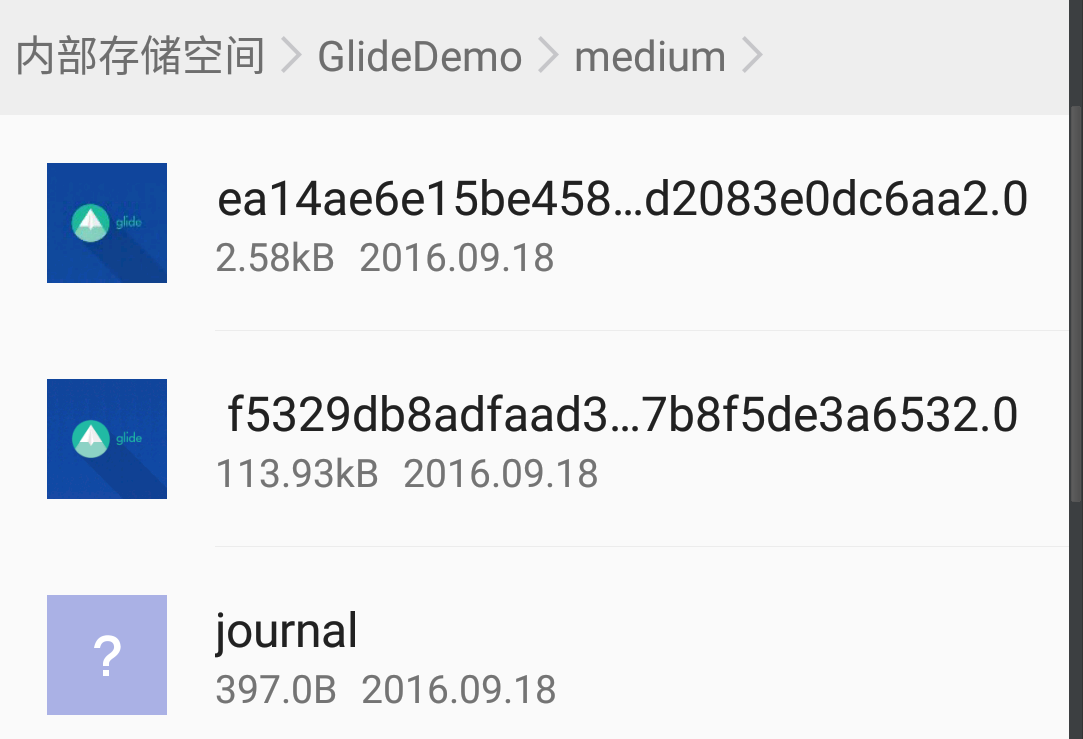 DiskCacheStrategy
如果圖片需要分享或需要原圖的建議緩存
ALL,否則只緩存RESULT。 -
Glide全局配置
-
創建
GlideModelpublic class GlideConfigModule implements GlideModule { @Override public void applyOptions(Context context, GlideBuilder builder) { } @Override public void registerComponents(Context context, Glide glide) { } } -
在
AndroidManifest.xml的meta-data配置GlideModule<meta-data android:name="com.branch.www.glidedemo.GlideConfigModule" android:value="GlideModule"/> -
解決
GlideModel沖突有可能加入的library中也同樣配置了
GlideModule,如果配置了多個會出現沖突,無法編譯運行,解決方式可在AndroidManifest.xml移除<meta-data android:name=”com.mypackage.MyGlideModule” tools:node=”remove” /> -
默認Bitmap Format 是 RGB_565
為了降低內存消耗,Glide默認配置的Bitmap Format 為 RGB_565,修改GlideBuilder's
setDecodeFormat設置builder.setDecodeFormat(DecodeFormat.PREFER_ARGB_8888); -
配置Disk緩存
使用GlideBuilder's
setDiskCache()方法設置緩存目錄和大小。
默認Glide使用InternalCacheDiskCacheFactory,默認最大緩存250M,這是一個應用內部目錄的緩存,緩存的圖片只能本應用可以有權獲取。builder.setDiskCache( new InternalCacheDiskCacheFactory(context, yourSizeInBytes)); builder.setDiskCache( new InternalCacheDiskCacheFactory(context, cacheDirectoryName, yourSizeInBytes));你也可以使用
ExternalCacheDiskCacheFactory去設置SD卡緩存builder.setDiskCache( new ExternalCacheDiskCacheFactory(context, cacheDirectoryName, yourSizeInBytes));或者使用DiskLruCacheFactory配置自己管理的緩存目錄和大小
     // If you can figure out the folder without I/O:
     // Calling Context and Environment class methods usually do I/O.
     builder.setDiskCache(
       new DiskLruCacheFactory(getMyCacheLocationWithoutIO(), yourSizeInBytes));

     // In case you want to specify a cache folder ("glide"):
     builder.setDiskCache(
       new DiskLruCacheFactory(getMyCacheLocationWithoutIO(), "glide", yourSizeInBytes));

     // In case you need to query the file system while determining the folder:
     builder.setDiskCache(new DiskLruCacheFactory(new CacheDirectoryGetter() {
         @Override public File getCacheDirectory() {
             return getMyCacheLocationBlockingIO();
         }
     }), yourSizeInBytes);
或者你想完全控制緩存可以通過實現
DiskCache.Factory然后用DiskLruCacheWrapper去創建你期望的目錄。builder.setDiskCache(new DiskCache.Factory() { @Override public DiskCache build() { File cacheLocation = getMyCacheLocationBlockingIO(); cacheLocation.mkdirs(); return DiskLruCacheWrapper.get(cacheLocation, yourSizeInBytes); } });如果你不需要任何緩存可以使用
DiskCacheAdapter或者自己實現DiskCache,DiskCacheAdapter內部沒有任何實現。 -
Bitmap Pool
為了避免Bitmap頻繁解碼,我們通常會在系統內存中緩存一部分經常使用的圖片。GlideBuilder's
setBitmapPool()可以設置你想要的緩存策略,緩存大小。例如我們常用的LRU策略。builder.setBitmapPool(new LruBitmapPool(sizeInBytes));或實現
BitmapPool自定義一個吧。Glide所有的基本配置都在
GlideModule內,使用Glide提供的緩存方式如下:builder.setDiskCache(new DiskLruCacheFactory(dirPath, DiskCache.Factory.DEFAULT_DISK_CACHE_SIZE));如果需要自定義實現
DiskCache.Factory。GlideModule 更多配置如下:
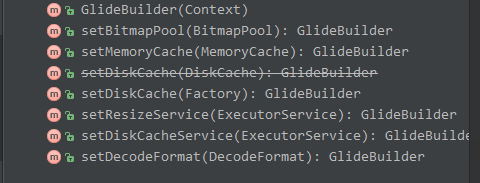 GlideModule
-
自定義加載
-
SimpleTarget
如果單純的想獲得Bitmap,顯不顯示或者其他再定,則可以使用
SimpleTargetGlide.with(this).load("http://inthecheesefactory.com/uploads/source/glidepicasso/cover.jpg") .asBitmap() .diskCacheStrategy(DiskCacheStrategy.ALL) .into(new SimpleTarget<Bitmap>() { @Override public void onResourceReady(Bitmap resource, GlideAnimation<? super Bitmap> glideAnimation) { } });需要注意的是如果你想獲取Bitmap那么一定不想因為
Activity,Fragment的生命周期影響,因此Glide.with(context)使用Context,同時為了避免內存泄露建議SimpleTarget使用靜態內部類而不是內部類(靜態內部類不持有外部引用)。 -
ViewTarget
如果想要在圖片加載完成后設置一些動畫則可以使用
ViewTargetGlide.with(this).load("http://inthecheesefactory.com/uploads/source/glidepicasso/cover.jpg") .asBitmap() .override(500,500) .diskCacheStrategy(DiskCacheStrategy.ALL) .into(new ViewTarget<ImageView, Bitmap>(mImageView) { @Override public void onResourceReady(Bitmap resource, GlideAnimation<? super Bitmap> glideAnimation) { this.view.setImageBitmap(resource); } });如果
.asGif()使用GlideDrawable替換Bitmap,同時ViewTarget中包含onStart(),onStop(),onDestroy()生命周期回調。如果想要繼續保留默認的特性可以相應的使用
GlideDrawableImageViewTarget在asGif()之后,使用BitmapImageViewTarget在asBitmap()之后。
-
-
自定義url
通過
widthxheight拼接url下載指定大小的圖片,或者根據屏幕大小選擇高,中,低三種分別率的圖片url。使用http或https加載圖片可以繼承
BaseGlideUrlLoaderpublic interface MyDataModel { public String buildUrl(int width, int height); } public class MyUrlLoader extends BaseGlideUrlLoader<MyDataModel> { @Override protected String getUrl(MyDataModel model, int width, int height) { // Construct the url for the correct size here. return model.buildUrl(width, height); } }MyDataModel就相當于我們的媒體model,里面有當前媒體的類型(image/gif/video),url等屬性。然后你可以在加載是這樣使用:
       Glide.with(yourFragment)
      .using(new MyUrlLoader())
      .load(yourModel)
      .into(yourView);
如果不想每次都使用
.using(new MyUrlLoader()),可以在前面我們的GlideModule中配置public class MyGlideModule implements GlideModule { ... @Override public void registerComponents(Context context, Glide glide) { glide.register(MyDataModel.class, InputStream.class, new MyUrlLoader.Factory()); } }配置后加載時跳過
.using()
-
<span id="getBitmap">在后臺線程下載</span>
-
downloadOnly
downloadOnly有異步版和同步版,如果已經在后臺線程中執行必須同步版FutureTarget<File> future = Glide.with(applicationContext) .load(yourUrl) .downloadOnly(500, 500); File cacheFile = future.get();這種方式在主線程中會阻塞主線程。如果想要在主線程中執行可以使用前面講到的
SimpleTargetGlide.with(this) .load("http://inthecheesefactory.com/uploads/source/glidepicasso/cover.jpg") .downloadOnly(new SimpleTarget<File>() { @Override public void onResourceReady(File resource, GlideAnimation<? super File> glideAnimation) { } }); -
into
使用into可以用于下載,下面是在后臺線程中的使用:
     Bitmap myBitmap = Glide.with(applicationContext)
     .load(yourUrl)
     .asBitmap()
     .centerCrop()
     .into(500, 500)
     .get()
如果想在主線程中使用同樣可以使用
SimpleTarget
-
-
清除緩存
Glide.get(getApplicationContext()).clearMemory(); Glide.get(getApplicationContext()).clearDiskCache(); -
怎么使緩存失效
有時我們并不是想要清理所有緩存,只是app版本變動則原來的緩存可能不需要了,或本地圖片庫中圖片變更但是文件名地址沒有變則可能就出現繼續使用原來的縮略圖或
.override(200,200)使用的小圖,其實最好的情況是如果數據變更則相應的改變url,如果不改變可以使用StringSignature解決這個問題.-
通過版本使緩存失效
Glide.with(yourFragment) .load(yourFileDataModel) .signature(new StringSignature(yourVersionMetadata)) .into(yourImageView); -
MediaStore中的數據Glide.with(fragment) .load(mediaStoreUri) .signature(new MediaStoreSignature(mimeType, dateModified, orientation)) .into(view); -
自定義
實現
Key接口,重寫equals(),hashCode()和updateDiskCacheKey()方法,可以參考StringSignature或MediaStoreSignature的實現。
-
-
Transformations
-
默認的Transformations
Fit center
相當于Android's
ScaleType.FIT_CENTER.Glide.with(yourFragment) .load(yourUrl) .fitCenter() .into(yourView);Center crop
相當于Android's
ScaleType.CENTER_CROPGlide.with(yourFragment) .load(yourUrl) .centerCrop() .into(yourView); -
自定義transformations
最簡單的方式是集成
BitmapTransformationprivate static class MyTransformation extends BitmapTransformation { public MyTransformation(Context context) { super(context); } @Override protected Bitmap transform(BitmapPool pool, Bitmap toTransform, int outWidth, int outHeight) { Bitmap myTransformedBitmap = ... // apply some transformation here. return myTransformedBitmap; } @Override public String getId() { // Return some id that uniquely identifies your transformation. return "com.example.myapp.MyTransformation"; } }然后使用
.transform(new MyTransformation(context))Transformations 有各種豐富的效果。
BitmapTransformation可以用于改變bitmap形狀,顏色,截取,放大,所有等操作。
-
-
設置占位圖和加載錯誤圖
.placeholder(R.drawable.placeholder) .error(R.drawable.imagenotfound) -
ProGuard
-keep public class * implements com.bumptech.glide.module.GlideModule -keep public enum com.bumptech.glide.load.resource.bitmap.ImageHeaderParser$** { **[] $VALUES; public *; } -keepresourcexmlelements manifest/application/meta-data@value=GlideModule -
相關問題問答
-
使用
downloadOnly或into -
是否支持Webp
Android 4.0 以上能支持
-
在
AndroidManifest.xml的meta-data配置GlideModule是如何獲取的查看源碼在
Glide.get(Context)public static Glide get(Context context) { if (glide == null) { synchronized (Glide.class) { if (glide == null) { Context applicationContext = context.getApplicationContext(); List<GlideModule> modules = new ManifestParser(applicationContext).parse(); GlideBuilder builder = new GlideBuilder(applicationContext); for (GlideModule module : modules) { module.applyOptions(applicationContext, builder); } glide = builder.createGlide(); for (GlideModule module : modules) { module.registerComponents(applicationContext, glide.registry); } } } } return glide; }可以看到
GlideModule的獲取在ManifestParser同時也發現可以設置多個,不過同樣的配置后面的會覆蓋前面的。那么進入ManifestParser查看是怎么實現的。public final class ManifestParser { private static final String GLIDE_MODULE_VALUE = "GlideModule"; private final Context context; public ManifestParser(Context context) { this.context = context; } public List<GlideModule> parse() { List<GlideModule> modules = new ArrayList<>(); try { ApplicationInfo appInfo = context.getPackageManager() .getApplicationInfo(context.getPackageName(), PackageManager.GET_META_DATA); if (appInfo.metaData != null) { for (String key : appInfo.metaData.keySet()) { if (GLIDE_MODULE_VALUE.equals(appInfo.metaData.get(key))) { modules.add(parseModule(key)); } } } } catch (PackageManager.NameNotFoundException e) { throw new RuntimeException("Unable to find metadata to parse GlideModules", e); } return modules; } private static GlideModule parseModule(String className) { Class<?> clazz; try { clazz = Class.forName(className); } catch (ClassNotFoundException e) { throw new IllegalArgumentException("Unable to find GlideModule implementation", e); } Object module; try { module = clazz.newInstance(); } catch (InstantiationException | IllegalAccessException e) { throw new RuntimeException("Unable to instantiate GlideModule implementation for " + clazz, e); } if (!(module instanceof GlideModule)) { throw new RuntimeException("Expected instanceof GlideModule, but found: " + module); } return (GlideModule) module; } }
-
