英語太爛,菜鳥水平,如有不妥之處,請各位大神指正
-
工作原理
React Native應用程序由JavaScript文件和附帶的圖像組成,它們由打包程序捆綁在一起,并作為平臺特定的二進制文件(即.ipa或.apk文件)的一部分分發。 當應用程序發布后,更新JavaScript代碼(例如進行錯誤修復,添加新功能)或圖像資源時,需要重新編譯和重新分發整個二進制文件。(簡單說就是React Native App如果不使用熱更新的話,和原生App發布沒什么區別,同樣需要提交應用商店審核然后等待發布)
通過使用CodePush 插件,可以讓你的APP 時時和CodePush服務的數據保持同步更新,實現熱更新,而不用再去繁瑣的把應用提交到應用商店,等待審核。這樣可以讓你的APP更快的更新,獲得最新的體驗,實現雙贏。
為了確保你的APP用戶始終能正常使用您的應用程序,CodePush插件將會保留你的APP最新版本以前的副本,以便在您推送的最新版本發生崩潰時,可以自動回滾到上一個正常版本。
注意:如果你的產品修改了 原生文件代碼(例如修改AppDelegate.m/MainActivity.java等原生文件,或者添加新插件)不能通過CodePush進行更新,只能通過提交相應的應用商店更新。
-
支持平臺
- iOS(7+)
- Anddroid (4.1+)
- Windows(UWP)
我們會盡最大努力去維護CodePush和React Native版本的兼容性,但由于各個平臺的升級,會更改一些特性,你可能需要使用特定版本的CodePush插件,以支持你正在使用的ReactNative版本。下面的表格中列出了CodePush版本正式支持的ReactNative版本:
| ReactNative 版本 | 支持CodePush版本 |
|---|---|
<0.14 |
不支持 |
v0.14 |
v1.3.0(introduced Android support(支持安卓))
|
v0.15-v0.18 |
v1.4.0 - v1.6.0(introduced iOS asset support (不太懂,應該是支持iOS原生圖片添加)
|
v0.19-v0.28 |
v1.7.0+(introduced Android asset support)
|
v0.29-v0.30 |
v1.13.0+(RN refactored native hosting code) (這個意思應該是改變了這個 RCTBundleURLProvider 寫法)
|
v0.31-v0.33 |
v1.14.6+(RN refactored native hosting code)
|
v0.34-v0.35 |
v1.15.0+(RN refactored native hosting code)
|
v0.36-v0.39 |
v1.16.0+(RN refactored resume handler) (這個是什么鬼??? )
|
v0.40-v0.41 |
v1.17.0+(RN refactored iOS header files)
|
v0.42+ |
適配中 |
-
已經支持的組件
當React Native 引用本地圖片時(例如:require("./foo.png")),支持CodePush熱更新,以下列表是支持CodePush熱更新的React Native組件
| 組件 | 屬性 |
|---|---|
Image |
source |
MapView.Marker(Requiresreact-native-maps >=O.3.2)
|
image |
ProgressViewIOS |
progressImage, trackImage
|
TabBarIOS.Item |
icon, selectedIcon
|
ToolbarAndroid(React Native 0.21.0+)
|
actions[].icon, logo, overflowIcon
|
以下列表的組件的某些屬性目前還不支持CodePush更新
| 組件 | 屬性 |
|---|---|
SliderIOS |
maximumTrackImage, minimumTrackImage, thumbImage, trackImage
|
Video |
source |
-
開始入門
CodePush是微軟提供的一套用于 React Native 和 Cordova 應用的熱更新服務。CodePush 是給 React Native 和 Cordova 開發者提供移動應用直接部署更新給用戶設備的一項云服務。CodePush 作為一個中央倉庫,開發者可以推送更新 (JS, HTML, CSS and images)到CodePush,應用可以從客戶端 SDK 里面查詢更新。CodePush 可以讓應用有更多的可確定性,也可以讓你直接接觸用戶群。在修復一些小問題和添加新特性的時候,不需要經過二進制打包,可以直接推送代碼進行實時更新。
-
iOS
1. 安裝 CodePush CLI
您可以使用基于NodeJS的CLI來管理您的CodePush帳戶。 要安裝它,請打開命令提示符或終端,然后鍵入
npm install -g code-push-cli //安裝客戶端

code-push -v                 //可以查看版本
注意:在OSX和Linux上,您可能需要使用
sudo對此命令進行前綴
2. 創建一個 CodePush 賬號
在使用發布更新之前,您首先需要創建一個CodePush賬號,使用以下命令:
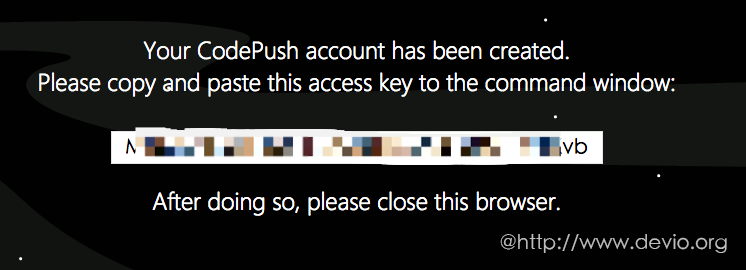
code-push register //注冊賬號 授權登錄并得到access key
會打開如下注冊頁面讓你選擇授權賬號
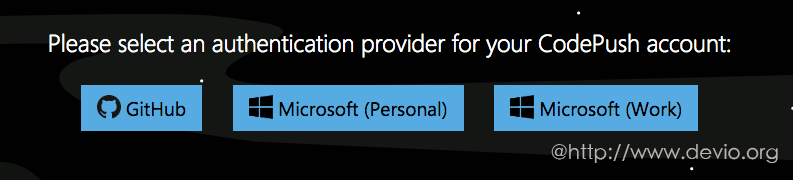
授權通過之后,CodePush會告訴你“access key”,復制此key到終端即可完成注冊。(access key每次都不一樣,不必記住)
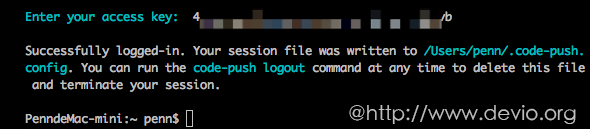
登錄
code-push login //登錄,登陸成功后,你的session文件將會寫在 /Users/你的用戶名/.code-push.config。

//其他一些命令
code-push logout //注銷

code-push access-key ls //列出登陸的token

code-push access-key rm <accessKye> //刪除某個 access-key
3.使用服務注冊你的APP
//添加一個APP
code-push app add [app名稱]

//移除
code-push app remove [app名稱]

//重命名chong'ming
code-push app rename [app名稱]

//列出賬號下的所有app
code-push app list

//把app的所有權轉移到另外一個賬號
code-push app transfer

注意:一個app名字對應兩個部署環境:生產環境Production 、模擬或演示環境 Staging
//可以使用如下命令查看
//查詢部署環境的key也是一個app對應兩個:(Deployment Key)
code-push deployment ls <appName> -k

4.在你的APP里配置code-push SDK
進入到你的項目目錄下,在終端里運行
npm install --save react-native-code-push@latest
安裝code-push組件與所有其他React Native第三方組件一樣,iOS和Android的集成方式不同,因此根據您平臺執行以下設置步驟。 請注意,如果您要同時配置這兩個平臺,建議為每個平臺創建單獨的CodePush應用程序。
iOS 配置
一旦你獲得了CodePush插件,你需要將它集成到React Native應用程序的Xcode項目并正確配置。 為此,請執行以下步驟:
為了迎合盡可能多的開發人員的偏好,CodePush支持三種安裝方式:
1. RNPM安裝 - React Native包管理器 (RNPM) 是一個非常棒的工具,它為React Native插件提供了最簡單的安裝體驗。 我們推薦這種方法。
(1)從React Native v0.27開始,rnpm鏈接已經合并到React Native CLI中。運行以下命令:
react-native link react-native-code-push
如果您的應用程序使用的版本低于v0.27的React Native,請運行以下命令:
rnpm link react-native-code-push
注意:如果您尚未安裝RNPM,可以通過簡單地運行npm i -g rnpm安裝rnpm然后再執行上述命令。
就是這樣!!這就是RNPM?哈哈??
(2) 系統將提示您輸入要使用的部署密鑰。 如果你還沒有它,你可以通過運行code-push deployment ls <appName> -k來檢索這個值,或者你可以選擇忽略它(直接按<ENTER>),并在以后添加它。 開始吧,我們建議您先使用您的Staging部署密鑰進行測試。
2. CocoaPods安裝 - 如果你在iOS應用里嵌入使用React Native,或者就是任性,喜歡使用CocoaPods,那么建議使用我們插件中提供的Podspec文件.
(1)把CodePush依賴添加到Podfile里,并指向NPM的安裝路徑
pod 'CodePush', :path => '../node_modules/react-native-code-push'
(2)運行
pod install
3. "手動安裝" -如果你不想依賴任何額外的工具,你可以使用這個方法.
(1)打開你的APP的Xcode工程
(2)點擊Libraries文件夾右鍵‘Add Files to ....’,在node_modules里找到‘CodePush.xcodeproj’


(3)把.a文件從Libraries/CodePush.xcodeproj/Products拖拽到Link Binary With Libraries選項

(4)選擇“Link Binary With Libraries”列表下方的加號,添加libz.tbd

(5)在項目配置的“"Build Settings"”選項卡下,找到“Header Search Paths”。 添加路徑$(SRCROOT)/../node_modules/react-native-code-push/ios并在下拉菜單中選擇“recursive”。
(6)插件配置
注意:如果你使用RNPM 或者
react-native link自動配置了組件,這一步已經完成,你可以跳過這一步了!!!
1.打開AppDelegate.m文件,導入CodePush頭文件:
#import "CodePush.h"
2.將
jsCodeLocation = [[NSBundle mainBundle] URLForResource:@"main" withExtension:@"jsbundle"];
替換為
#ifdef DEBUG
jsCodeLocation = [NSURL URLWithString:@"http://localhost:8081/index.ios.bundle?platform=ios&dev=true"];
#else
jsCodeLocation = [CodePush bundleURL];
#endif
3.在Info.plist里添加CodePushDeploymentKey字段,填入Deployment Key

通過code-push deployment ls <appName> -k查詢Deployment Key

4.在Info.plist中將Bundle versions string, short的值修改為1.0.0
iOS里的配置到此就完成了
Andriod 配置
注意:如果你安裝的是React Native 0.29-0.32版本,我們建議按照手動步驟安裝
1.RNMP
(1)從React Native v0.27開始,rnpm鏈接已經合并到React Native CLI中。運行一下命令:
react-native link react-native-code-push
如果您的應用程序使用的版本低于v0.27的React Native,請運行以下命令:
rnpm link react-native-code-push
注意:如果您尚未安裝RNPM,可以通過簡單地運行npm i -g rnpm安裝rnpm然后再執行上述命令。
(2)手動配置
1.在您的android / settings.gradle文件中,添加以下代碼:
include ':app', ':react-native-code-push'
project(':react-native-code-push').projectDir = new File(rootProject.projectDir, '../node_modules/react-native-code-push/android/app')
2.在你的android / app / build.gradle文件中,添加:react-native-code-push依賴:
...dependencies { ... compile project(':react-native-code-push')}
3.在你的android / app / build.gradle文件中,添加codepush.gradle文件路徑
...
apply from: "../../node_modules/react-native/react.gradle"
apply from: "../../node_modules/react-native-code-push/android/codepush.gradle"
...
4.修改MainApplication.java文件
React Native >= v0.29
...
// 1. Import the plugin class.

import com.microsoft.codepush.react.CodePush;

public class MainApplication extends Application implements ReactApplication {
    private final ReactNativeHost mReactNativeHost = new ReactNativeHost(this) {
        ...
        // 2. Override the getJSBundleFile method in order to let
        // the CodePush runtime determine where to get the JS
        // bundle location from on each app start
        @Override
        protected String getJSBundleFile() {
              return CodePush.getJSBundleFile();
        }

        @Override
        protected List<ReactPackage> getPackages() {
              // 3. Instantiate an instance of the CodePush runtime and add it to the list of
              // existing packages, specifying the right deployment key. If you don't already
              // have it, you can run "code-push deployment ls <appName> -k" to retrieve your key.
              return Arrays.<ReactPackage>asList(
                    new MainReactPackage(),
                    new CodePush("deployment-key-here", MainApplication.this, BuildConfig.DEBUG)
              );
        }
    };
}
For React Native v0.19 - v0.28
...
// 1. Import the plugin class (if you used RNPM to install the plugin, this
// should already be done for you automatically so you can skip this step).
import com.microsoft.codepush.react.CodePush;

public class MainActivity extends ReactActivity {
    // 2. Override the getJSBundleFile method in order to let
    // the CodePush runtime determine where to get the JS
    // bundle location from on each app start
    @Override
    protected String getJSBundleFile() {
        return CodePush.getJSBundleFile();
    }

    @Override
    protected List<ReactPackage> getPackages() {
        // 3. Instantiate an instance of the CodePush runtime and add it to the list of
        // existing packages, specifying the right deployment key. If you don't already
        // have it, you can run "code-push deployment ls <appName> -k" to retrieve your key.
        return Arrays.<ReactPackage>asList(
            new MainReactPackage(),
            new CodePush("deployment-key-here", this, BuildConfig.DEBUG)
        );
    }
    ...
}
這一部分不太懂(安卓用戶自行翻譯吧)
Background React Instances
This section is only necessary if you're * explicitly * launching a React Native instance without an Activity
(for example, from within a native push notification receiver). For these situations, CodePush must be told how to find your React Native instance.
In order to update/restart your React Native instance, CodePush must be configured with a ReactInstanceHolder
before attempting to restart an instance in the background. This is usually done in your Application
implementation.
For React Native >= v0.29
Update the MainApplication.java file to use CodePush via the following changes:
...
// 1. Declare your ReactNativeHost to extend ReactInstanceHolder. ReactInstanceHolder is a subset of ReactNativeHost, so no additional implementation is needed.
import com.microsoft.codepush.react.ReactInstanceHolder;

public class MyReactNativeHost extends ReactNativeHost implements ReactInstanceHolder {
    // ... usual overrides
}

// 2. Provide your ReactNativeHost to CodePush.
public class MainApplication extends Application implements ReactApplication {
    private final MyReactNativeHost mReactNativeHost = new MyReactNativeHost(this);

    @Override
    public void onCreate() {
      CodePush.setReactInstanceHolder(mReactNativeHost);
      super.onCreate();
    }
}
For React Native v0.19 - v0.28
Before v0.29, React Native did not provide a ReactNativeHost
abstraction. If you're launching a background instance, you'll likely have built your own, which should now implement ReactInstanceHolder
. Once that's done:
// 1. Provide your ReactInstanceHolder to CodePush.

public class MainApplication extends Application {

    @Override
    public void onCreate() {
        // ... initialize your instance holder
        CodePush.setReactInstanceHolder(myInstanceHolder);
        super.onCreate();
    }
}
In order to effectively make use of the Stagingand Productiondeployments that were created along with your CodePush app, refer to the multi-deployment testing docs below before actually moving your app's usage of CodePush into production.
在項目中使用CodePush
在項目里使用CodePush時可以設置以下功能:
1、何時更新,多長時間檢查一次更新。比如:應用啟動后,設置檢查更新按鈕,以及固定間隔周期檢查更新
2、當更新完成后,怎樣展示給用戶
最簡單的更新方式是:在你的項目根組件處設置一下兩個選項之一:
1.使用codepush組件去 包裹你的 根組件
//在js文件中引入react-native-code-push
import codePush from "react-native-code-push";

class MyApp extends Component {

}

MyApp = codePush(MyApp);
2.ES7語法
此方法需要安裝和使用 babel-preset-react-native-stage-0.
import codePush from "react-native-code-push";

@codePush

class MyApp extends Component {
}
更新方式
默認情況下,CodePush將在應用每次啟動時檢查更新,如果有可用的更新,它將被靜默下載,并在應用下次重新啟動時安裝
如果你希望你的應用程序更快的發現更新,你還可以選擇每次應用程序從后臺恢復時與CodePush服務器同步。
//每次應用程序從后臺恢復時與CodePush服務器同步
let codePushOptions = { checkFrequency: codePush.CheckFrequency.ON_APP_RESUME };

class MyApp extends Component {

}

MyApp = codePush(codePushOptions)(MyApp);
如果你希望當你的App啟動后在后臺進行靜默更新,可以直接調用 CodePush.sync()
這個方法
import codePush from "react-native-code-push";

//在componentDidMount調用sync方法,當你的App啟動的時候會在后臺更新
componentDidMount(){
    codePush.sync();
}

class MyApp extends Component {

}

MyApp = codePush(MyApp);
如果你想可控的進行檢查更新(例如添加檢查按鈕,或者計時器間隔),你可以調用 CodePush.sync()
這個方法,添加到你的控制選項里。
//進行可控的手動檢查更新模式
let codePushOptions = { checkFrequency: codePush.CheckFrequency.MANUAL };

class MyApp extends Component {
    onButtonPress() {
        codePush.sync({
            updateDialog: true,
            installMode: codePush.InstallMode.IMMEDIATE
        });
    }

    render() {
        <View>
            <TouchableOpacity onPress={this.onButtonPress}>
                <Text>Check for updates</Text>
            </TouchableOpacity>
        </View>
    }
}

MyApp = codePush(codePushOptions)(MyApp);
如果在更新時要提示給用戶去安裝更新,請進行相關的配置(例如,點擊立即更新后,會強制立即重新啟動),詳情請參閱 codePush() API
注意:如果你正在使用 Redux 或者 Redux Saga, 你可以使用react-native-code-push-saga 組件,它將會有一個更簡單的方式去調用同步更新
注意:雖然蘋果公司允許使用 js進行熱更新,但是彈出更新的提示框是違反蘋果的政策的,因此,我們建議在提交蘋果審核時,不啟用 更新提示,而谷歌商店可以進行更新提示
5.發布APP更新
在你的應用發布以后,當你利用CodePush推送發布你的下一個版本時,最簡單(推薦)的方法是利用一下命令去部署,它將自動綁定你的js文件和asset 然后更新到你的CodePush服務器上。
這個命令只需要兩個參數,你的 應用程序名稱和 發布平臺(iOS或Android)
code-push release-react <appname> <platform>

code-push release-react  MyApp-iOS ios

code-push release-react  MyApp-Android android
release-react命令啟用了這樣一個簡單的工作流程,因為它提供了許多明智的默認值(例如,生成發布包,假設您的應用程序的入口文件在iOS上是index.ios.js或index.js)。 但是,所有這些默認值都可以進行自定義,以允許根據需要增加靈活性,這使得它非常適合大多數情況。
#發布帶有日志說明的強制更新
code-push release-react MyApp-iOS ios -m --description "Modified the header color"

#發布入口文件名字命名不標準的更新,
#并捕獲由react-native bundle生成的源映射文件
code-push release-react MyApp-iOS ios --entryFile MyApp.js --sourcemapOutput ../maps/MyApp.map

#發布一個安卓開發版 更新,給總用戶的1/4用戶?
code-push release-react MyApp-Android android --rollout 25% --dev true

#發布給 運行1.1.*版本的用戶,而不是將更新限制在build.gradle文件中的完全版本名稱
code-push release-react MyApp-Android android --targetBinaryVersion "~1.1.0"
Multi-Deployment Testing 多環境部署測試的步驟
Staging 和 Production 部署環境,可以讓你制定一個有效的發布流程
1.使用code-push release-react 命令去發布一個CodePush更新到你的Staging 部署環境下。
2.運行 你的stagging或測試版本應用,同步服務器的更新,驗證其是否正常工作
3.使用code-push promote命令 將測試版本 從Stagging 升級到Production
4.運行 你的production或發布版本應用,同步服務器的更新,驗證其是否正常工作
注意:更給力的是,你可以選擇“分階段推送”作為第3步的一部分,以減輕額外的風險,因此,你可以先向一定百分比的用戶推送更新,(例如:
code-push promote <APP_NAME> Staging Production -r 20%)然后查看在一定時間內是否發生崩潰,和客戶反饋,再根據情況去進行整體推送code-push patch <APP_NAME> Production -r 100%
You'll notice that the above steps refer to a "staging build" and "production build" of your app. If your build process already generates distinct binaries per "environment", then you don't need to read any further, since swapping out CodePush deployment keys is just like handling environment-specific config for any other service your app uses (e.g. Facebook). However, if you're looking for examples on how to setup your build process to accommodate this, then refer to the following sections, depending on the platform(s) your app is targeting.
Android部署
Android 的Android Gradle 插件允許你為每個 build type (eg: debug, release)自定義配置,所以你可以輕松的使用Staging 部署密鑰配置你的debug環境,用production 部署密鑰配置你的release環境。
按一下步驟進行設置:
1.打開你應用的 build.gradle 文件(eg: android/app/build.gradle)
2.在 {buildTypes{}}部分,添加debug和release 的buildConfigField 條目,
android {
    ...
    buildTypes {
        debug {
            ...
            buildConfigField "String", "CODEPUSH_KEY", '"<INSERT_STAGING_KEY>"'
            ...
        }

        release {
            ...
            buildConfigField "String", "CODEPUSH_KEY", '"<INSERT_PRODUCTION_KEY>"'
            ...
        }
    }
    ...
}
For React Native >= v0.29
打開MainApplication.java文件并進行以下更改:
new CodePush(BuildConfig.CODEPUSH_KEY, MainApplication.this, BuildConfig.DEBUG);
For React Native v0.19 - v0.28
new CodePush(BuildConfig.CODEPUSH_KEY, this, BuildConfig.DEBUG);
這樣就OK了,當你運行你的程序時,你的debug版本將自動 配置你的 Staging 部署,你的release版本 將自動配置你的 Production 部署
注意: 默認情況下,
react-native run-android命令只會構建你的Debug版本,如果你想測試你的 release/production版本,需要運行react-native run-android --variant release
如果你想在同一臺設備上同時運行 Debug 和release 版本,那么你需要確保 這兩個版本有不同的 id 和 圖標,否則系統不能區分兩者,你可以通過以下步驟來執行:
1.在buile.gradle文件中,為你的debug版本添加applicationIdSuffix字段,為debug版本設置 一個id(eg:com.foo 或者 com.foo.debug)
buildTypes {
    debug {
        applicationIdSuffix ".debug"
    }
}
2.創建app/src/debug/res目錄,
3.在第二步的res目錄下創建一個名為values的目錄,把app/src/main/res/values目錄下的string.xml文件拷貝到此目錄下
4.打開 debug目錄下的 string.xml文件,修改<string name="app_name">元素的值為其他值,eg:foo.debug,確保你的debug版本具有不同的名字,以便和其他版本區分
5.在app/src/debug/res創建mirrored目錄,為debug版本創建不同的圖標,以便區分
iOS部署
在info.plist 文件中添加 CodePushDeploymentKey字段
1.在Xcode 里打開項目 ,選擇工程根目錄,選擇info

2.點擊?按鈕,選擇Duplicate "Release" Configuration

3.命名為 Staging或者你喜歡的
4.選擇 Build Setting
5.點擊工具欄上的+號按鈕,選擇Add User-Defined Setting

6.命名為CONDPUSH_KEY,添加Staging和Production環境的deployment key

7.打開你工程的Info.plist文件,修改CodePushDeploymentKey的值為:$(CODEPUSH_KEY)

到此,你的iOS動態部署配置已完成,當你運行項目時,根據你運行的版本(Debug,Release)會去自動匹配Staging和 Production環境
動態部署分配 - 項目端修改
The above section illustrated how you can leverage multiple CodePush deployments in order to effectively test your updates before broadly releasing them to your end users. However, since that workflow statically embeds the deployment assignment into the actual binary, a staging or production build will only ever sync updates from that deployment. In many cases, this is sufficient, since you only want your team, customers, stakeholders, etc. to sync with your pre-production releases, and therefore, only they need a build that knows how to sync with staging. However, if you want to be able to perform A/B tests, or provide early access of your app to certain users, it can prove very useful to be able to dynamically place specific users (or audiences) into specific deployments at runtime.
In order to achieve this kind of workflow, all you need to do is specify the deployment key you want the current user to syncronize with when calling the codePush method. When specified, this key will override the "default" one that was provided in your app's Info.plist (iOS) or MainActivity.java (Android) files. This allows you to produce a build for staging or production, that is also capable of being dynamically "redirected" as needed.
// Imagine that "userProfile" is a prop that this component received
// which includes the deployment key that the current user should use.
codePush.sync({ deploymentKey: userProfile.CODEPUSH_KEY });
API 文檔
API文檔可以參考以下這位大神的帖子寫的非常好(安卓端配置也可以參考)
React Native熱更新部署/熱更新-CodePush最新集成總結
